User:Harry138/builds/teamp2
From GuildWiki
[edit] Team Dual Anguish Farmer
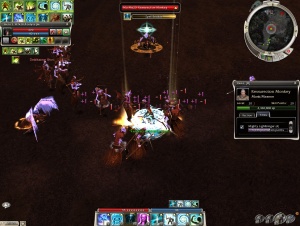
This build is designed to farm the City of Torc'qua with just two people to get Margonite Gemstones and other items.
[edit] The Tank
| Attribute Rank | |
|---|---|
| Healing Prayers | 6 + 3 |
| Smiting Prayers | 0 + 3 |
| Protection Prayers | 7 + 3 |
| Divine Favor | 12 + 3 + 1 |
| Illusion Magic | 9 |
 |
 |
 |
 |
 |
 |
 |
 |
NOTE: The tank must have rank 4 lightbringer or higher or this build will not work.
[edit] Equipment
- A full set of armor with radiant insignias with a superior rune on each.
- A +5 energy sword or axe with a 20% enchanting mod on it such as a Totem Axe or a Rajazan's Fervor and a grim cesta from the quest Cities of Ascalon.
[edit] The QZ/Famine Ranger
| Attribute Rank | |
|---|---|
| Expertise | 12 + 1...3 |
| Wilderness Survival | 12 + 1 + 3 |
| Blood Magic | 3 |
 |
 |
 |
 |
|
|
|
|
[edit] Equipment
- A full set of armor with radiant insignias with a rune of superior wilderness survival and any expertise rune.
- A Insightful Staff of Enchanting with a Hale & Hearty inscription is optimal, but any weapon set will work.
[edit] Usage
- The first thing to do upon entering the city is to cast the 4 enchantments on the tank. During this time, the ranger should be using Blood Ritual on him/her.
- Within 40 seconds of the first person to enter the area, the ranger should cast Quickening Zephyr followed by Famine behind the gate. NOTE: The ranger should cast the spirit within range of the Margonite Quickening Zephyr. The ranger will continue to use Quickening Zephyr whenever it recharges and Famine whenever it is about to die.
- The ranger should then use Blood Ritual on the tank until he/she has at least 37 energy.
- One person must then take the quest The City of Torc'qua from Captain Sulahresh. The participants at this time may also take the Anguish Hunt from the Whispers Informant.
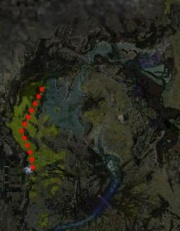
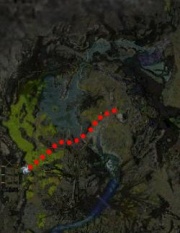
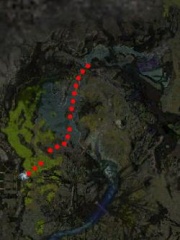
- The ranger should stay near the gate while the tank moves forward.
- The tank should have his/her hero window active and being able to easily click on his/her Lightbringer title.
- The tank should then cast Protective Spirit and Spell Breaker on him/herself and engage the first group of Margonites.
- The tank should then toggle his/her Lightbringer title on and then quickly off. This will cause a 4...8 damage reduction based on Lightbringer rank. This damage reduction does not last forever and should be reapplied every 15 seconds. NOTE: If the tank is rank 5 or higher Lightbringer, they will not gain energy due to Essence Bond, thus Essence Bond should be replaced with Blessed Signet. See below variant.
- As soon as the tank has enough energy, he/she should use Healing Breeze.
- The tank should reapply Healing Breeze, Protective Spirit, and Spell Breaker whenever necessary.
- The Warrior and Dervish Margonites will then begin to attack the tank in melee.
- The tank should then begin to use Sympathetic Visage whenever it recharges (which is only 10 seconds because of quickening zephyr). This will drain the energy of the warriors and dervishes relatively quickly. They will begin to take damage from famine, which will cause the enemy monks to heal the melee attackers. Because they use Healing Whisper, they will move closer to the attackers.
- The tank should then try to get the monks to be very close to each other by pulling the melee attackers. Be sure not to pull backwards as this will allow the Margonites to attack the ranger, which will cause you to fail.
- The tank should then go into adjacent range of the monks. The dervishes and warriors will follow.
- The energy should completely drain from the monks and they will stop healing. They will later die due to famine. This will also leave the dervishes and warriors at very low health.
- Once the monks have died, the other Margonites should be easy to kill using a similar method, although once the dervishes and warriors have died it will be impossible to kill other Margonites because Sympathetic Visage only triggers when you get hit in melee.
- The tank can pick up his/her loot whenever he/she chooses and can pull the Margonites away so that the ranger can pick up his/her loot.
[edit] Variants
- If the tank has rank 5 or higher Lightbringer, he/she should use a radically different build since he/she will be taking 0 damage from the Margonites. This also allows for a 2 man farm for all of the City of Torc'qua and The Foundry of Failed Creations. An example of this build would be:
| Attribute Rank | |
|---|---|
| Healing Prayers | 6 + 3 |
| Smiting Prayers | 0 + 3 |
| Protection Prayers | 6 + 3 |
| Divine Favor | 12 + 3 + 1 |
| Illusion Magic | 9 |
| Inspiration Magic | 4 |
|
|
|
|
|
 |
 |
|
|
- The ranger could put some attribute points into Beast Mastery and bring Edge of Extinction to speed up the farming a bit.
- The ranger could bring Sunspear Rebirth Signet with the small hope that, if the tank dies, he can be resurrected and the build can restart. This is near impossible due to the fact that the Margonites will rush the area before you have time to set up again.
- The ranger could bring some running stances such as Storm Chaser, Dodge, and Natural Stride to pick up loot.
- The tank could also be a Mo/W who uses "Fear Me!" to drain energy instead of Sympathetic Visage and uses Balanced Stance or Dolyak Signet to prevent knockdown while using Spell Breaker. The build should be something similar to this:

| Attribute Rank | |
|---|---|
| Healing Prayers | 6 + 3 |
| Smiting Prayers | 5 + 3 |
| Protection Prayers | 7 + 3 |
| Divine Favor | 12 + 3 + 1 |
| Tactics | 8 |
|
|
|
|
 |
 |
|
|
|
-
- To effectively use this build, it is advisable to set the button to use "Fear Me!" to something easily pushed. This variant of the build only works in the City of Torc'qua or any other place with massive (20 or greater) mobs. The main advantage to this over the Visage build is that it does not require melee attackers to energy deny. If you have Lightbringer rank 5 or higher, replace Mending with "For Great Justice!" or Blessed Signet. Auto-attacking is also a good idea to more quickly gain adrenaline for "Fear Me!".
[edit] Notes
- This is a very difficult build for the tank to perform. It should only be attempted by someone who has a large amount of 55 farming experience.
- This build can be used with a Mo/Me or Mo/W and a ranger hero, although it requires more concentration and is more difficult.
- If you are just learning the build, it might be a good idea to try staying alive before trying to kill anything.
- Video of this build being ran can be seen here - http://www.youtube.com/watch?v=OxOgT7shDfg
[edit] Team Dual Monk UW team
[edit] Tanking Monk
| Attribute Rank | |
|---|---|
| Protection Prayers | 12 + 1 |
| Divine Favor | 12 + 1 |
 |
|
|
 |
|
|
|
 |
[edit] Equipment
- Ascalon Monk armor or Shing Jea Ascetic Head Piece, Pants, Feet armor (AL: 15) (Yes I'm right, only take 3 armor pieces)
- Runes are Minor Protection and Minor Divine Favor on 2/3 armor pieces.
- Kepkhet's Refuge or a other +15E, +30HP, 20% longer enchantments (For tank and smiter)
[edit] Bonding Monk
| Attribute Rank | |
|---|---|
| Smiting Prayers | 12 + 1 + 3 |
| Protection Prayers | 12 + 3 |
 |
 |
 |
 |
 |
 |
 |
 |
[edit] Usage
- Cast all of the bonds on the tanking monk.
- For players more experienced with the run, take the quest immediately and aggro both groups, to decrease run time.
- The bonding monk stays back in the first room when aggroing 2 groups, there can be a cause of aggroing.
- The tanking monk aggros groups and keeps Spirit Bond and Protective Spirit up while being attacked.
- Use Spell Breaker if Dying Nightmares pop up.
- When fighting the Grasping Darkness use Elemental Resistance.
[edit] Variants
- Mantra of Inscriptions instead of Rebirth if tank is very experienced and won't die...
- The tanking monk can take warrior as a secondary, and replace elemental resistance with Frenzy.
[edit] Notes
- This build can kill the Coldfire Nights, but due to their ability to interrupt and their attacks not dealing enough damage, it is suggested to avoid them and just kill the Smite Crawlers.
- The tanking monk does not need to attack every just sit there and be attacked (Dying Nightmares can be the exception if you have a wand or a staff, although they will end up killing themselves when they attack).
[edit] See Also
This build is similar to the Dual UW Smite build but there are enough differences in the attributes that I thought it would be easier to designate it as a whole new build.
[edit] Team Dual UW Smite
This Dual Monk build using a 600 Tank and a Smiter. Spirit Bonding is not nerfed, this build proves it.
[edit] 600 Monk
[edit] Attributes and Skills
| Attribute Rank | |
|---|---|
| Protection Prayers | 12 + 1 + 1 |
| Divine Favor | 12 + 1 |
 |
|
|
|
|
|
|
|
- Inexperienced players are advised to take Blessed Signet for energy management.
- More experienced players are advised to take Frenzy (Warrior Secondary).
[edit] Equipment
- Armor with lowest possible AL and a Vigor Rune
- Any weapon set with 20% longer enchantment mod and additional health
[edit] Usage
- Cast Blessed Aura, Balthazar's Spirit and Essence Bond and maintain them.
- Use Blessed Signet whenever energy is needed, energy should be around 35 before attempting to engage any monsters.
- Before entering into battle cast Spell Breaker, Protective Spirit, Spirit Bond and Shield of Absorption. Always keep Protective Spirit and Frenzy (if taking Warrior secondary) on. A second before SoA ends cast Spirit Bond, followed by SoA after another second (to avoid interruption). Repeat cycle until monsters have died.
- When facing coldfires, only use Protective Spirit and SoA as Spirit Bond will not give you any extra health. It is also recommended to keep spell breaker on as much as possible.
[edit] Notes
- Keep in mind that Spirit Bond ends after 10 hits, not just when time runs out.
[edit] Smiter Monk
[edit] Attributes and Skills
| Attribute Rank | |
|---|---|
| Smiting Prayers | 12 + 1 + 3 |
| Protection Prayers | 12 + 3 |
| Divine Favor | 3 + 1 |
|
|
|
 |
|
|
|
|
|
- The first choice for the optional slot is Blessed Signet.
- The second choice for the optional slot is Signet of Rage.
- This build works just as well with Signet of Judgment replacing Shield of Judgment. Since it is a Signet and not a Spell, you can use it with 0 energy, and it will deal damage to multiple targets.
[edit] Equipment
- Any Armor
- Any weapon set
[edit] Usage
- Cast Vital Blessing, Life Attunement, Holy Wrath and Retribution on 600 monk. Stay back and let the monk do the rest.
- When facing coldfire nights with 1st optional skills, remove Holy Wrath, use Blessed Signet until there is sufficient energy to cast Shield of Judgment on the teammate. Use Blessed Signet to cast holy wrath again on the tank. Once Shield of Judgment has finished repeat cycle until they are dead.
- When facing coldfire nights with 2nd optional skills, spam the 3 smiting signets until they are dead.
- Dying whilst using this build is highly unlikely when properly executed; the smiter should always remain half a minimap distance or more away from the 600 Monk. The 600 Monk should have no problems tanking, but just in case, Rebirth is handy incase any problems should arise.
[edit] Notes
- Do not use Shield of Judgment or smiting signets at any other time than described! The enchantments are plenty enough to take down every other foe. Using them could aggro enemies and knockdowns can slow down kills instead of helping!
- If the teammate has accidentally aggrod both smite crawlers and coldfires nights, let the smite crawlers die first before going in to kill coldfires.
[edit] Hero Variant
This build works well with a Smiter Hero. Usage, armor and skills are identical to the above. Here are some tips:
- Keep your Hero in Avoid Combat mode at all times.
- Disable all the hero's enchantments, so they will be maintained.
- Cast all of the enchantments on yourself, always keep the hero a good distance away from the fight because of monsters who run and heal for a bit. But remember keep within distance of enchantments.
- When fighting against coldfire nights, keep the hero in Avoid Combat and carry out the cycle chosen above. It can be tricky to control your enchantments and your hero's position.
[edit] Team Eskimos
The Eskimos team build relies on Greater Conflagration, Winter, and Mantra of Frost to convert and reduce damage. The energy and safety given from Mantra of Frost lets the team focus more on high amounts of damage than other sources of healing and defense.This should be used mostly in well coordinated PvE.
The Team should consist of:
Team of four
- 1 Ice ranger
- 1 Healer
- 1 Damage Dealer
- 1 Support
Team of six
- 1-2 Ice Rangers
- 1-2 Healers
- 1-2 Damage Dealers
- 2 Support
Team of eight
- 1-2 Ice Rangers
- 2 Healers
- 2-3 Damage Dealers
- 2-3 Support
[edit] Ice Ranger
Attributes and Skills
| Attribute Rank | |
|---|---|
| Wilderness Survival | 11 + 1 + 1 |
| Marksmanship | 8 + 1 |
| Inspiration Magic | 9 |
| Expertise | 8 + 1 |
 |
|
 |
 |
 |
 |
 |
 |
- There are many suggestions for the optional slot
-
- Needling Shot to bring a target down once they are below 50% health.
- Try adding wilderness survival traps to protect the spirits.
- Antidote Signet or Hex Eater Signet for condition or hex removal.
- Savage Shot for an interrupt.
- Pin Down for crippling kitting targets.
- Favorable Winds for extra damage.
- Splinter Shot for countering blocking foes.
- Serpent's Quickness could be used just before casting the spirits and then replaced with Mantra of Frost as soon as the spirits are set.
Equipment
- Frostbound Armor is recommended.
- Druid's Armor could be useful for pieces such as arms and feet if you find you are low on energy.
- Any bow with "Damage +15% (while in a stance)".
-
- Note that Elemental Bow Strings are basically useless.
Usage
- The Ice Rangers' main job is to lay down the spirits. At the beginning of the battle cast Greater Conflagration and Winter near your base. As they recharge space them out along the battle field. When you are not laying down spirits use Kindle Arrows and fire Focused Shot on every other attack. Remember to keep Mantra of Frost on you at all times.
Counters
- Simply killing the spirits is the best counter.
- Armor-ignoring damage works just as well against this as normal balanced builds.
- Removing Mantra of Frost with Wild Strike, Wild Blow or Wild Throw will take away the Ice Ranger's advantage.
Variants
- Apply Poison instead of Kindle Arrows and a poison bow.
- Choking Gas could also replace Kindle Arrows for interrupts.
- Elemental Resistance is not as effective as Mantra of Frost but could be used.
- Ignite Arrows for AoE damage to replace Kindle Arrows.
- Read the Wind for extra damage and a replacement for Kindle Arrows.
- You could add some extra utility with some Inspiration magic skills. However their energy costs must be watched.
- Using a superior Wilderness Survival rune would help your spirits last longer at the expense of your maximum health
[edit] The rest of the team
Builds for various primary professions for the remainder of the team.
- Note that everyone Must be a mesmer primary or secondary to have Mantra of Frost.
- Also you should not have other stances in your build. Mantra of Frost is a stance and will be removed if you use another stance.
- If using Nightfall armor Sentry's Insignia is usually the best choice for armor.
Notable Skills:
- Dervish - Grenth's Grasp
- Necromancer - Spinal Shivers / Shivers of Dread
- Elementalist - Conjure Frost
[edit] Warrior
Builds that could be modified for this team
- Build:W/Me UW Solo
- Build:W/any Axe Rune Farmer
- Build:W/any Basic PvE Hammer
- Build:W/any Cleave PvE Soldier
- Build:W/any Flailing Dragon
- Build:W/any Steady Warrior
- Build:W/any Triple Chop PvE Tank
(Note: It is best to use Dreadnought's or Legionnaire's Armor)
[edit] Ranger
Builds that could be modified for this team
- Build:R/Me Feverish Archer
- Build:R/Me Fissure Forest Farmer
- Build:R/any Chkkr Thousand Tail Farmer
- Build:R/any General Interrupter
- Build:R/any General Barrager
- Build:R/any Tank Master
(note: It is best to use Frostbound Armor)
[edit] Monk
Builds that could be modified for this team
- Build:Mo/Me Barrier Bond Monk
- Build:Mo/Me Blessed Light Bond Monk
- Build:Mo/Me PvE WoH Monk
- Build:Mo/Me Elona's Bonder
- Build:Mo/any Canthan Bonder
- Build:Mo/any Word of Healing Monk
(Note: Wanderer's Armor Works well)
[edit] Necromancer
Builds that could be modified for this team
- Build:N/Me FoC Spiker
- Build:N/Me Midnight Solo
- Build:N/Me SS Nuker
- Build:N/any BiP Necro
- Build:N/any Icy Blighter
- Build:N/any Minion Master
- Build:N/any Aura of the Lich MM
[edit] Mesmer
Builds that could be modified for this team
(Note: It's best to use Savant's Armor)
[edit] Elementalist
Builds that could be modified for this team
- Build:E/Me Echo Nuker
- Build:E/Me Terra Tank
- Build:E/Me Underworld Tank
- Build:E/any Dual Attunement Air Spiker
- Build:E/any Renewal Nuker
- Build:E/any Searing Flames Elementalist
(note: It is best to use Hydromancer's Armor)
[edit] Assassin
Builds that could be modified for this team
- Build:A/Me Solo Sin
- Build:A/any Blind Promises
- Build:A/any Chkkr Locust Lord Farmer
- Build:A/any Critical Fox
- Build:A/any Deadly Promise
- Build:A/any Shadow Blossom
(note: Armor sets with resistance against specific damage types will not provide a helpful armor bonus.)
[edit] Ritualist
Builds that could be modified for this team
- Build:Rt/Me Painful Echo
- Build:Rt/Me Vengeful Farmer
- Build:Rt/any Attuned Restorer
- Build:Rt/any Continual Channeler
- Build:Rt/any Ritual Lord
- Build:Rt/any Spirit Nuker
[edit] Paragon
Builds that could be modified for this team
[edit] Dervish
Builds that could be modified for this team
(Note: It is best to use Windwalker's Armor)
[edit] Team Foundry Balanced
The Foundry Balanced team build is a build designed to conquer all of The Foundry of Failed Creations in the Domain of Anguish. It is a balanced build that relies on the tried and true formula of a warrior tank, elementalists nuking and monks keeping the team alive.
This build can complete the quest The Foundry of Failed Creations, the quest Foundry Breakout and kill The Fury. Incidentally, this same build can actually be used to conquer any of the 3 other areas in the Domain of Anguish with slight modifications.
[edit] Build Concept
While there are different tactics for different situations (explained below, in the tactics section), the general outline of how this team works is as follows:
- An Obsidian Flesh tank draws aggro and tries to hold it.
- Three Searing Flames nukers take out the targets.
- Two healer monks keep the tank alive and catch any damage that strays towards the elementalists.
- One bonder maintains all bonds on the tank and some bonds on the nukers to prevent massive spikes.
- An optional Ranger can use Broad Head Arrow to shut down critical spell-casting foes among the enemy.
- The party avoids fighting in tight spaces (which the Foundry tries to enforce) by using a pet and the skills Necrotic Traversal or Consume Corpse to have one party member with Rebirth outside the room whenever there is danger.
[edit] Build Details
[edit] The Obsidian Flesh Tank
| Attribute Rank | |
|---|---|
| Earth Magic | 12 |
| Strength | 12 + 3 + 1 |
 |
 |
 |
 |
 |
 |
|
|
Usage:
- The tank will be heavily bonded. As such he/she will only be receiving partial damage at all times.
- The tank will have Balthazar's Spirit on which will allow for constant casting of all Earth Magic spells.
- When going into a group of foes, it is best not to use Obsidian Flesh or Armor of Earth as they will slow down your approach. Instead ask for Spell Breaker from a monk.
- When pulling a group of foes, it is actually useful to invoke Obsidian flesh or Armor of Earth as moving slower than computer controlled foes will make them follow you as far as they could as opposed to running at normal speed.
- Use Stoneflesh Aura as often as possible. It will make you take zero damage from nearly all attacks and spells.
- Lay down Ward Against Foes when foes around you are near half-health. This will snare them around longer for the elementalists to finish them off.
- The optional slot can be:
- Glyph of Concentration: To avoid having any of your spells interrupted.
- Dolyak Signet: As a massive armor boost. This is not needed, but is useful in situations where, for example, monks go down and you need to stay alive till they are revived.
- Lightbringer's Gaze: To add some offensive punch to this very defensive build.
- Sliver Armor: To add some damage as well.
Equipment:
- A sword/axe with +5 Energy and a 20% "of Enchanting" grip. This will give you extra energy and make all the Earth spells last longer on you. Rajazan's Fervor or the Totem Axe make great weapons for this build.
- A Shield with either +30 Health or +45 while Enchanted is optimal. Also, having a secondary set of Earth Magic based wand and Focus item is optimal for energy. It can also be a 15/-1 set to provide an extra energy boost in times of trouble.
- Gladiator's Armor or an armor set fully equipped with Radiant Insignia (for the extra energy) is ideal for this build.
[edit] The Searing Flames Nukers
| Attribute Rank | |
|---|---|
| Energy Storage | 12 + 1 |
| Fire Magic | 12 + 3 + 1 |
Note: The remainign 3 attribute points should be placed in Healing Prayers or Protection Prayers based on the type of resurrection skill the elementalist is bringing. See Usage section below.
 |
 |
 |
 |
 |
 |
 |
 |
Usage:
- Wait until all enemy aggro has settled on the tank.
- Maintain Fire Attunement during a fight unless facing the Greater Dream Riders (see tactics below).
- You will have two combos to invoke during a fight.
- If the foes contain casters you need to take out quickly (enemy monks, mesmers, necromancers and/or elementalists) then use Glyph of Sacrifice followed by Meteor Shower. Then proceed to spam Glyph of Lesser Energy, Searing Flames, Glowing Gaze and Lightbringer's Gaze as they become available.
- If the foes are mostly melee foes (like all Titans) then inverse the combo. Spam the first four skills on your bar until foes are at half health, then use Metoer Shower to finish them off. In fact, against pure melee foes (Warriors, Dervishes and Assassins), try not to use Meteor Shower altogether.
- If your Lightbringer title is less than rank 3, replace Lightbringer's Gaze with Liquid Flame.
- In the "generic resurrection" slot, each of the three E/Mo
nukers must equip a different one of these skills:
- Rebirth: One elementalist will be in charge of "Glyph-Sac" rebirthing players who in a bad spot inside the foundry itself. This elementialist can also help monks rebirth players through the gate when the party is setting up to fight behind a gate.
- Resurrection Chant: One elementalist must have this skill. combined with Glyph of Sacrifice, it can bring a player immediately up and at full health. However, it only has half the regular range. This is mainly used to bring up the tank (and the ranger if used) on the other side of the gate.
- Resurrect: The third elementalist must bring this skill in case the tank dies outside of the range of Resurrection Chant.
Equipment:
- As elementalists have a large pool of energy, the only real upgrade this build really needs is 20% HSR preferably on both the wand and the focus item. This is to speed up the readiness of Meteor Shower.
- A variety of armor choices make sense:
- An armor set with Radiant Insignia will provide extra energy.
- An armor set with Pyromancer Isnignia will provide extra protection against the Tortureweb Dryders' nukes.
- An armor set with Stalwart Insignia will provide extra protection against any melee aggro that comes your way.
- Tempest Armor would provide extra protection as the elementalist will always have at least 2 enchantments on.
[edit] The Healer's Boon Monk
| Attribute Rank | |
|---|---|
| Divine Favor | 12 + 1 |
| Healing Prayers | 12 + 3 + 1 |
Place spare points in death magic
 |
 |
 |
 |
 |
 |
|
|
Usage:
- Maintain Healer's Boon on at all times during a battle.
- Maintain Essence Bond on the tank.
- Dwayna's Kiss is the primary healing skill.
- Healing Touch is for self-healing.
- Use Heal Party to heal the tank at a distance, or when the party is collectively moving and taking damage from Enduring Torment.
- Using Healing Seed on the tank and alternate it with the other monk.
- When the party comes to a room where they will have to fight outside the room (see the tactics below), you will need to run to the gate as soon as it closes and then invoke Necrotic Traversal (or Consume Corpse) and then move away from enemy casting range. If the party has a fighting chance, then assist them with Heal Party.
Equipment:
- A perfect Insightful Staff of Enchanting with 20/20 HSR and HCT for Healing Prayers is optimal.
- Ascetic's Armor or an armor set fully equipped with Radiant Insignia (for the extra energy) is ideal for this build.
[edit] The Spell Breaker Monk
| Attribute Rank | |
|---|---|
| Divine Favor | 12 + 3 + 1 |
| Healing Prayers | 12 + 1 |
| Protection Prayers | 3 + 1 |
|
|
|
|
|
|
 |
|
|
Usage:
- Maintain Essence Bond on the tank.
- Dwayna's Kiss is the primary healing skill.
- Healing Touch is for self-healing.
- Use Protective Spirit on any party memeber other than the tank who begins to draw the attention of foes.
- Dismiss Condition is primarily for the Prisoners of the Foundry Breakout quest so that they do not become crippled, however, there is disease, Poison, Bleeding and Deep Wound aong the way, so feel free to use it as needed.
- Cascade Healing Seed on the tank with the other monk.
- Use Spell Breaker on the tank as he goes in to gather aggro. This will allow the tank to move freely without being slowed by Obsidian Flesh.
- When the party comes to a room where they will have to fight outside the room (see the tactics below), you will need to cast Spell Breaker and Protective Spirit on the Healer's Boon monk to make sure he makes it outside to safety.
Equipment:
- A perfect Insightful Staff of Enchanting with 20/20 HSR and HCT for Healing Prayers is optimal.
- Ascetic's Armor or an armor set fully equipped with Radiant Insignia (for the extra energy) is ideal for this build.
[edit] The Bonder
| Attribute Rank | |
|---|---|
| Divine Favor | 10 + 3 + 1 |
| Inspiration Magic | 10 |
| Protection Prayers | 11 + 3 + 1 |
|
|
 |
|
|
|
 |
 |
|
Usage:
- Maintain all the bonds above on the tank in order from right (Life Barrier cast first) to left (Vital Blessing cast last).
- Maintain Balthazar's Spirit on yourself as well.
- Maintian Life Barrier on the elementalists and (depending on your skill and how comfortable you are with bonding) everyone else.
- When the party gets to the Prisoners part, you will need to maintain Life Barrier and Life Bond on each prisoner as he is being rescued. After the prisoner is taken to safety, you can remove those bonds. Since no fighting takes place during those sequences, you can drop the bonds on the elementalists if you need to.
Equipment:
- A perfect Insightful Staff of Fortitude with +5 Energy while health is above 50% ("Hale and Hearty" inscription) is optimal.
- Ascetic's Armor or an armor set fully equipped with Radiant Insignia (for the extra energy) is ideal for this build.
- Two head pieces, a Defender's head piece with a superior Protection Prayers rune to cast the bonds and then a Prophet's head piece with a superior Divine Favor rune to maintain them.
[edit] Necromancer Variant
This is a more common variant that just uses the spirits from the ranger profession along with Curses damage abilities.
| Attribute Rank | |
|---|---|
| Beast Mastery | 10 |
| Blood Magic | 2 + 1 |
| Curses | 12 + 3 + 1 |
| Soul Reaping | 8 + 1 |
 |
 |
 |
 |
|
 |
 |
 |
Usage:
- Lay down Edge of Extinction at the start of every fight in a safe spot that keeps all foes in range.
- As soon as the tank brings back foes and is set, use Spiteful Spirit and follow it up with Reckless Haste for constant Damage on foes. Reapply Spiteful Spirit on other foes as it recharges.
- Spam Desecrate Enchantments and Defile Enchantments as they become available. Stygian Golems are the best targets for these.
- Use Blood Ritual on teammates as they need energy.
- Manage the pet as the ranger above.
[edit] Tactics
Conquering the Foundry involved clearing the four chambers leading up to the Foundry itself and then clearing it of most monsters to set up the final fight against The Fury. This is a chamber by chamber walkthrough:
[edit] 1st Chamber
This is the easiest of the four chambers and should be completed without the party having to use the "Necrotic Traversal then Rebirth" trick. However, just to be safe, the ranger should have his pet die outside the first gate. Everyone should take the quest from Captain Jerzah. As soon as everyone is sufficiently deep enough into the room, the gates will lock and a group of Margonite Anurs will spawn at the end of the room.
After everyone has their bonds on. The Tank should be covered with Spell Breaker and should go in just as the spawn of Margonites is collapsing so as to form a nice ball for Meteor Shower. Remember not to cast anything on the tank while he is their aggro range until all aggro settles on him (i.e. their melee attackers all start attacking him). As soon as aggro is set, the elementalists should proceed to nuke with Meteor Shower first. When this group is about to die, make sure to save one last Margonite and pull him back to the gate where party came in, then finish him off there. This should ensure that the next spawn of Titans does not aggro the party, or at least aggro only on the tank. After the last Margonite dies, 3 Rage Titans and 3 Despair Titans will show up.
If those Titans spawn ouside of everyone's aggro, then the tank should take another Spell Breaker and go to them. If they spawn within aggro range of the tank then he/she should use Obsidian Flesh and walk to them (to ensure they do not walk to him/her and see other party members behind). Whenever the tank is setting aggro like this, Heal Party should be the only healing used.
These titans will not spawn more titans, however, because they cannot be knocked down, Meteor Shower acts like Fire Storm making them scatter rather quickly. So, try and stick with Searing Flames as much as possible. Finish off the Rage Titans first as they can wipe out the whole party with Earthquake followed by Churning Earth. If things look grim, the Healer's Boon monk should always have his/her finger on the Necrotic Traversal trigger. However, with experience, this group should be easy to take out with no deaths.
Revive the pet then move it to the door of the next chamber and then let it die.
[edit] 2nd Chamber
This room is nigh impossible to fight in. It is very small and the spawn that appears after the door closes has three Tortureweb Dryders (which can wipe a tightly packed party in 2 spells). The party should hug the left wall and proceed slowly until the spawn appears. As soon as it does, the Spell Breaker monk should throw Spell Breaker followed by Protective Spirit on the Healer's Boon monk and that monk should Necrotic Traversal out of the room and move away from the casting range of the Dryders.
The Party should try and take out the Margonite Anur Ki that spawns in this group before wiping as well as any Dryders they can, however, they should also try to die as close as they can to the gate. After the fight is over and all members in the chamber have died, the monk should proceed to rebirth them outside the room leaving the warrior and the ranger. Those two must always remain in the room the party is trying to clear out.
After the casters have all been resurrected and bonded, one of the elementalists should "Glyph-Sacc Rez" the tank inside the chamber. The tank should come as close as possible to the game and the bonder should careully reapply bonds while the monk heal him/her. The elementalists should be able to nuke the enemy from across the gate and the wall. They should spread apart so that Searing Flames does not damage all of them at the same time.
Sometimes, a foe or two will run off and get stuck on the opposite side of the room. If the party waits for a few minutes, that foe will come back within casting range. Alternatively, one of the eles could resurrect the ranger inside the room and the ranger can use poison to bring that foe down.
When the chamber is almost cleared, the Spell Breaker monk should cast Spell Breaker on the tank as the second spawn contains a Greater Dream Rider. The second spawn should be cleared in the same manner.
Revive the pet then move it to the door of the next chamber and then let it die.
[edit] 3rd Chamber
This chamber will spawn all its creatures at the same time (there will be no seondary spawn after the first groups are wiped). There will be four patrols roaming the room (all of which come near the gate, but not all the way). A patrol of 4 Misery Titans, a patrol of 4 Anguish Titans, a patrol of 4 Rage Titans and a patrol of 3 Dryders along with one Rider.
The Titans in this room will exhibit the usual Titan behavior of spawning smaller Titans. There are two spawn chains:
The Healer's Boon monk should wait outside the gate using Necrotic Traversal. The Tank can try and pull the Misery titans (easiest to take out) and the party can wipe trying to finish them off. Make sure not to stand right next to the gate or the new Titans that spawn from the dead Titans might spawn outside the gate and prevent the Healer's Boon Monk from rebirthing.
After the party is rebirthed on the outside, the tank can proceed to pull group after group, while the elementalists take them out.
Revive the pet then move it to the door of the next chamber and then let it die.
[edit] 4th Chamber
This chamber will again give the party room to operate. A spawn of Dryders along with a Margonite Anur Ki will spawn at the back of the room. They can be taken out by a frontal assault (tank charge in when they are balled up). Before the last foes dies, the party should pull that foes back to the beginning of the room and finish it off there to be safe. The next spawn will be a large group of Dementia Titans. At this point, the Healer's Boon monks should leave the room to be safe. The party can try and kill them while they are on the tank. If aggro breaks, a wipe + rebirth maybe necessary.
After this group there will be a mixed group with a Margonite Anur Ki, a few Titans and a Dryder. One of the Titans is a special Fury Titan that drops a unique item.
After this room is clear, you can proceed to take the quest reward anf the next quest from Tekliss.
[edit] The Foundry
The name of the game in the Foundry is pulling and aggro control. Because the Foundry is spacious, kiting and breaking aggor if things go bad is quite possible, so there will be no more need for the pet.
As soon as the party goes in, they will see a large Vat to their right with a small gap between it and the wall. That gap will be the focus of all pulling and tanking till that part of the Foundry is cleared. The tank will simply aggro a group and tanks them at the gap so that they are unable to get through the gap and then the nukers can cast on them through the wall.
Past the gap, the party will see 4 large vates in the center of the hall, they should always use those vats for groups that do not pull all the way to the gap. The tank should pull the foes to the vat, the casters should be behind him/her so that the enemies need to go through the tank to get to them and then nuke.
Note that the Greater Dream Riders will follow indefinitely. One way to exploit this is to aggro their group (usually patrol with Dryders) and then run off till the Dryders break aggro, and then kill off the Riders who, alone, will not do much damage.
After all patrols are cleared, the party can attempt to complete the quest. For each prisoner, the bonder will place Life Bond and Life Barrier on that prisoner, and the SB monk will place Spell Breaker on the prisoner and immediately after that, the tank will speak to the prisoner and advance the quest). Then everyone needs to run far away and the prisoner will follow them. If the prisoner is crippled, Dismiss Condition should be used, Heal Party should be used for healing the party as they move. After aggro breaks, everyone should stand still, and the ranger should take the prisoner away till the names in the party are all grayed out. This will ensure the prisoner does not follow the party anymore.
The same procedure should be done with the other two prisoners. Captain Valkyss' group should be taken out as they are in the way of future fights. First, the party should run away till only the Riders follow. After they die, the Captain should be taken away to safety and then the remaining party members should kill off the Dryders.
After all three prisoners are safe, the tank should advance to the gate to aggro the spawn of The Black Beast of Arrgh. With bonds, the tank should be able to tank him even with 0 attribute points. However, the Beast should first be pulled all the way to where his patrol will follow no more and then fought there so that they do not try and go for party members behind the tank.
After the Beast dies, the quest will be completed and the prisoners will be removed from the party list. The party can then take on The Fury's group. Once again, they can pull the Guardians of Komalie who look like Dream Riders all the way to the gap and finish them off. After that, they can keep pulling the Fury's Group back and forth until they find the spot beyond which they will not follow, and then nuke the monks first then the Dryder guardians. The Fury is actually less of a threat than those Dryders.
[edit] Variants
- The entire nuking cast can be replaced with Necromancers using Feast of Corruption to spike.
- The tank does not necessarily need to be an Obsidian Flesh warrior. Other tanking builds can be used, as well as non-warrior tanking builds like a continual Shadow Form assassin or an Obsidian Dervish.
[edit] Notes
- Should the inconceivable happen and the tank dies outside of therange of Resurrect, a work around (and possible exploit that might get fixed), is to have a party member kill themselves (preferably one who has rebirth), and then Rebirth that member while standing in the middle of the gate. If done right, it will cause that member to spawn inside the room.
- Another possible work-around for this situation is for the Healer's Boon monk to use Necrotic Traversal on a nearby corpse, if there is one near the gate, and get the tank.
[edit] Team Lutgardis FFF
The Lutgardis FFF (Fast Faction Farming) team is a build designed to perform the quest Securing Echovald Forest in Melandru's Hope as rapidly as possible for the purposes of faction farming. The quest offers 400 Kurzick Faction as a reward and with this build, the Lutgardis run can take 1.5-2 minutes. Which means that 10k Faction (25 runs) would take between 37-50 minutes depending on team skill. This is currently the fastest known way of amassing Kurzick Faction. Teams starting this run form in Lutgardis Conservatory, typically in international districts.
[edit] Build Concept
The main concept of the build is to perform the quest before taking it from Scoutmaster Arne. The quest requires players to go near four way points in Melandru's Hope. However, taking it will cause Luxon raiding parties to spawn out of nowhere near those four way points. If players touch these way points then speak to Scoutmaster Arne, then the quest will be immediately updated as being done and they can get the reward.
Since all that is required is to get to those points, the build is based on four runners hitting those spots as quickly as possible then killing themselves (saccing) very fast. The group then resurrects at the door, where Arne is standing, they take the quest, the reward, and exit.
The core build requires 4 runners, however, points can be combined (when there is a shortage of runners) and there is an optional 5th role:
- Bridge runner: Runs and dies in the middle of the bridge, "br".
- Mushrooms runner: Runs and dies at the giant mushrooms, "shrooms" / "mu".
- Stairs runner: Runs and dies at the base of the stairs to the Jade Flats (Kurzick), "st".
- Shore runner: Runs and dies at the northern shore of the lake, "sh".
- Door man (optional): A player who speeds up re-entry into Lutgardis for maximum time efficiency.
- This leaves room for three saccers who just run in and die then collect their reward with everyone else after resurrection.


[edit] Build Details
[edit] The Runners
The best combination for running is Assassin/Ranger. While any of the runs can be performed by virtually any profession combination in a variety of creative ways, the A/R combination provides the longest cover from enemy spells and attacks, constant stance running and the fastest deaths at the end of the run. R/A is nearly identical in doing this with the disadvantage of a shorter Shadow Form. W/A suffers from slower speed boosts, but is a more reliable runner due to Endure Pain.
| Attribute Rank | |
|---|---|
| Shadow Arts | 12 + 1 + 3 |
| Wilderness Survival | 12 |
 |
 |
 |
 |
 |
 |
 |
|
| Attribute Rank | |
|---|---|
| Expertise | 12 + 1 + 3 |
| Shadow Arts | 12 |
|
|
|
 |
|
|
|
|
|
Note: To use Factions-only skills, the ranger can go with 16 Wilderness Survival and Storm Chaser instead of Dodge and Zojun's Haste.
| Attribute Rank | |
|---|---|
| Strength | 12 + 1 + 1 |
| Shadow Arts | 12 |
|
|
 |
|
|
|
|
|
|
Equipment:
- Weapon Set 1: A Vampiric Weapon of Enchanting. If the weapon is one-handed, the off-hand could be a Focus Item to provide a little extra energy or a Shield to provide extra armor from hits. The enchanting upgrade makes Shadow Form last 20% longer and the Vampiric upgrade is to prevent health from going back up after Shadow form runs out.
- Weapon Set 2: A Vampiric One-handed Weapon of Enchanting and the -50 health Grim Cesta.
- Weapon Set 3 (optional): For inexperienced runners, they may wish to have a set with no Vampiric upgrade to prevent themselves from dying before they want to.
Usage:
- Invoke running stances one after the other.
- Use Dash when available, but best to save it when you need to break aggro.
- Use Shadow Form when approaching Mantis Dreamweavers.
- Use the two shadow stepping skills (Death's Charge and Dark Prison) to zip faster through enemies while Shadow Form is on.
- As players get to their spots, their Shadow Form will have worn off (so their health would be around 50), so they switch to the -50 health set to die on the spot.
Useful Skills:
- Shadow Refuge for healing in case something goes wrong.
- Heart of Shadow is used by more seasoned runners as a heal and a way to escape imminent death.
- Shadow of Haste is also very useful in a few spots. It can allow the Stairs runner to combine it with Mushrooms, or the bridge runner to combine bridge with door. It can also allow any runner to return to foes after hitting their way point to die if he/she does not have the propper saccing equipment.
- Recall if there's a shortage of runners to do shore and mushrooms in one run, by putting recall on the stairs runner and taking the "fast" shore route then canceling it to hop to stairs runner and continue to shrooms.
[edit] The Door Man
This may very well be the only Any/Any character in a build on the wiki. All this player has to do is wait by the entrance until the runners hit their spot. They will usually call out to signal completion with:
- bd: Bridge done.
- md: Mushrooms done.
- std: Stairs done.
- shd: Shore done.
- ad: All done.
More veteran groups will say nothing and either all hit their spots and die, or the stairs runner (the last to get to their spot if all runners start at the same time) will call their health or their equipment to signal that the stairs are done. Taking the quest early will spawn Luxons by the stair runner (who at this stage will likely have <50 health) and kill him, ruining the run.
As soon as the door man sees that all points are called complete through one of the above means, he/she will take the quest from Arne, immediately take reward then use map travel to return back to Lutgardis Conservatory. Do not just walk through the portal or you will have a very angry team. Once there, the door man will go up right next to the entrance to Melandru's Hope. As soon as the party re-appears in Lutgardis, he/she will rejoin them (by spamming command "/invite [runner name]") then step back into Melandu's Hope. This saves about 10-15 seconds per run.
[edit] Running Routes
The four routes pass through few to several groups of Mantis, the Mantis present two dangers:
- Mantis Dreamweavers will throw Crippling Anguish at a runner and that usually marks the end of the run. If that is not enough, they will quickly have two hexes on their target, then crush them with Accumulated Pain and Fragility.
- Mantis Hunters start off their attack with Leaping Mantis Sting which will cripple a moving foe. If a Mantis Hunter is about to strike a runner, they should stand still and take the hit as the consquences are very dire if they succeed in crippling the runner. Whether the runner is slowed by crippling or Crippling Anguish, these hunters can very quickly finish them off with Twisting Fangs.
After the runners clear the Mantis, the only danger to look out for is the Dragon Moss. They have powerful elementalist spikes in the form of Arc Lightning and Shatterstone.
[edit] The Bridge
The shortest of the four runs, the bridge presents the runner with a short challenge of 3-4 Mantis groups. The runner should run straight up the hill until they are near foes, invoke Shadow Form and just run by them (see the bridge route map). There is little need to shadow step or even use an enchanting upgrade for this run.
[edit] The Shore
The easiest run of the four, the shore can be done by simply jogging (with no run skills) to the spot. If the player follows the easy route, they will come across a pair of Mantis just before their way point. If they wait for a few seconds, that patrol will move away clearing the way. Doing this with a run skill on will guarantee death before the last runner (stairs runner) as the player can use that same patrol to die quickly.
To perform the Shore really fast, the alternate route can be taken:
- As players spawn into Melandru's Hope, they will see a patrol of 2 mantis heading left. Click on them to follow them.
- As they move, a patrol will come from behind them towards the player.
- As that patrol nears radar range, the player should invoke Shadow Form, then shadow step to the patrol he/she was following (which would now be behind the incoming patrol), then just run into the water and stay by the cliff until they get to the shore then sacc.
[edit] The Mushrooms
One of the harder runs because it requires good timing of skill usage along with enemy movement:
- The player heads straight to the cliff ahead of him/her using Dark Escape (starting with Dark Escape instead of Storm Chaser is relevant in this run)... As their radar nears that of the two patrols below they invoke Shadow Form and then press C (closest target) and shadow step to that target.
- They will then wiggle free of those two groups (if for some reason the runner is stuck, they should invoke the other shadow step skill).
- Head down the slope past one then another group of Mantis.
- There should be one more group on the slope going upwards. Target this group then invoke the second shadow step (if it was not already used). This group likes to move away from the runner, but they soon meet a group of Dragon Plants and stop.
- By this time two things are happening:Shadow Form is flashing, and the player is amidst the fight between the Mantis and the Dragon Plants (either side will land a random hit on the player if Shadow form runs out). Hit Dash and follow it with Dark Escape (to half the damage from any attacks).
[edit] The Stairs
There are two routes to the stairs, the first is basically straight down the middle and the second is with a slight swerve to the right. The second path is less dangerous as there are fewer groups, the first route is slightly shorter.
Taking the first path down the middle:
- Start out as the Shore fast run. Follow the same pair and Shadow form at the same time then shadow step past the second group.
- Head down into the center of the lake, find a group that is in the center and use your second shadow step.
- As you start clearing the clog of Mantis groups, Shadow Form should be flashing, so hit Dash to make sure you lose all enemies.
- Continue to the base of the stairs and die there.
Taking the second path:
- Start out as the mushrooms runner, and use the first shadow step the same way.
- Head down the slope and head towards the stairs. there should be one or two groups coming towards you.
- Use Tab till you find a good target and then use your other shadow step skill. Continue as in the first path.
As the stairs is the longest run, and hence the limiting factor on the speed of the run, most groups will expect stair runners to take the second path.
[edit] Nightfall Variants
- For Ranger/Assassins and Assassin/Rangers, Natural Stride is a solid 33% faster running skill.
- Going Assassin/Elementalist and using Storm Djinn's Haste as the sole running skill (can be maintained indefinitely with 4 pips of energy regeneration and requires a 1/4 second cast).
- Feigned Neutrality as a self heal should Shadow Form run out at the wrong time.
- Deadly Paradox to make Shadow Form cast and recharge faster for runners covering more than one spot.
[edit] Notes
- If any player takes the quest too soon they can jeopardize the runs, mainly the bridge, the mushrooms and the stairs.
- The bridge runner should be careful not to venture too far north in the Dredge infested areas past the bridge. This will trigger another Resurrection Shrine and may cause the party to spawn in that area after death and have to all run back to Arne... taking an F out of FFF (the first one)...
- If the Luxons have taken over Lutgardis conservatory as a result of Alliance Battles, then the door man (or the shore runner, or one of the saccers) needs to speak to the Luxon Priest and bribe him so that the party can res by the door. Otherwise, the party will res in the middle of Melandru's Hope which will greatly slow down the run.
- A perk of the shore run is a Kurzick chest which occasionally spawns shortly before or after the destination. Bring keys if you feel lucky, however, be advised that many serious runners will frown upon party members who open chests, especially if they die after the stairs runner (the runner who is supposed to die last) as a result of being busy opening or IDing the item. It also sometimes causes envy among other runners who start to open chests near their spots (like the mushrooms and the stairs) and make each run go longer.
[edit] Team Shadow Flame
The Shadow Flame Build is designed primarily for fighting in the Domain of Anguish. It uses the incredible damage abilities of the PBAoE Fire Magic skills to do as much damage possible over a short time, while Shadow Form is used to keep the casters safe from harm.
[edit] Overview
This party consists of:
- 6
 /
/ Shadow Flames
 - 1
 / Shelter Lord
 - 1
 /
/ LoD Support
[edit] Membership
[edit] E/A Shadow Flame
| Attribute Rank | |
|---|---|
| Fire Magic | 12 + 3 + 1 |
| Energy Storage | 3 + 3 |
| Shadow Arts | 12 |
 |
|
 |
 |
 |
 |
 |
|
[edit] Usage
Cast Recall on the Monk. Then cast Deadly Paradox followed by Shadow Form, and then rush your target. When attacking, rush your target until you are adjacent to them. Start off with Inferno, followed by Flame Burst and so on, spamming spells as they become available. Using this order you are likely to get off 2 Infernos and 2 Flame Bursts per attack, if not more. It is key that all Elementalists focus on the same target, so someone should be responsible for calling targets.
[edit] Special Note
You need to know your enemies. Some will carry spells that can strip enchantments indirectly. For these targets it is advised that you stay as far away from them as possible while using Flare to indirectly spike them. Then move in to finish off the rest of the mob when it is safe.
[edit] Equipment
You'll want the highest energy equipment available to you. A sword with a +5 energy mod and a 20% enchant mod and an offhand with a +12 energy mod are good choices, as the sword will automatically cause you to move to adjacent range when you attack.
[edit] Rt/A Shelter Lord
| Attribute Rank | |
|---|---|
| Communing | 12 + 3 + 1 |
| Spawning Power | 12 + 3 |
|
|
 |
 |
 |
 |
 |
 |
 |
[edit] Usage
The one and only purpose of the Ritualist is to ensure that Shelter stays up. Use Soul Twisting on your other spirits to ensure that Shelter stays up. Shelter is the teams insurance policy against PBAoE spells.
[edit] Mo/P LoD Support
| Attribute Rank | |
|---|---|
| Motivation | 12 |
| Healing Prayers | 12 + 3 + 1 |
 |
 |
|
 |
 |
|
 |
 |
[edit] Usage
The job of the Monk is to heal the team with Light of Deliverance while staying far away from battle and acting as an anchor for the rest of the team to Recall to. Upon return of the team the monk can use the rest of his skills to quickly restore everyone to full health and energy to get ready for an attack.
[edit] Entire Build Usage
All players cast Recall on the Monk. The Ritualist places Shelter a proper distance from the intended mob and uses skills to maintain Shelter continually. The Elementalist all cast Deadly Paradox followed by Shadow Form and then rush the intended target. Very few spells can penetrate Shadow Form and those that do will be caught by Shelter. The Monk meanwhile uses Light of Deliverance to heal his team while staying far away from battle.
[edit] Variants
In certain areas, mainly Stygian Veil, it is advisable for one or two of the elementalists to bring Deep Freeze as a way to pin down PBAoE and touch enemies so that the team can kill them at a distance without risk of them getting too close.
[edit] Team Stygian Veil Symbiosis
The Stygian Veil Symbiosis team build is a build designed to conquer all of the Stygian Veil in the Domain of Anguish. It is a balanced build that relies on the tried and true formula of a warrior tank, elementalists nuking and monks keeping the team alive. The catalyst to this build is a ranger spirit-spammer who keeps two vital spirits up: Symbiosis to sustain the tank and Edge of Extinction (EoE) to complement the nuking.
This build can complete the quest Breaching the Stygian Veil, the quest Brood Wars and kill the Dreadspawn Maw. Incidentally, this same build can actually be used to conquer any of the 3 other areas in the Domain of Anguish with less emphasis on the spirits.
[edit] Build Concept
While there are different tactics for different situations (explained below, in the tactics section), the general outline of how this team works is as follows:
- The ranger spirit-spammer lays down Symbiosis and EoE in range of where the tank will will be holding aggro.
- An Obsidian Flesh tank draws aggro and tries to hold it.
- Three Searing Flames nukers take out the targets, using snares to keep them in nuking range and relying on EoE and Crippling Shot from the ranger to finish off stragglers.
- One of the Searing Flames nukers brings Deep Freeze to ensure foes remain in the area of effect of Searing Flames till EoE kicks in. All foes should die after one usage of Meteor Showers by each elementalist along with Searing Flames.
- Two healer monks keep the tank alive and catch any damage that strays towards the elementalists.
- One bonder maintains all bonds on the tank and some bonds on the nukers to prevent massive spikes.
- Using Symbiosis and the various bonds from the bonder as well as the Earth Magic enchantments, the tank can bring his/her health up to 3,000 health. This makes the tank very resilient to the attacks of the Stygian Hungers which are touchers who steal health (i.e. ignore all armor buffs and protective enchantments).
[edit] Build Details
[edit] The Obsidian Flesh Tank
| Attribute Rank | |
|---|---|
| Earth Magic | 12 |
| Strength | 12 + 3 + 1 |
|
|
|
|
|
|
|
|
|
Usage:
- The tank will be heavily bonded. As such he/she will only be receiving partial damage at all times.
- The tank will have Balthazar's Spirit on which will allow for constant casting of all Earth Magic spells.
- In the early going, all foes will be melee attackers and rangers, as such, you will not need Obsidian Flesh's protection. You should only use it if in danger of losing enchantments. The main culprits will be Soul Tormentors who use Gaze of Contempt and Water Tormentors who can slow you down significantly.
- When pulling a group of foes, it is actually useful to invoke Obsidian flesh or Armor of Earth as moving slower than computer controlled foes will make them follow you as far as they could as opposed to running at normal speed.
- Use Stoneflesh Aura as often as possible. It will make you take zero damage from nearly all attacks and spells.
- Lay down Ward Against Foes when foes around you are near half-health. This will snare them around longer for the elementalists to finish them off.
- The optional slot can be:
- Glyph of Concentration: To avoid having any of your spells interrupted.
- Dolyak Signet: As a massive armor boost. This is not needed, but is useful in situations where, for example, monks go down and you need to stay alive till they are revived.
- Lightbringer's Gaze: To add some offensive punch to this very defensive build.
Equipment:
- A sword/axe with +5 Energy and a 20% "of Enchanting" grip. This will give you extra energy and make all the Earth spells last longer on you. Rajazan's Fervor or the Totem Axe make great weapons for this build.
- A Shield with either +30 Health or +45 while Enchanted is optimal. Also, having a secondary set of Earth Magic based wand and Focus item is optimal for energy. It can also be a 15/-1 set to provide an extra energy boost in times of trouble.
- A longbow for pulling.
- Gladiator's Armor or an armor set fully equipped with Radiant Insignia (for the extra energy) is ideal for this build.
[edit] The Searing Flames Nukers
| Attribute Rank | |
|---|---|
| Energy Storage | 12 |
| Fire Magic | 12 + 3 + 1 |
| Protection Prayers | 3 |
|
|
|
|
|
|
|
|
|
Usage:
- Wait until all enemy aggro has settled on the tank.
- Maintain Fire Attunement during a fight.
- Once aggro is settled on the tank, go in and use Meteor Shower. Try not to use Glyph of Sacrifice if you have it, so as not to increase the cool down between fights.
- Continue to spam Searing Flames, Glowing Gaze and Lightbringer's Gaze till foes are dead.
- If your Lightbringer title is less than rank 3, replace Lightbringer's Gaze with Liquid Flame.
Equipment:
- As elementalists have a large pool of energy, the only real upgrade this build really needs is 20% HSR preferably on both the wand and the focus item. This is to speed up the readiness of Meteor Shower.
- A variety of armor choices make sense:
- An armor set with Radiant Insignia will provide extra energy.
- An armor set with Stalwart Insignia will provide extra protection against any melee aggro that comes your way.
- Tempest Armor would provide extra protection as the elementalist will always have at least 2 enchantments on.
[edit] The Searing Flames Freezer
Nearly identical to the others elementalists, this elementalist simply freezes enemies after a nuke so that they do not disperse before they are killed.
| Attribute Rank | |
|---|---|
| Energy Storage | 12 |
| Fire Magic | 12 + 3 + 1 |
| Water Magic | 3 |
 |
|
|
|
|
|
|
|
Usage:
- Wait until all enemy aggro has settled on the tank.
- Maintain Fire Attunement during a fight.
- Once aggro is settled on the tank, go in and use Meteor Shower. Try not to use Glyph of Sacrifice if you have it, so as not to increase the cool down between fights.
- After Meteor Shower, cast Deep Freeze. This will greatly hamper enemy movement until they are taken down.
- If your Lightbringer title is less than rank 3, replace Lightbringer's Gaze with Liquid Flame.
Equipment:
- As elementalists have a large pool of energy, the only real upgrade this build really needs is 20% HSR preferably on both the wand and the focus item. This is to speed up the readiness of Meteor Shower.
- A variety of armor choices make sense:
- An armor set with Radiant Insignia will provide extra energy.
- An armor set with Stalwart Insignia will provide extra protection against any melee aggro that comes your way.
- Tempest Armor would provide extra protection as the elementalist will always have at least 2 enchantments on.
[edit] The Healer's Boon Monk
| Attribute Rank | |
|---|---|
| Divine Favor | 12 + 1 |
| Healing Prayers | 12 + 3 + 1 |
|
|
|
 |
|
|
|
|
|
Usage:
- Maintain Healer's Boon on at all times during a battle.
- Maintain Essence Bond on the tank.
- Dwayna's Kiss is the primary healing skill. (This will heal the tank for upward of 500 health)
- Healing Touch is for self-healing.
- Use Infuse Health if the tank becomes the victim of Grenth's Balance and loses a large chunk of health.
- Use Heal Party to heal the tank at a distance, or when the party is collectively moving and taking damage from Enduring Torment.
- Using Healing Seed on the tank and alternate it with the other monk once the tank sets aggro.
Equipment:
- A perfect Insightful Staff of Enchanting with 20/20 HSR and HCT for Healing Prayers is optimal.
- Ascetic's Armor or an armor set fully equipped with Radiant Insignia (for the extra energy) is ideal for this build.
[edit] The Spell Breaker Monk
| Attribute Rank | |
|---|---|
| Divine Favor | 12 + 3 + 1 |
| Healing Prayers | 12 + 1 |
| Protection Prayers | 3 + 1 |
|
|
|
|
|
|
|
|
|
Usage:
- Maintain Essence Bond on the tank.
- Dwayna's Kiss is the primary healing skill.
- Healing Touch is for self-healing.
- Use Protective Spirit on any party memeber other than the tank who begins to draw the attention of foes.
- Cascade Healing Seed on the tank with the other monk.
- Use Spell Breaker on the tank against groups of Sygian Hungers when Meteor Shower starts dropping. This is to prevent them from using Grenth's Balance on him. Their AI is such that they will use it on the target with the highest health (always the tank) when they fall to 1/3 health or so. So, if you SB the tank, you deny them that self healing and prevent a huge spike (if they get GB off, they will steal upward of 1500 health from the tank).
Equipment:
- A perfect Insightful Staff of Enchanting with 20/20 HSR and HCT for Healing Prayers is optimal.
- Ascetic's Armor or an armor set fully equipped with Radiant Insignia (for the extra energy) is ideal for this build.
[edit] The Bonder
| Attribute Rank | |
|---|---|
| Divine Favor | 10 + 3 + 1 |
| Inspiration Magic | 10 |
| Protection Prayers | 11 + 3 + 1 |
|
|
|
|
|
|
|
|
|
Usage:
- Maintain all the bonds above on the tank in order from right (Life Barrier cast first) to left (Vital Blessing cast last).
- Maintain Balthazar's Spirit on yourself as well.
- Maintian Life Barrier on the elementalists and (depending on your skill and how comfortable you are with bonding) everyone else.
Equipment:
- A perfect Insightful Staff of Fortitude with +5 Energy while health is above 50% ("Hale and Hearty" inscription) is optimal.
- Ascetic's Armor or an armor set fully equipped with Radiant Insignia (for the extra energy) is ideal for this build.
- Two head pieces, a Defender's head piece with a superior Protection Prayers rune to cast the bonds and then a Prophet's head piece with a superior Divine Favor rune to maintain them.
[edit] The Necromancer Spirit Spammer
This utility necromancer added nuking with Curses spells, maintianing useful spirits up during fights and providing other casters with energy.
| Attribute Rank | |
|---|---|
| Beast Mastery | 10 |
| Blood Magic | 2 + 1 |
| Curses | 12 + 3 + 1 |
| Soul Reaping | 8 + 1 |
 |
 |
|
|
|
|
 |
|
Usage:
- Lay down Edge of Extinction and Symbiosis at the start of every fight in a safe spot that keeps all foes in range. Ideally, you want the spirit ahead and to the side of where the tank will be stopping so that Symbiosis covers the tank for the greatest possible radius.
- As soon as the tank brings back foes and is set, use Suffering and follow it up with Feast of Corruption for a significant nuke.
- Spam Desecrate Enchantments and Defile Enchantments as they become available. Stygian Golems are the best targets for these.
- Use Blood Ritual on teammates as they need energy.
Equipment:
- A Necromancer staff or wand and focus item that provide extra energy as well as halving the spell recharge on Feast of Corruption are ideal.
- Cabalist's Armor or an armor set fully equipped with Radiant Insignia (for the extra energy) is ideal for this build.
Variant:
- Replace Feast of Corruption and Suffering with Spiteful Spirit (SS) and Reckless Haste. SS has less synergy with groups that are being pummeled by Meteor Shower, but if the fight drags on, SS will produce more damage per second.
[edit] Tactics
Conquering the Stygian Veil involves three stages:
- Clearing the initial mobs of monsters at the start of the Breaching the Stygian Veil quest.
- Clearing the two hills north and south to defeat the two Stygian Underlords and complete the Breaching quest.
- Killing the four Stygian Lords to complete Brood Wars and cause the Dreadspawn Maw to appear.
- Destroying the Dreadspawn Maw.
[edit] The Initial Assault
For the first part of Breaching the Stygian Veil, the party should all go north of the Acolyte who gives the quest. The tank should take the quest and back up till all mobs reachs the Acolyte. Spirits should be laid and then the tank should pull using the longbow (always hit "C" and shoot the neartest creature). There will be three mobs jumbles up together, whenever you clear a mob, another will come from the same hill that the first mob came from, till you see a mixed group of foes. That will signal that there will be no more mobs coming from that hill.
Depending on the type of mobs, the party should react accordingly:
- Groups of Stygian Hungers should be pulled to tank, they wil pile themselves around him nicely. Nuke a middle target, freeze them and then finish them off with Searing Flames. Use Spell breaker when they are below half health.
- Groups of Stygian Brutes or Stygian Horrors do not require Spell Breaker. However, the tank should buff himself up with the Earth Magic spells as their Physical damage can trickle to the bonder.
- Groups of Stygian Golems actually benefit from Symbiosis, but not as much as the tank. They are handled like the Horrors and Brutes.
- Groups of Stygian Fiends are very dangerous. The tank should pull them back using a zig-zag motion till they form a tight ball for the nukers to nuke them. Also, if the tank goes to them in melee range and attacks, they will say on him.
- Mixed groups will usually have one Fiend and then the rest will be melee. The melee foes should be nuked first and should the Fiend go for the party , containing it should not be a problem.
[edit] The Two Hills
Starting with the southern hill, the technique should be the same. Spirits get laid down, the tank goes in and gathers several enemies, then brings them back within spirit ranger and tanks them. The only thing to watch out for is that the Stygian Fiends can cripple the tank and the Brutes can knock him/her down with Bull's Strike. The Healer's Boon monk should use Heal Party to aid the tank at a distance. When pulling a group with Water Tormentors, the tank should have Spell Breaker coverage.
The northern hill has pop-ups through out the first half of it. As such, the spirits should be laid outside the hill, the tank should go in till a group starts popping up (the tank should stand still till they all come out of the ground, there is usually 6 monsters). The group will be mixed with at least one Stygian Fiend. There are thre more pop-up groups past the first one. A group around each of the Torment Claws that will spawn near the middle of the hill.
Past those Torment Claws, there should be no hidden groups and the tank should proceed like the first hill, gathering groups and bringing them to spirit range. The spirits should be constantly moved as the party makes its way deeper into the hill.
[edit] The Stygian Lords
There are ways to skip over barriers and so on to get to the Sytgian Lords. This guide will simply tackle the problem straight on.
The party should choose one of the trenches to clear out, the best candidates would be the second trench to the north or south. Either of those trenches leads to a Stygian Lord, and from there on the party can move in a circle to get to the remaining three.
Each trench will spawn two melee groups as soon as someone is half-way through it. The two groups will rush towards each other (and kill anyone stuck inside) and then will camp on the opposite end of where they spawned. In addition, some Tormentor demons will spawn up top on one or both sides of the hills sandwiching the trench. To avoid surprises, one party member can simply run into the trench to trigger its spawns and then die half way through. The party can then Rebirth that member from atop one of the two hill overlooking the trench. If dying is such a big deal, one Elementalist can go secondary Assassin and bring Recall and use it to leave the trench before the pop-up groups close in on him/her.
Once the trench's spawns are stationary the tank can tackle them under spirit range and the party can destroy the closer melee group then the furhter one as well as the spawns on top of the hills. Once the trench is clear, the party can proceed to the Stygian Lord, kill any patrols roaming around him, and destroy him. From that point on, the party will simply circle around to kill the other three lord (see the walkthrough for the quest Brood Wars for their locations).
Note the following:
- The first Stygian Lord to the south is a necromancer, there is a patrol that comes in front of him from the east and another from the west. After clearing the eastern patrol, he can be pulled without the western patrol. He is guarded by Tormentor demons.
- The next one to the east of him is a mesmer. There is a stationary group of Tormentors around him as well as two spawns of Torment Claws.
- The next one to the northeast is an elementalist. There are two patrols on the way to him and then a large pop-up spawn inside the alcove he is found in. The tank should hold then around the entrance to the alcove so they cannot go around him to the rest of the party. Casters should watch out for Chain Lightning from the Stygian Lord.
- The final boss heading northwest from that spot is a smiting monk. Again he is found in an alcove which he can be pulled out of using a long bow. If anyone steps past the entrance of the alcove, a spawn of Stygian Hungers will appear at the entrance. The party should either pull carefully or trigger them on purpose and take them out first.
[edit] The Dreadspawn Maw
After the party returns and cashes in the quest Brood Wars, the Dreadspawn Maw will appear immediately behind them. Make sure everyone is out of the center area and safely next to the Acolyte before having ANY party member accept the reward. The Maw will be comprised of six Smothering Tendrils. The objective is to kill all six and their spawns.
For each Tendril, one elementalist will drop Meteor Shower on it, followed by a few Searing Flames casts. this elementalist should have Protective Spirit on them by the Spell Breaker monk. Everyone else should move back north where the party originally killed the monsters of the initial assault.
As soon as the Tendril is about to die, the SB monk should leave and join the others. The elementalist should finish off the Tendril and then pull back slowly. As soon as the Tendril dies, numerous Torment Claws will spawn as will as several Stygian creatures. If the Stygian creatures DID see the elementalist, he/she should just pull back slowly and have them kill him/her midway to the party. They should NOT bring them back to the party othwerwise the party can wipe after doing so much work. After they kill the elementalist, someone can rebirth him/her and then the tank can pull them into spirit range and the party can destroy them.
The party can then proceed to kill all the Torment Claws that spawned (great wanding fun). The same steps should be repeated for each Smothering Tendril.
[edit] Variants
- One or two of the nuking cast can be replaced with Necromancers using Feast of Corruption to spike. The Freezer is vital for keeping all foes in the same AoE of spells. If the tank brings a snare like Grasping Earth, then the entire nuking crew can be replaced with necromancers.
- The tank does not necessarily need to be an Obsidian Flesh tank. Other tanking builds can be used, as well as non-warrior tanking builds like a continual Shadow Form assassin or an Obsidian Dervish. However, buffing physical armor is important so that no damage goes through to the bonder.
- The N/R can be switched to Spiteful Spirit or can be switched out for any other profession than can bring the two spirits on the side.
[edit] Notes
- The monsters in the Stygian Veil have a bad habit of following for a very long time. As such, it is important that the bonder remain out of the aggro range of the party and that no one drags any aggro back to the bonder for any reason (kite around, do not run away). The bonder will be the safety valve in case anything goes wrong.
[edit] Team Underworld Speed Trap Duo
This build is designed to farm the Underworld with a team made of two trapping rangers. Its originality comes from the use of Echo to duplicate Dust Trap, as well as the Nightfall skill Trapper's Speed. The idea is to lay down just as few traps as you need to kill the group you are going to pull, and for that, Dust Trap is the best as it deals the most damage.
[edit] Attributes and Skills
[edit] Trapper 1 - Puller
| Attribute Rank | |
|---|---|
| Wilderness Survival | 12 + 1 + 3 |
| Expertise | 12 + 1 |
 |
 |
 |
 |
 |
|
 |
|
 |
ASJxlx8oESOKnlzw13IcEAA |
[edit] Trapper 2 - Mime
| Attribute Rank | |
|---|---|
| Wilderness Survival | 12 + 1 + 3 |
| Expertise | 12 + 1 |
 |
|
|
 |
|
|
|
|
|
|
ASJxlx8EESOKnmzw13IcEAA |
[edit] Equipment
- Full Druid's Armor or equivalent in function.
- As many Runes of Attunement as you can (up to 3)
- A Staff of the Forgotten or a similar staff (with at least 15 energy bonus)
[edit] Usage
This build requires good coordination between the two players.
- First, choose the trapping spot.
- Then, the Mime uses Arcane Mimicry on the Puller to copy his Echo. The Puller must be carefull not to begin the combo before the Mime has copied Echo, so the Mime should Ctrl-click on Arcane Mimicry so that the Puller knows he can begin. Now both trappers have Echo.
- The main sequence is: Trapper's Speed > Echo > Dust Trap > copy of Dust Trap > Trapper's Speed > Dust Trap > copy of Dust Trap. Just lay down the other traps while both Dust Traps are recharging, and don't forget to always have Trapper's Speed on you before you drop a trap.
- When each trapper has dropped two series of traps (which makes a total of 8 Dust Traps equaling 8*5*26=1040dmg), the Puller can aggro (don't forget to use Troll Unguent and Whirling Defense to stay alive). The Mime should have finished laying down his second Spike Trap by the time the mobs arrive. He should make a step backwards and hit Whirling Defense.
[edit] Tips
- You don't have to put all the traps on the exact same location. You can spread out a bit to cover a wider area. You'll just have to make sure that when mobs trigger the first trapper's traps, they trigger the second trapper's traps too.
- Good spots to put traps on are corners. When the puller comes back, chased by mobs, they tend to take the shortest way, thus grinding the wall inside the corner. The Puller should drop his traps right inside the corner, while the Mime should drop his traps a bit farther outwards. This way, you are sure that all of them will be hit by Spike Trap and stay in the Dust Traps for their whole duration.
- When you trap in an open area, put all your traps on the same spot, except Spike trap. The Mime should place one a bit backwards on the left and another one a bit backwards on the right of the spot where the other traps are. This tactic is meant to counter the AI which makes mobs spread out before engaging you to try to circle you.
- Sometimes Aatxes won't stay on the traps for the whole
duration, so you have basically two solutions:
- Put a couple more Dust Traps on the trapping spot before pulling them.
- Active trap them if they survive the initial traps.
-
- The first solution is as fast as the second and more reliable, so each trapper should put 5 Dust Traps before the Aatxes are to be pulled.
- Against Coldfire Nights, you can lay a single series each (for a total of 4 Dust Traps, 2 Barbed Traps, 1 Flame Trap and 1 Spike Trap) on their path, then run backwards. It's generally enough to kill them.
- Against mobs that chase you from afar, such as the ones you aggroed but didn't manage to kill, just run away until they break aggro, then try to find the exact point where they aggro again. Put a first series of traps just behind that spot, wait, and when the second series is ready, put it down two steps forward. Stay on this spot until the mobs come back at you, then walk two steps backwards to make them trigger the first series of traps.
[edit] Variants
- Take Tripwire instead of Troll Unguent for the mime. Use it just after the enemies are knocked down for the first time so they will be knocked down again, thus taking even more damage from the Dust Traps.
The build for trapper 1 can also be used to farm vermins outside Senji's Corner, then replace Resurrection Signet with Ether Signet and put the extra attribute points in inspiration magic and use it the second time you lay the echoed dust trap.
- An excellent alternative for Trapper 1 is to run a pure Dust Bomber build, the skills would include Arcane Echo, Echo, Dust Trap, Serpent's Quickness, Ether Signet, Troll Unguent, Whirling Defense, and Sunspear Rebirth Signet. In order for this build to work, you need to have 57 energy exactly, no more no less. Take an end game Nightfall staff with plus 20 energy and set you armor up with Radiant Insignias (don't put one in the head peice), Runes of Attunement, and of course a Vigor of your choice. Your attributes should be as follows:
Inspiration: 6
Expertise: 11+1
Wilderness: 12+3+1
You will run Serpents Quickness+Arcane Echo+Echo+Dust Trap+Echo (from Arcane Echo)+Dust Trap+Dust Trap+Ether Signet
Go through your Dust Traps again once they recharge and if you want you can lay another 4 Dust Traps with just Echo (making sure to use Ether Signet in between skills) to make a grand total of 10 Dust Traps from Trapper 1 alone! If you do 10 Dust Traps, you'll only have a few seconds to pull before they start going off, so I recommend doing 8 until you find your medium.
[edit] Counters
This team build will give you a hard time against Terrorweb Dryders, but with proper aggro, it is not impossible to destroy them.
[edit] Notes
- This build is much faster than the traditional 3 man trapping team, and gives you more chances to receive dropped ectos!
- This build was originally posted here: [1].
[edit] See also
[edit] Team Underworld trapping
[edit] Introduction
The ranger trapper group is one of the most effective ways to farm the Underworld. Trapper groups usually range from 2-5 people. The trappers can be a part of a larger party with a Battery, a Nuker and a 55 monk for example. This larger group isn't necessary as three trappers alone can survive well enough if they know what they are doing. A large trapper group can clear the whole Underworld and complete all of the quests there. The player's skill, loot desires and availability determine the size of groups.
Trappers place traps just outside the aggro range of the enemy. After several traps have been placed a designated "puller" runs around until a sizeable group of enemies is following him. The puller then leads the enemies right into the traps. If done correctly, all the enemies in the pull will be killed by the traps. Besides the great fun derived from the spectacle of flame and magic that will bring any video card to its knees, the loot is the main object of this build.
In a trapper group build there are two types of mini-builds, the aformentioned puller and non-pullers. All members lay down traps and use Nature Rituals. The "puller" has the most dangerous job of the group as he needs to aggro the enemies and lead them to the traps without dying.
[edit] How to use the build
There are two different types of mobs which are trapped in two different ways. The first type are the static or little-moving mobs and the second are patrolling groups which patrol a certain path. Experienced trappers will know exactly which groups fall into each category. To eliminate confusion the group should designate a group leader who is experienced and possibly acts as the puller. The leader should designate the spot for traps, start the trapping process and order the puller to aggro the enemies.
[edit] Static Enemies
The group leader should begin by moving just outside the aggro circle of the designated enemies. The group, including the puller, should get as close behind the leader as possible. They should never go in front of the leader so that they won't accidentally aggro the mob. The leader should then call the first Nature Ritual, preferably Energizing Wind (Unless he is the puller who has Quickening Zephyr). Other trappers should cast their Nature Rituals immediately after the EW is in effect or immediately after the call if the spirit in question is QZ. Then all members begin to lay their traps. Traps do stack and do not begin to disappear until 90 seconds have passed, so the trappers can lay down multiple sets of traps.
The group leader should decide when it is time to send the puller into the fray. The puller should typically aggro the enemies 70-80 seconds after the group began trapping. A good way to keep track of time is to use a ritual that you know the duration of. Energizing Wind lasting for 78 seconds or a bit less is a good choice.
To succesfully pull a mob the puller should run towards the enemy and aggro them. Before the monsters get to the puller he should activate a stance to keep him/her alive. After a sufficient number of enemies have been aggroed the puller should run back towards the traps. If the enemies spread too much apart the puller needs to stop for a while and allow the enemies to bunch up. When the puller gets to the traps he should usually keep running until the enemies switch their focus to the spirits or other trappers. After 1-2 seconds the traps activate and hopefully kill the enemies with spectacular visual effects.
The rest of the group continue trapping during the pulling process and even after the initials traps have activated if any enemies remain. If a player takes much damage he should run away from the enemies and use Troll Unguent. If the trapping and pulling were done correctly all the enemies should be killed in the first wave of traps and the ground should be littered with loot.
[edit] Patrol Enemies
These types of enemies present a different challenge to the trappers. A puller isn't used. Instead watch the patrolled paths and decide a spot on the route to trap. Begin by casting the rituals out of aggro from the chosen trapping spot. Be sure that the rituals are still close enough for you to gain the benfits of them. The group needs to begin placing traps on a spot on the patrol route just after the mob has passed over it. Continue to place traps until patrol is coming back to your spot. Then the entire group needs to retreat behind the rituals. Do NOT aggro the enemies, because this will disturb their path of movement. If done correctly, the enemy patrol will walk over the traps and die. If any enemies survive the party needs to rush towards them and lay their traps standing beside them. This is called aggressive trapping, which can also be used against any enemies which do not deal a lot of damage and can't interrupt your traps. Using stances to avoid being interrupted will help.
[edit] Enemy Notes
Fighting a Smite Crawler the same way as fighting a Coldfire Night can prove to be disastrous. Below are notes on different monsters confronted in the Underworld.
[edit] Banished Dream Riders
Banished Dream Riders can be easily pulled to the traps, but be aware of the group of Mindblade Spectres spawning after the kill.
[edit] Bladed Aatxes
Bladed Aatxes do extensive damage, killing trappers in 2-3 hits, so make sure to kill them with the initial traps if possible. They tend to run away after the first wave of traps if they survive, so you will have some time to set new traps before they return.
[edit] Charged Blacknesses
These elementalist deal heavy damage, so they should be quickly pulled to the traps before they can kill the puller. Remember to set the nature rituals far behind the trapping spot.
[edit] Coldfire Nights and Stalking Nights
Coldfire Nights and Stalking Nights are patroling elementalists and it is relatively easy to trap their path. Remember to set the nature rituals far behind the trapping spot.
[edit] Dead Collectors and Dead Threshers
These powerful necromancers are hard to pull and deal heavy damage. Better instructions needed.
[edit] Dying Nightmares
These creatures can be killed with whatever weapon is equipped, do not waste traps on them. They pose no threat to trappers.
[edit] Grasping Darknesses
Grasping Darknesses are quick and can easily surround the puller. They do not deal a lot of damage but drain energy, so the puller could use Storm Chaser instead of Whirling Defense when pulling them. They are weak and easily killed by the initial traps and they tend to stay together when pulled, but if you fail they are really hard to kill with aggressive trapping.
[edit] Mindblade Spectres
The Mindblade Spectres might or might not pose much threat to a trapping group, depending on the players skills. They cause heavy -8 health degeneration (Conjure Phantasm: -5, Migraine: -3) which might easily overcome the party if they do not keep Troll Unguent up all the time. Using aggressive trapping with Troll Unguent always up they should fall quickly.
Against a larger group of Mindblades the trappers should set an initial trap, but - unlike usually - the traps should be spread on a wider area, because the Mindblades are harder to pull as a tight group. They are however weak enough to die to a smaller amount of damage and any leftovers are easily killed by agressive trapping.
[edit] Obsidian Behemoths
These wurm-like creatures do not move and they use traps themselves. Have the puller set off the traps, then attack with bows and traps after their own traps have been cleared. With their use of Healing Springs, one missed bow attack can foil the gradual weakening, wasting another few minutes wearing them down again. You can also use a pet to set off the traps and one barrager can keep the Behemoths from setting more of them.
[edit] Smite Crawlers
Smite Crawlers are quick and numerous creatures that can cause havoc if the first wave of traps does not kill them all as they have many healing and anti-damage spells. Often one of them will stray from the group just before reaching the traps and the puller should react to this.
[edit] Terrorweb Dryders
Use Troll Unguent before pulling Terrorweb Dryders as they cause burning. The puller has to wait for them to cast Meteor Showers before they begin to follow him. He should be on constant move, staying in the Terrorwebs aggro range, to dodge the Meteor Showers. Often only two of the three Terrorwebs will die when the initial traps are triggered, but the third one is easily killed by trapping aggressively.
[edit] Pros/Cons to trappers
- Pros
- Can kill a lot of enemies without engaging in combat
- Easy if the party size is sufficient
- Can clear whole of the Underworld
- Very versatile with the addition of skills from other campaigns
- Cons
- Time consuming in smaller groups
- If a pull fails it could mean doom for the entire group
- Can get boring after a while especially in larger groups
[edit] Attribute Points
The group members assign their attribute points differently depending on their task. Every member has Wilderness Survival maxed out because most of the skills (especially the traps) use it. A lot of points are also assigned to Expertise for energy management. The attribute utilized by the spirit affects the attribute distribution of the player. If a player chooses to use a skill from a secondary profession which benefits from assigning points into the attribute line take this into account too.
The following table assumes that players have level 20 and the extra attribute points gained from quests.
| Character | Wilderness Survival | Expertise | Beast Mastery | Marksmanship | Secondary attribute |
|---|---|---|---|---|---|
| Puller | 16 (12 + mask + superior rune) | 13 (12 + minor rune) |
0 | rest (rest + minor rune) |
0 or 3 |
| Trapper (With WS spirit) | 16 (12 + mask + superior rune) | 13 (12 + minor rune) |
0 | 4 (3 + minor rune) |
0 |
| Trapper (With WS spirit and secondary profession skills) | 16 (12 + mask + superior rune) | 12 (11 + minor rune) |
0 | 3 (2 + minor rune) |
6 |
| Trapper (With BM spirit) | 16 (12 + mask + superior rune) | 12 (11 + minor rune) |
6 (5 + minor rune) |
5 (4 + minor rune) |
0 |
| Trapper (With BM spirit and secondary profession skills) | 16 (12 + mask + superior rune) | 12 (11 + minor rune) |
6 (5 + minor rune) |
2 (1 + minor rune) |
4 |
[edit] Skills
In the table below are listed the skill sets of the puller and the non-pullers. The Nature Rituals are distributed in a manner described later and the changeable skill slots can have a variety of different skills from any profession. You should discuss your skill choices with the group. Some tasks in the Underworld need specific skills, so make sure that someone in your party equips them if needed.
| Puller | Non-Puller |
|---|---|
[edit] Nature Rituals
Everyone in the party should bring a Nature Ritual, also called by the name spirit. The Nature Rituals are what make a trapper group so effective, as they allow the players to lay more traps than usually possible and they boost the damage output of the traps. Equip the Nature Rituals in the order listed, one per player (Ie. If you have 3 players, equip only the 3 first). Remember that the puller has to take a ritual which uses Wilderness Survival.
| 1. | |
| 2. | |
| 3. | |
| 4. | |
| 5. |
*Do not bring a second QZ if all of your party members have Serpent's Quickness.
[edit] Traps
The above skill sets are built presuming that the trappers have access to Prophecies. However if they do not, they need to replace Dust Trap with Viper's Nest. If the trappers have access to both Prophecies and Factions skills they should also include Viper's Nest in the team build. The best person to take Viper's Nest is a trapper with a Beast Mastery spirit as Viper's Nest uses Beast Mastery unlike all of the other traps. Each trapper should usually have 4 traps. Discuss the distribution of traps with your team.
[edit] Puller
It is best that your leader acts as the puller if possible, because he should be the most experienced player in the group and there is no need to command the puller to begin. The puller functions just like the normal team members, casting the ritual and laying traps, until the enemies need to be pulled to the traps. He then moves forward to aggro the enemies and uses Whirling Defense to avoid fatal hits. Using a stance which increases movement speed could also be useful against certain mobs, but isn't necessary. A quick heal skill might come in handy. The puller usually regains a good amount of energy during the pull so he can easily continue trapping the enemies if some of them survive the initial traps.
[edit] Non-Puller
The "Non-Pullers" can have a bit more varied skillbars. There is rarely a reason to use only ranger skills as skills from other professions can give a huge boost to the efficiency of the party. The most usual secondary is the monk profession as groups like to have a few Rebirths so that the party can be resurrected after fights which do not go as planned. Other professions have their own benefits and uses. Some can increase the damage done by the traps, some can help the players to stay alive, some can help with energy management. You can be very creative with the use of skills as the Underworld contains a large variety of monster types.
[edit] Optional skills
Each skill has a marker which shows how useful it is. ![]() marked skills are almost a
must,
marked skills are almost a
must, ![]() marked skills are
very nice and good in many situations. Rest of the skills can be
useful, but only in certain situations and against certain enemies
or the benefit gained is small.
marked skills are
very nice and good in many situations. Rest of the skills can be
useful, but only in certain situations and against certain enemies
or the benefit gained is small.
[edit] Optional Core skills
The core skills are accessible by everyone. They contain a wide variety of useful skills for the trapper team and most teams contain a few of these skills.
| Skill | Attribute | Use | |
|---|---|---|---|
| - | Fast resurrection in a tight spot. You should consider bringing permanent resurrection skills if possible. | ||
[edit]
|
|||
| Marksmanship | - | If the group is going to clear more than just the Labyrinth, Ice Wastes and Forgotten Vale, one ranger could equip Barrage instead of Spike Trap to efficiently interrupt all traps set by the Obsidian Behemoths. This ranger just keeps shooting the Behemoths while the others trap them. | |
| Beast Mastery | - | Needed to capture a Black Widow. Very good against Obsidian Behemoths as you can send your pet to trigger their traps before you move to set traps. Bringing Comfort Animal or Revive Animal with is a must as your pet will die often. | |
| Wilderness Survival | - | Increases the movement speed of the puller against faster enemies and allows him to have more energy to continue trapping after the pull. | |
| Expertise | - | Good when the initial traps fail, although Dust Trap should have blinded the enemies. One Throw Dirt can blind all enemies and give the trappers a chance to set a few more traps, especially a new Dust Trap. Coordinated use of Dust Traps should render this skill useless. | |
| Wilderness Survival | Very useful when the initial traps fail. The best healing skill usable by trappers so you should consider bringing it. It is commonly used before pulling creatures like the Terrorweb Dryders to counter the health degeneration they cause. | ||
| Expertise | Evasion is as useful to others when the pull doesn't work as it is for the puller when he pulls. Other trappers with WD can also act as replacement pullers if the puller dies. | ||
[edit]
|
|||
| Protection Prayers | - | Good for keeping players alive when the initial traps fail. | |
| Protection Prayers | A good skill to keep the puller alive. Be aware of Dying Nightmares if you use this instead of a stance as they remove enchantments. It is best to use this only as an addition, not a replacement. | ||
| Protection Prayers | Permanent resurrection to bring your dead party members back after you have survived a hard situation. Never use this before the enemies are dead or far away. A player or two should bring this. Rebirth also moves the resurrected character to you out of harms way which makes this skill superior to other permanent resurrection skills in a trapper team. | ||
[edit]
|
|||
| Curses | If cast on one of the enemies prior to the triggering of the traps the other members of the mob receive huge amounts of damage. | ||
[edit]
|
|||
| Tactics | - | Good against Obsidian Behemoths to prevent them from interrupting traps and dealing a lot of damage. | |
[edit] Optional Prophecies skills
There are only a few Prophecies skills which a trapper group should consider, but especially Serpent's Quickess can be used for a great benefit.
| Skill | Attribute | Use | |
|---|---|---|---|
[edit]
|
|||
| Wilderness Survival | Allows you to lay traps faster. SQ is even worthwile when Quickening Zephyr is alive as this adds an extra 33% recharge to the 50% from QZ. Best used when enemies survive the first traps and your QZ is dead. Can also replace the second QZ (In that case every party member needs to bring SQ). | ||
[edit]
|
|||
| Blood Magic | - | Helps with energy management. Not needed if the players have the required equipment and Nature Rituals. | |
[edit]
|
|||
| Inspiration Magic | - | Good to remove hexes when fighting against the Mindblades. Also helps with energy management when removing hexes. | |
| Inspiration Magic | - | Useful during aggressive trapping as it prevents monsters from interrupting your traps. | |
[edit] Optional Factions skills
Especially the new trapping related skills introduced in the Factions campaign create interesting possibilities and can boost the teams damage output.
| Skill | Attribute | Use | |
|---|---|---|---|
[edit]
|
|||
| Expertise | - | Some trappers in the group could take TF instead of Spike Trap. TF makes your traps non-easily interruptable so it is very useful during agressive trapping. Consider taking Viper's nest as a fourth trap if you remove Spike Trap. | |
| Beast Mastery | Viper's Nest is the only trap using Beast Mastery. It is also the only trap to cause poison, so replacing Barbed or Flame trap on one person with VN would increase damage. Remember to have it on a player who already has points in BM. | ||
[edit]
|
|||
| Divine Favor | - | If your group is going to venture to the Chaos Planes, this skill might be taken by one member to remove all hexes cast by the Mindblade Spectres. | |
[edit]
|
|||
| Inspiration Magic | - | Helps with energy management. Not needed if the players have the required equipment and Nature Rituals. | |
| Inspiration Magic | - | Good to remove hexes when fighting against the Mindblades. Also helps with energy management when removing hexes. | |
| Inspiration Magic | - | Good to remove hexes when fighting against the Mindblades. Also helps with energy management when removing hexes. | |
[edit]
|
|||
| Fire Magic | - | Additional damage and burning to the traps. | |
[edit]
|
|||
| Tactics | - | Good to protect team members and prevent interruption of traps after the initial traps fail. | |
[edit]
|
|||
| Note: Many skills with the Shadow step functionality might have uses in different situations. | |||
| Deadly Arts | - | Fast energy gain and trap recharge when target dies. Useful when fighting enemies which can't be pulled in the initial traps as a group. Note that this skill is an elite and will replace Spike Trap. | |
| Shadow Arts | - | Good for the puller when monsters surround him and prevent moving. The random location where you Shadow Step might be an obstacle in which you get stuck permanently. | |
| Shadow Arts | - | A good skill to keep the puller alive. Be aware of Dying Nightmares if you use this instead of a stance as they remove enchantments. It is best to use this only as an addition, not a replacement. | |
| Shadow Arts | - | Good for the puller when monsters surround him and prevent moving. The random location where you Shadow Step might be an obstacle in which you get stuck permanently. | |
[edit]
|
|||
| Note: Many ashes spells might be beneficial if dropped when the initial traps are triggered. Many spirits might be beneficial. | |||
| Channeling Magic | - | Helps with energy management. Not needed if the players have the required equipment and Nature Rituals. | |
[edit] Optional Nightfall skills
A few of the Nightfall skills make good additions to a trapping group.
| Skill | Attribute | Use | |
|---|---|---|---|
[edit]
|
|||
| Wilderness Survival | Smoke Trap is a low cost trap which causes blindness, but as it is an elite skill you won't be able to use Spike Trap. | ||
| Expertise | Trapper's Speed makes the trapping process faster, but you need to take care of your energy pool. | ||
| Wilderness Survival | This is another trap usable instead of one of the regular ones. | ||
[edit]
|
|||
| Strength | - | Good for pulling when you are pulling more than 1 group at time and at long range. | |
[edit]
|
|||
| Shadow Arts | - | Good for pulling because of armor bonus. | |
[edit] Armor

Due to the high requirement of energy, Druid's Armor is almost a must. Traveller's Mask and a rune of superior Wilderness Survival are required. Minor Marksmansip and Expertise runes and the best possible Vigor rune should also be taken.
Note: Most pick-up trapping groups won't take trappers without 16 Wilderness Survival. There is a collector's version of the Traveller's Mask that has the same look as a Archer's Mask so just looking at the mask on a character isn't going to tell. The only way to know for sure if another player has 16 wilderness survival is to see their mask in trade although this typically isn't necessary.
[edit] Weapons
Most beginning trappers bring only their usual bow with them, but a trapper doesn't have a high Marksmansip to use a bow. A bow is sometimes used for pulling in PvE, but only if the group doesn't have a real puller who aggroes the enemy mobs. You shouldn't usually change to a bow even when a mob doesn't die to the initial traps, as you will lose the energy bonus from your other equipped items. If you want to use a bow, the best one to use is propably the Candy Cane Bow, beause it has no requirements.
The more important weapon to bring is a staff or wand/off-hand combination. Rangers don't typically use these type of weapons but the benefits of +10 to +15 energy these magic weapons provide are invaluable. These magic weapons don't have to be the most expensive or rarest around. Any weapon that gives the additional energy will help. Doing so increases an average ranger's energy from 32 to 42-47, depending on the weapon.
There are many choices for trapping equipment. Flint's Fleshcleaver and the Handsmasher (and their collector weapon counterparts) make excellent weapons for trappers. Both offer +15 energy and +30 health. Brohn's Staff, Villnar's Staff, and the Willcrusher offer the same boosts, but the price and availability are much more prohibitive than the aforementioned. New options to consider are Milius' Pillar, Wenslauss' Faith, Illyana's Staff and Kole's Torment.
The Fires in the East quest-reward is a staff that provides 13 energy, and can be upgraded with a perfect Insightful Staff Head, for a total of 18 energy, bringing the trapper to a total of 50 energy. Adding a +5 AL or a +30 HP staff wrapping upgrade to this in addition to the head will make this one of the best staves to use.
Trappers with access to the Nightfall campaign may add a 'Hale and Hearty' Inscription and an Insightful Staff Head to an inscribeable staff for a +20 energy staff. Such weapons are available from Nightfall greens as well, such as The Mindclouder or Staff of the Forgotten.
[edit] Tips
- Trap as tightly together as possible without blocking in your puller. The puller should ideally be the one standing just in front of the others.
- One Dust Trap could be set closer to the enemies than the other traps, so that the monsters are blinded when they get to the group.
- Non-pullers shouldn't run away from enemies. Instead they should continue laying traps. Of course this doesn't apply against ranged enemies.
[edit] Example Build
[edit] 2x R/Mo Wilderness Survival trapper
|
|
|
|
|
|
|
|
|
[edit] Attributes
- Expertise: 13 (12+1)
- Marksmanship: 4 (3+1)
- Wilderness Survival: 16 (12+1+3)
[edit] Equipment
- Illyana's Staff or equivalent
- Gorrel's Staff or equivalent for main puller
- Druid's Armor
[edit] 1x R/Mo Beast Mastery trapper
|
|
 |
|
|
|
 |
|
|
[edit] Attributes
- Beast Mastery: 6 (5+1)
- Expertise: 12 (11+1)
- Marksmanship: 5 (4+1)
- Wilderness Survival: 16 (12+1+3)
[edit] Equipment
- Illyana's Staff or equivalent
- Gorrel's Staff or equivalent for main puller
- Druid's Armor
[edit] Notes
- Any of the trappers can pull. A staff with extra hit points is a nice help, but not required.
- Lay traps starting from slot one and moving right. If you start with the traps which cost more energy, you might run out of it.
- This team also works if one of the Wilderness Survival trappers disconnects.
[edit] See also
- See Build:R/Me_Underworld_Speed_Trap_Solo and Build:Team_-_Underworld_Speed_Trap_Duo for fast alternative builds.
- See the General trapping guide for an in-depth discussion of trapping and a list of related builds.
[edit] Team - Urgoz Trappers
The Urgoz Trapping team is a build designed to clear the way to, and destroy Urgoz inside Urgoz's Warren as quickly as possible while keeping the odds of party failure to a minimum. The core of the build is trapping which is used to damage the large groups of enemies in the warren as well as to keep them off balance. The build relies on Edge of Extinction (or EoE) to destroy Urgoz when the party reaches his inner sanctum.
[edit] Build Concept
While there are different tactics for different situations (explained below, in the tactics section), the general outline of how this team works is as follows:
- The team will set its traps and spirits at a good tactical position that does not expose it to moving patrols and allows for retreat. Using line of sight to protect against ranged attacks is always a good strategy if available.
- A sweeper will go scout and pull the target enemy group back to the traps (usually the trapper with the most experience in the Warren).
- As the enemy hits the traps. the party will finish them off with nuking and more trapping.
- During fights, the monks and ritualist try to keep all party members alive.
[edit] Build Details
Urgoz's Warren allows for a party of 12 members. However, at its core, this build is composed of 9 members:
- Three trappers
- Two nukers
- Two healers
- One BiP necromancer
- One Ritual Lord ritualist
Typically, the final three spots are filled with a backup trapper, a backup nuker and a backup monk. Such redundancy can protect the party from failing due to a team member leaving or getting disconnected.
[edit] The Trappers
The core three trappers should serve do three different roles, the fourth one can be a duplicate of either of the last two:
[edit] The EoE Trapper
This trapper specializes in bringing the skill Edge of Extinction at the highest possible level (16 Beast Mastery). This means that his/her Wilderness Survival traps (the bulk of the traps) will not be as potent. However, the presence of this trapper makes defeating many of the large groups in the warren much easier, as well as making the defeat of Urgoz himself a walk-in-the-park.
| Attribute Rank | |
|---|---|
| Beast Mastery | 12 + 3 + 1 |
| Wilderness Survival | 10 + 1 |
| Expertise | 8 + 1 |
 |
|
|
|
|
|
|
|
Note: Because of the lower than usual Expertise rank, it's better if this trapper not carry Dust Trap.
Usage:
- Place EoE and EW (Energizing Wind) at a safe spot that will be within comfortable range of where the traps will be. Using line of sight to protect it from rangers is always a good approach.
- Trap with the other trappers using Viper's Nest primarily as well as other traps.
- When enemies are pulled into range use Oath Shot as soon as you can, do not wait till EoE has been killed to recharge it with Oath Shot. This will cause you to have to wait until Oath Shot is recharged to be able to use it again. Instead, adapt the approach of using Oath Shot as soon as you can, not when you have to.
- During the fight, keep trapping as your energy allows (with Whirling Defenses on), while keeping an eye on EoE and making sure it is always up. It is not recommended that you keep EW up during the fight as it tampers with the recharge time of the skills of other party members.
- For tips on the final confrontation with Urgoz, see the tactics section below.
Equipment:
- Druid's Armor is recommended for maximum energy. Tamer's Mask is required to achieve maximum EoE.
- Carrying a Traveler's Mask with a superior Wilderness Survival rune on it and swapping it with the Tamer's Mask while laying the trappers can help the potency of your traps. Remember to switch back to the Tamer's Mask when laying down the spirits.
- Any Insightful staff will serve as a good trapping weapon. A staff wrapping of Fortitude is a nice bonus.
- Any bow to use with Oath Shot to recharge your skills. The best for purposes of accuracy would be a Recurve Bow.
[edit] The Pure Trapper
The pure trapper has 16 Wilderness Survival and as such, his/her traps carry maximum potency. He/she is also in charge of laying down Quickening Zephyr (QZ).
| Attribute Rank | |
|---|---|
| Wilderness Survival | 12 + 3 + 1 |
| Expertise | 12 + 1 |
|
|
|
|
|
|
|
|
|
Usage:
- Place QZ at a safe spot that will be withing comfortable range of where the traps will be. Using line of sight to protect it from rangers is always a good approach.
- Trap with the other trappers using all of your traps. Make sure Dust Traps are especially well spaced to protect your back line from melee attackers.
- During the fight, keep trapping as your energy allows (with Whirling Defenses on). It is not recommended that you keep QZ up during the fight as it tampers with the energy cost of the skills of other party members.
Equipment:
- Druid's Armor is recommended for maximum energy. Traveler's Mask is required to achieve maximum trap potency.
- Any Insightful staff will serve as a good trapping weapon. A staff wrapping of Fortitude is a nice bonus.
- A bow for pulling is optional.
Variations:
- This trapper can also bring Healing Spring for to heal himself and his fellow trappers when trapping in health degeneration rooms.
[edit] The Hybrid Trapper
The Hybrid trapper has high Wilderness Survival and Beast Mastery to act as a support trapper for the Pure trapper as well as a backup in case the EoE trapper leaves or is disconnected. This is mainly because EoE is such an important component of defeating Urgoz.
| Attribute Rank | |
|---|---|
| Wilderness Survival | 11 + 3 + 1 |
| Beast Mastery | 10 + 1 |
| Expertise | 10 + 1 |
|
|
|
|
|
|
|
|
|
Usage & Equipment:
- Exactly like the Pure Trapper. In addition, a Tamer's Mask in case this trapper is forced to use his/her EoE instead of the main EoE trapper.
[edit] The Nukers
The two nukers will have the exact same build and their main focus should be Fire Magic. The build could be any Build:E/Me Heavy Nuker build, but for Urgoz, the following basic build seems to work best:
| Attribute Rank | |
|---|---|
| Fire Magic | 12 + 3 + 1 |
| Energy Storage | 12 + 1 |
 |
 |
 |
|
 |
|
|
|
Usage:
- The main function of the two elementalists is to finish off enemy groups. They must be patient and allow the enemy to fall into the traps. While the ensuing chaos may spoil a perfect nuke, it serves the party better to have enemies scurrying about blinded, burning, and crippled.
- It's best to time the cast of nukes with traps triggering. If enemies are pummeled by Meteor Shower just as they trigger a trap, they will be damaged fully by the trap before they can run off. After a little time and experience the nukers will get the hang of it.
- Use Breath of Fire wisely. Its primary usage should be to break away melee attackes who wander past the trappers or who arrive late and are not affected by the traps.
- Glyph of Energy is extremely useful in fighting in areas where the party will be under the effects of Sheer Exhaustion.
Equipment:
- Battlemage's Armor may provide an extra defensive boost, but any armor works fine.
- A staff or (Wand and Focus Item combination) that provides +5 Energy and +30 Health as well as faster casting time and skill recharge for Fire Magic would be optimal.
[edit] The Healers
The monks in the party should all specialize in Healing Prayers primarily. While other healing builds (such as boon prot) can be just as useful, the heavy presence of mesmers in the final few rooms of the Warren makes builds that rely on Protection Prayers less effective. Such builds tend to rely on enchantments which will be consistently removed by Greater Blood Drinkers and Maddened Mind Wardens. All monks should run a build along these lines:
| Attribute Rank | |
|---|---|
| Healing Prayers | 11 + 3 + 1 |
| Divine Favor | 10 + 1 |
| Protection Prayers | 10 + 1 |
 |
|
|
|
 |
 |
|
|
Usage:
- Word of Healing is the primary healing skill for other party members and healing touch is the primary healing skill for self-healing.
- Protective Spirit is mandatory in at least one of the monks in case the Rituliast drops out. Facing the Thorn Wolves without some way to control their spike damage is ill-advised.
- Heal Party is mandatory for many scenarios in the warren. There are at least two rooms with -15 health degeneration and Heal Party makes operating in those much easier, especially in the presence of the BiP necromancer.
- Extinguish is extremely useful on the Fire Flower bridge.
- Use Holy Veil (or any other Hex removal skill) to remove critical hexes from your party, such as Icy Veins and Shroud of Silence.
Equipment:
- Ascetic's Armor is recommended for energy.
- Any staff (or wand and focus item combination) that provides +5 Energy, +30 Health and fast recharge and cast time for Healing Prayers is optimal.
Variations:
There can be many variations for the monk builds as the only
essential skills are Heal Party and Protective Spirit. All other
skills can be replaced with others in a very flexible manner...
- Word of Healing can be replaced with Blessed Light or Healing Light.
- Extinguish can be replaced with Aegis.
[edit] The Bipper
The BiP necromancer is the energy source of the party. Without him/her, the run can take an hour longer. The presence of the necro allows the trappers to trap faster, the monks to heal more frequently and the whole party to simply take on bigger groups of enemies. The build is no different that Build:N/any BiP Necro with the addition of a traversal skill for room 3.
| Attribute Rank | |
|---|---|
| Blood Magic | 12 + 3 + 1 |
| Soul Reaping | 10 + 1 |
| Death Magic | 8 + 1 |
 |
 |
 |
|
 |
|
|
|
Usage:
- Keep Blood Renewal on at all times.
- Use Blood is Power on any party member you wish to give Energy to.
- A good Bipper never waits for people to call their Energy. Instead, the
bipper should have a plan:
- While trapping and setting up for enemies, the bipper should focus on feeding the trappers.
- During a fight, the bipper should bip the monks, then elementalists, then trappers in that order of priority.
- Use wells as Energy and circumstances permit.
- Use Consume Corpse (or Necrotic Traversal) to get on the bridge in room 3.
- Having as little maximum health as possible allows the bipper to be extremely effective in doing his/her job, however, this should only be done if the bipper is very good at staying alive. Dying does not really harm the bipper, but having to do without the bipper in the middle of an intense fight is not a good thing for the other party members.
Equipment:
- Scar Pattern Armor is recommended for energy. Adding Superior Runes to reduce health is an option.
- Any staff (or wand and focus item combination) that provides +5 Energy and fast recharge and cast time for Blood Magic is optimal. An item which reduces health or one that lengthens enchantments (for Blood Renewal and BiP) can help also.
[edit] The Ritual Lord
The Ritual Lord ritualist is a Communing-specialized ritualist who maintains 3 very imporant defensive Binding Spirits up. The main objective is to create a spike-free zone for the party to operate in.
| Attribute Rank | |
|---|---|
| Communing | 12 + 3 + 1 |
| Spawning Power | 12 + 1 |
|
|
 |
 |
 |
|
 |
|
 |
Usage:
- Make sure Boon of Creation and Ritual Lord are on at all time.
- Extend Spike Trap and Meteor Shower knock down time to 3 seconds with Earthbind.
- When the rangers are almost done with their traps, the ritualist should setup the spirits. A good spot would be near where the trappers setup EoE.
- As the spirits die, the ritualist should be constantly replacing them. Beware of interrupts.
- In any room in which there are Thorn Wolves, it is imperative that the spirits be up and ready when the Wolves approach the party.
Equipment:
- Halcyon's Armor is recommended for energy.
- Any staff (or wand and focus item combination) that provides +5 Energy, +30 Health, and fast recharge and cast time for Communing is optimal.
[edit] Tactics
The build primarily follows the mission walkthrough in the article Urgoz's Warren, the following are tactics specific to this build:
Room 1:
- The trappers should set the traps where the party spawns; all non-trappers should move back a little bit (to the open gate behind the party). The trappers should make the traps in multiple layers as the Thought Stealers usually precede the Hopping Vampires. When ready, a trapper should move forward to trigger the pop-ups.
- The party should then bunker down in the corridor. Traps should be set at the end of the corridor while spirits should be placed just around the bend where the party spawned.
- Pull one or more (if the party is proficient) of the Dredge groups. Trappers should keep their focus on the Maddened Dredge and the Maddened Dredge Savages while the nukers should try and take out the Dredge Gardeners and the Maddened Dredge Seers.
- For this pull and all future pull, the puller should be a veteran trapper. It is poor pulling to get the enemy group trickling one by one. Instead, the trapper should try and bunch them up (using Whirling Defense to stay alive) so that they approach the traps together. It renders the traps useless (and puts a lot of strain on the monks) to have one enemy come first and set off all the traps and then have the rest of that enemy's group arrive unmolested.
- After the Dredge patrols are destroyed, kill the Twisted Bark and then set up near the top of the flight of stairs. Pull the Dredge group there.
- After destroying that group, set the traps at the open gate (without stepping in) and then when ready, step in to bring the two running patrols (one will come from each side). Pull them through the traps and then finish them off. Proceed to kill the Guardian Serpent.
Room 2:
- Non-trappers should stay outside of the health degeneration effect (roughly where the dark shadow ends). The trappers place their spirits out of degeneration and then setup around the corner. They should proceed to pull the two large Dredge groups and the one Greater Blood Drinker pop up group.
- The Bipper needs to focus mainly on the monks in this room. They will be spamming Heal Party.
- The nukers should step in to the degeneration area to nuke and then step out.
- When the path to the Twisted Bark is clear, the nukers should go in and kill it quickly.
- Trappers are extremely effective at neutralizing the Greater Blood Drinker in an open battle. Depending on how proficient the party is, they can pop out one or more of the Blood Drinker groups hidden in the room and just take them head on. Using Whirling Defense, exploiting the face that the Blood Drinker use mostly slow casting necromancer skills, and because they like to target softer targets in the back, the trappers will be able to trap almost unmolested under their feet. This will keep the Blood Drinkers off-balance (getting knocked down by Spike Trap, running from AoE trap effects) and will actually make the job of the monks much easier. At this stage of the fight, the Bipper should keep the monks and nukers well-fed.
Room 3:
- The trappers should trap heavily (and in mutiple layers) at the gate and then just pull both plant groups (the Burning Brushes, Brooding Thorns, and Uprooted Malices). Fire nuking and Flame Trap are extremely effective in wiping out these groups.
- The party should then proceed to all hide under the bridge. Traps will work under the bridge and damage those above it. EoE is very important in quickly taking out the Dredge who are not on the bridge.
- The bipper should use Consume Corpse to get up on the bridge and open the two locks.
Room 4:
- Trappers should set their traps at the start of the bridge. The ritualist should set up his/her spirits as closely as possible to the beginning of the bridge to provide protection to the puller as far as possible.
- A puller should pop the first group of Thorn Wolves (about 1/4 of the way throughthe bridge) and finish them off.
- Re-stablish traps and spirits then get the second group of wolves. The second group (at the center of the bridge, where the two lamps are) is the hardest to pull, because the puller would be so far from the healers and because the pulling distance is so long that they sometimes do not follow all the way back to the traps. The party should just be patient. Using Recall in this situation greatly helps (see Variations below).
- After this group is cleared, the party should move up to the two lamps and setup traps and spirits there. The puller should then proceed to pull the third group of wolves (once again, Recall being very useful).
- Finally, the party should re-establish traps (in two layers) and then the puller should proceed to the end of the bridge where the Vampires and Thought Stealers will pop up. Recall would work perfectly as they will run to the party anyway even if the puller is gone.
Room 5:
- This area is filled with Thorn Wolf pop-ups and a veteran in the party needs to let them know where to pause for traps at each juncture.
- At each point, traps should be set up (special emphasis should be made on a few Dust Traps near the casters) and the ritualist spirits have to be up to prevent disaster.
- Monks should use Hex Breaker (see Variations below) when possible to prevent themselves from getting shrouded. Preventing this hex is much better than trying to remove it while being unable to cast for several seconds.
- The party will proceed past the left bridge then go right, then straight to the green area, then right and cross a long bridge. At that point they should turn right sharply (passing under the bridge they last crossed) and head straight till they get to the Guardian Serpent. All along this path there are Thorn Wolf pop-ups that need experience to tell where they will appear.
Room 6:
- One member should wait while the rest of the party should go in, destroy the Twisted Bark (a couple of players staying behind it will prevent it from running the wrong way out of AoE). The bipper can give a little extra boost of energy if needed.
- After this, the party should destroy the Guardian Serpent, cross the bridge, then signal to the waiting member to catch up to them.
Room 7:
- The trappers should set traps just before the gate and then pull the large group of plants and take them out.
- Trap at the gate now and then pull the other group of plants that is near the Guardian Serpent.
- If the elementalists can damage a Brooding Thorn enough (not a Burning Brush because they will run away and around the back to try and attack) that the Twisted Bark comes to heal it with Healing Touch, then the party can have a shot at killing it without having to fight the Wardens.
- If this does not work, the trappers should setup past the gate and around the corner to the left (so that the casters are outside of Sheer Exhaustion) and then they should proceed to pull the Warden groups.
- When fighting the Wardens, it's important to be conscious of spacing and movement. The casters should not stand next to each other (making themselves vulnerable to group interrupttion via Cry of Frustration). The nukers should focus on the Maddened Song Wardens and Maddened Mind Wardens while the trappers should take out the melee wardens.
- After the Wardens and plants are destroyed, the party should kill the Twisted Bark to be exhaustion-free in the next area.
Room 8:
- Traps should be laid at the gate (the top of the stairs) and the spirits should be placed around the corner and away from where the party members will be standing, this is to prevent Churning Earth from destroying them.
- The presence of EoE is extremely useful in wiping out large numbers of Wardens quickly.
- All party members should be ready to kite to avoid damage from Churning Earth that is cast by Maddened Earth Wardens.
- After the first few group are pulled to the gate and destroyed, the party can go in and clear the stationary plants. The final two Warden groups will require the same scheme of trapping and pulling.
Room 9:
- The party should name one party member who will stay behind the gate no matter what transpires. This is to prevent the entire party from stepping past the door during the heat of battle and getting locked in with a few pop-ups of Thorn Wolves. the ideal candidate for this should be the ritualist who will be laying his/her spirits just behind the gate at all times.
- The trappers should generally use the gate as their trapping point and pull back to it. Occasionally, a few monsters will be stuck or refuse to follow all the way back in which case they can move the traps a little bit ahead (but staying within the range of the protective Binding Spirits).
- When the door finally opens on the other end, then the full party can advance.
Room 10: Urgoz's Inner Chamber
- The nukers and trappers should quickly go in and kill the Twisted Bark causing the life degeneration. Monks should spam Heal Party.
- As Urgoz begins his monologue, trappers should setup in the middle of the bridge and then pull enemies to it.
- It is advisable to not only destroy the Guardian Serpent in the way, but the one to the left which will be near where EoE will be placed to kill Urgoz.
- The EoE trapper should go in and to the left away from Urgoz. With experience he/she will know exactly where to place EoE so that Urgoz is in its range. If EoE is placed too close, then Explosive Growths will spawn next to it and destroy it. To check that EoE is in the right place, a party member (preferably armed with Hex Breaker) should run in and stand next to Urgoz and see if EoE is showing up in the Effects Monitor.
- Once EoE is set up and Urgoz is clearly in its range, the nukers and trappers (other than the EoE trapper) should go in and start attacking him, being mindful not to stand in one spot for more than one skill usage. As soon as his health is down to 90%, EoE will start damaging him with the death of the growths.
- Once EoE starts kicking in, the nukers and trappers should just run around Urgoz in circles and let the death of the Explosive Growths destroy him. The bipper and the healers should stay on the ramp and spam heal party if needed. In less than a minute, Urgoz will kill himself.
[edit] Variations
- All the party roles above have been listed in a flexible manner without a secondary profession. However, when possible, party members should consider either going with monk as a secondary profession to bring Rebirth for crisis recovery, or to go with mesmer as a secondary profession and bring Hex Breaker which makes surviving in the final battle against Urgoz extremely easy.
- Monks could experiment with elementalist as a secondary profession to be able to use Glyph of Energy in areas where they are under the influence of Sheer Exhaustion.
- One of the trappers could bring assassin as a secondary profession and use Recall on a party member before pulling enemies. This is especially useful on the Fire Flower bridge where many pullers die under the pressure of the Fire Flowers and the Thorn Wolves. By canceling Recall, they will be teleported instantly to safety and can then proceed to pull the Wolves (which would then be popped) using a bow.

