User:Harry138/builds/ranger/pveonly
From GuildWiki
[edit] R/D Enchanted Forge Runner
This build uses Ranger stances to maintain high average speed and Dervish enchantments for support to run to various places, particularly from Beacon's Perch to Droknar's Forge.
[edit] Attributes and Skills
| Attribute Rank | |
|---|---|
| Expertise | 12 + 1 + 1 |
| Earth Prayers | 11 |
| Wilderness Survival | 5 |
| Wind Prayers | 4 |
 |
 |
 |
 |
 |
 |
 |
 |
[edit] Equipment
[edit] Armor
- Full Sentry's Insignia (+10 armor while in stance)
[edit] Runes
- Rune of Vigor
- 2 Attunement runes (+2 Energy x 2 = +4 Energy)
- Rune of Restoration
Note: Against getting Crippled a Rune of Restoration is highly recommended for surviving traps. It shortens Crippled and Bleeding by 20% which is considerable.
[edit] Weapons
- Crafted or collector's staff (20% chance of half spell recharge) with +5 energy staff head and any enchantment lengthening mod
[edit] Usage
[edit] General
- Use Dodge, Zojun's Haste, and Storm Chaser for running
- Use Fleeting Stability to run past enemies with knockdown (e.g. Frost Wurm, Siege Ice Golem, Tundra Giant, Azure Shadow)
- Use Vow of Silence (6 seconds with any enchantment lengthening mod) to pass through monsters with snares (Ice Imp, Siege Ice Golem, Stone Summit Heretic)
Very important: Timing is very important here. Make sure Vow of Silence lands before the snare hexes do! If you don't, Vow of Silence will prevent you from removing the hexes because you can't cast spells!
[edit] Lornar's Pass
[edit] Wurm Tunnel
- Cast Fleeting Stability before entering the Wurm spawning zones. Avoid getting knocked down while you cast it.
- Recast Fleeting Stability shortly before entering the tunnel and cover it with two other enchantments. Alternatively, you can cast Vow of Silence and Mystic Regeneration as non-strippable cover spell here.
[edit] Siege Ice Golem Spots
- Recast Fleeting Stability if time permits.
- Just after entering the casting range of the Ice Golems, cast Vow of Silence to give you 6 seconds of snare-hex-free running.
- Stay away from Pinesouls at all costs. One Barbed Trap will be fatal to you.
Note: In case of getting crippled, try to uphold Fleeting Stability, Mystic Regeneration, and Vow of Silence. Do not aggro any further group, and tank out the damage. Do not forget to uphold your stances as well, as they add extra protection, and a good chance of avoiding attacks.
[edit] After the Troll tunnel
- Cast Fleeting Stability at the curve after the bridge. Keep away from Grawl Crones as much as possible to avoid them stripping your Fleeting Stability with Chilblains.
[edit] Counters
- Lack of condition removal.
- With a Rune of Restoration Crippled and Bleeding can be reduced to tankable status, though.
[edit] Variants
|
|
|
 |
|
|
 |
|
 |
[edit] Template
 |
AiSyliZq2KPpGW5xJ/qeFvtX2LA |
[edit] External Links
- Video of this run (download, good quality) (Filefront)
- Video of this run (streaming, low quality) (Google video)
[edit] R/D Impurity Farmer
This farming build relies on Ranger evasion stances while spreading conditions to enemies and healing yourself for each enemy under a condition.
[edit] Attributes and Skills
| Attribute Rank | |
|---|---|
| Expertise | 9+2 |
| Wilderness Survival | 9+1+2 |
| Scythe Mastery | 12 |
 |
 |
 |
 |
 |
 |
 |
 |
- Optional slot can be filled with an additional attack skill such as Eremite's Attack or Troll Unguent for extra defense.
- Other good choices are Veil of Thorns or Aura of Thorns as they will ensure all enemies are always suffering from a condition. This is a must for this build as Reap Impurities is your main healing skill.
[edit] Equipment
- Radiant or Sentry armor
- Any Scythe will do the trick, best is Zealous, but if you cannot afford, take any max damage Scythe or Pre-Order one. Suli's Scythe is a good choice.
[edit] Usage
- Put on Apply Poison.
- Run in and aggro a mob.
- Pull back a bit so they all bunch up infront of you.
- Hit one of your stance , then swing your scythe once.
- Upon the 1st hit, use Reap Impurities followed by Victorious Sweep.
- When your stance ends, use another one.
- When the attacks recharge, use them immediately.
- Rinse and repeat.
[edit] Counters
Monsters using attacks that knock down, that can't be blocked or that knock down if blocked (such as Irresistible Blow), anti-melee hexes like Spiteful Spirit or Insidious Parasite, anti-melee conditions (Weakness, Blind and heavy degeneration).
[edit] Variants
For low-level monster farming, like Ettin or Totem Axe, use Reaper's Sweep and instead of Escape use Dodge/Zojun's Haste, so for more self-defense, put in Troll Unguent.
[edit] Notes
- This build originated from Arashi located at The Ranger's Beacon.
- This build is capable of farming many areas and can even solo Djinns, Ettins, Jade Knights, Vermin, possible Mountain Trolls and few other, depending on how good you are. Having better scythe is useful, too.
[edit] See also
- Original build
- Video containing some footage of the build Footage of this build starts at 2:07 and ends at 3:00 in video.
[edit] R/Me Ettin Solo
This build uses the Elite skill Fevered Dreams and a number of conditions inflicted through your pet to deal damage to multiple Ettins in Nebo Terrace, while preventing them from healing.
[edit] Attributes and skills
| Attribute Rank | |
|---|---|
| Beast Mastery | 12 + 1 + 3 |
| Expertise | 8 + 1 |
| Illusion Magic | 9 |
 |
 |
 |
 |
 |
|
 |
 |
For Optional try one of the following:
- Troll Unguent if you're having problems with your own health.
- Symbiosis to give your pet a boost of health while under the effects of Ancestor's Visage.
- Call of Protection to give your pet damage reduction.
- Otyugh's Cry for additional armour (and to gain help from any Lynx in the area).
- Toxicity Recommended for anyone who has access to the skill, cause an extra -2 health degeneration to any who are poisoned and are in range of the spirit.
[edit] Equipment
- Druid's Armor for an extra energy bonus.
- Any staff of offhand that provides max energy, Half Illusion Magic Recharge is also useful.
- A Longbow is very useful if you wish to keep out of danger.
- The best Vigor Rune you can afford.
- A Level 20 pet (Hearty is recommended, but any will work).
[edit] Usage

The objective of this build is to inflict bleeding through Feral Lunge and poison through Poisonous Bite to multiple enemies at once using Fevered Dreams. While using Primal Echoes and Ancestor's Visage to prevent the Ettin's from using Healing Signet.
Start from Beetletun and head east. You will encounter a number of Mergoyle's. These are good practice as their main way to deal damage is Mind Wrack and Spirit Shackles, which won't matter to your pet as he has no energy. Dispose of these through normal pet attacks coupled with your staff/wand attacks, or through conditions.
Keep heading east until you encounter two groups of two Tengu each. These may cause you some problems and this is where Troll Unguent comes in handy, although it is not necessary to beat them. (You may also want to switch to armor without any Superior Runes for the HP bonus.) Go for the Wild first, as he will inflict major health degeneration. It's almost impossible to avoid his first Conjure Phantasm, which will give you a -5 health degeneration for some time. Pull out your longbow and fire one shot off at the Wild. This should trigger the pet to run toward him. As soon as he does, take a few steps back so that both of them will go for your pet. They will die pretty easily if you poison them and then just use normal attacks. If your pet is taking major damage use Comfort Animal, which should heal him for about 33% of his health (depending on what type of pet he evolved into).
Next we move on to the Ettins. These are actually surprisingly easy as long as you cast the right spells/skill at the right times. First of all, you'll want to cast Primal Echoes somewhere safe so the Ettins won't destroy it. Then pull out your longbow and fire one shot at the nearest Ettin. When they start running towards you, your pet should run out to them. Take a few steps back to ensure they go for the pet. As soon as the 2 or 3 Ettin's are all focused on your pet, cast Ancestor's Visage on your pet. This will ensure that the Ettin's will not be able to use Healing Signet, as it will cost them 10 energy to do so. Next, cast Fevered Dreams on the Ettin that your pet is attacking. Follow this up with Poisonous Bite and then Feral Lunge. This will give a total health degeneration of -7 (14 health per second) to not only one Ettin, but all of them (thanks to Fevered Dreams). Continue to re-apply Fevered Dreams followed by your conditions, and also Ancestor's Visage to ensure that they don't heal. Use Comfort Animal when your pet's health is low, and, if you brought any skills that increase the armour of your pet, now is the time to use them.
This build can take down a group of 3 Ettins in less than a minute if done correctly, and not only is it effective but its fun! Enjoy.
[edit] Counters
There are no real counters to this while farming Ettin's. The only thing to watch out for your pet's health dropping too low. If he dies, you have no protection and low health due to the Sup Runes.
[edit] Variants
See Optional.
[edit] Notes
This build was actually made while I was messing around, it was going to be a novelty build, but then I realized how effective it was.
[edit] See also
[edit] R/Me Famine Farmer
The Famine Farmer is a Ranger build meant to easily solo many bosses in the Factions and Nightfall campaigns by using Famine combined with energy denial provided by Mesmer skills.
[edit] Attributes and skills
| Attribute Rank | |
|---|---|
| Wilderness Survival | 12 + 1 + 3 |
| Inspiration Magic | 10 |
| Domination Magic | 8 |
 |
 |
 |
 |
 |
 |
|
|
[edit] Equipment
- Druid's Armor, with a Rune of Superior Wilderness Survival and a mask with +1 Wilderness Survival.
- For the weapon set I suggest both of the following:
- A weapon that provides Activation Time and Recharge modifiers for Inspiration magic, such as the Handsmasher.
- A flatbow or longbow on which the modifiers do not matter (this bow is merely to pull some bosses with).
[edit] Usage
- Run to the boss and pull him into a location where he and his mob cannot hit you with their attacks (Behind a tree, around a ledge, etc).
- Set Famine and put Spirit Shackles, Spirit of Failure, and Empathy on the boss. Refresh these as needed.
- If the boss can cast spells on you, keep Troll Unguent up during this time.
- Once the boss is out of energy due to Spirit Shackles begin to spam Mind Wrack on him in addition to the hexes.
- Most bosses fall very quickly after their energy is gone, in under a minute.
[edit] Counters
- Because of the nature of how the build works it is only effective against bosses that use ranged attacks and have poor spell damage.
[edit] Variants
- Replace Storm Chaser with Illusion of Haste and allocate some attributes into Illusion magic if the threat of being Crippled on the way to the boss is high, as in Arborstone (Explorable)
- Drop Troll Unguent and/or Whirling Defense for more pressure if you know you won't need them for the run.
- Some replacements include:
- Serpent's Quickness (spam Mind Wrack faster)
- Wastrel's Worry (more spammable damage)
- Backfire (for spell caster bosses)
- Energy Tap (for quicker draining)
- Diversion (for Zarnas Stonewrath, to disable his Stone Daggers)
[edit] Notes
This build has been used to farm the following bosses:
 Razortongue Frothspit (Pull his group to ledge infront of
the Shrine and use Empathy to kill the Creeping Carps under the Priest's heals) (UPDATE: You can
now merely kill his mob with henchmen then flag them off)
Razortongue Frothspit (Pull his group to ledge infront of
the Shrine and use Empathy to kill the Creeping Carps under the Priest's heals) (UPDATE: You can
now merely kill his mob with henchmen then flag them off)
 Chkkr
Brightclaw (Be watchful of the Undergrowth/Dragon Moss patrol that goes by the stairs
every minute or so)
Chkkr
Brightclaw (Be watchful of the Undergrowth/Dragon Moss patrol that goes by the stairs
every minute or so)
 Zarnas
Stonewrath (He commonly has a huge energy pool and spams Stone Daggers
instead of attacking with his wand. Because of this it is quicker
to take Backfire on
this run and kill him that way, noting that he will not kill
himself through Backfire so you have to use Empathy on him when he is low. Diversion can
also work, as Zarnas will resort to attacking when his Stone
Daggers is disabled. His energy can be drained quite easily
after.)
Zarnas
Stonewrath (He commonly has a huge energy pool and spams Stone Daggers
instead of attacking with his wand. Because of this it is quicker
to take Backfire on
this run and kill him that way, noting that he will not kill
himself through Backfire so you have to use Empathy on him when he is low. Diversion can
also work, as Zarnas will resort to attacking when his Stone
Daggers is disabled. His energy can be drained quite easily
after.)
With the Advent of Henchman Flagging (killing the mobs around the boss, then sending them off your screen to solo the boss and get the drop) there are probably many more bosses that can potentially be farmed with this. So far the following have been tried and were successful:
 Chidehkir, Light of the Blind
(Use Ignorance for faster kill, sometimes his energy regen is
unnaturally high and Shackles isn't enough to keep him down)
Chidehkir, Light of the Blind
(Use Ignorance for faster kill, sometimes his energy regen is
unnaturally high and Shackles isn't enough to keep him down)
[edit] R/Me Feverish Archer
This build is meant only for PvE and is used to take full advantage of the conditions a ranger is known to have access to through the use of the Mesmer hex Fevered Dreams with minimal attribute points invested in it. By adding conditions to the hexed fleshy target (like poisoned, bleeding, crippled, and more) will then spread the conditions to an area of enemies if not the entire enemy mob severely hindering them at the least.
[edit] Attributes and Skills
| Attribute Rank | |
|---|---|
| Marksmanship | 10 + 1 + 2 |
| Wilderness Survival | 9 + 1 |
| Expertise | 11 + 2 |
| Illusion Magic | 4 |
|
|
|
 |
 |
 |
 |
|
 |
[edit] Equipment
- Druid's Armor or it's equivalent in function.
- A Recurve Bow is best for hitting your target if moving though a Shortbow is recommended if you use Screaming Shot and are having difficulty determining the effective distance for the skill to work properly. Any bow used should have a Poisonous, Crippling, or Silencing bow string depending on what condition you would like to last longer.
-
- Rotwing Recurve Bow is an example of a unique weapon that will work well.
[edit] Usage
- Start by using Apply Poison before battle but do not attack until the next step is completed.
- Quickly pick a centrally located or grouped up target (preferably one that isn't about to die or that may have some staying power) for the most effect (while at a safe distance to avoid interruption) and cast Fevered Dreams on it (it is very important to cast this on the target before any conditions are applied from yourself or allies as Fevered Dreams will only spread conditions that are not already on the target). Also, if you trust your team, calling out the specific target you are hexing may be a good idea so that that creature is not killed before you can apply all conditions/before Fevered Dreams can recharge.
- Fire off the appropriate follow up attack that coincides with the target profession to Poison and add another condition to them and others in the area (i.e.: interrupt a caster with Concussion Shot to spread dazed, Pin Down a melee class to add crippled, Screaming Shot/Hunter's Shot any target for additional damage and health degeneration through bleeding and to act as another cover condition, etc.).
- Continue with your next condition adding attack to stack more pressure on the enemy mob.
- If properly executed you should be able to add poison (-4 degeneration), bleeding (-3 degeneration), dazed, and crippled to the entire opposing mob within ~3 shots as Fevered Dreams spreads conditions to all of your foes in the area of the target though only if not experiencing those conditions when first hexed.
- Once your condition spreading job is completed you can continue using Screaming Shot/Hunter's Shot to add some minor add on damage to help finish any remaining enemies or target any stragglers to add poison or other conditions if they were out of the effected area.
- Concussion Shot should be used sparingly as it's energy cost is still high even with the Expertise cost reduction and how large a cost many of your other skills are. If there is a lack of enemy casters in the enemy mob it's best to not use it and spread other conditions instead until you find a mob with more casters in it (unless they are key targets and need to be stopped).
- If a condition is about to wear off the current hexed target it's best to wait for it to expire before reapplying it so that Fevered Dreams can spread it again. With the low attribute points in Illusion, Fevered Dreams will wear off about the same time as many of your conditions, thus allowing you to either choose another target, or re-apply to the same target, the entire process again.
[edit] Counters
- Non-fleshy targets (though some conditions can still be applied - like crippled or blindness)
- Blindness (See below variants to counter this)
- Hex removal (See below variants to counter this)
- Evasion/Blocking (it's best to avoid targets that use this ability often or are expected to and instead spread the conditions to them through Fevered Dreams on another easier to hit target)
[edit] Variants
- If entering a zone that has a lot of hex removal then bringing a long lasting, quick recharging, yet inexpensive cover hex like Mind Wrack may help even if it has no other use than to cover Fevered Dreams.
- Consider bringing Phantom Pain for Deep Wound. Just be sure to use this before you use Fevered Dreams so that Phantom Pains ends first and the Deep Wound is spread. However, when using this skill be careful about energy management since Expertise will not reduce its cost.
- Consider bringing Serpent's Quickness to help negate the rather long recharge on most of the skills which is nice considering most PvE battles don't last very long. And, if your target hexed by Fevered Dreams dies too early, this helps ensure that in longer battles you are able to switch targets more effectively.
[edit] Beast Master Variant
| Attribute Rank | |
|---|---|
| Beast Mastery | 12 + 1 + 3 |
| Expertise | 12 + 1 |
| Illusion Magic | 3 |
|
|
|
|
 |
 |
|
|
 |
This is an interesting twist on condition spreading concept. It sacrifices some survivability for more damage and more degeneration but loses Blind and Daze in the process. The game mechanics sometimes make this awkward to use, but it is a viable variant nonetheless.
[edit] Two "Optional" Slots
- Slot 1: Preferred: Screaming Shot
-
 Hunter's Shot or
  Screaming Shot for a cover
condition and/or added degeneration through bleeding (if both
skills are available Screaming Shot is preferred for ease of
application and more damage to the target but Hunter's Shot is
preferred if having trouble with managing energy or if the player
does not have access to Nightfall skills).
Screaming Shot for a cover
condition and/or added degeneration through bleeding (if both
skills are available Screaming Shot is preferred for ease of
application and more damage to the target but Hunter's Shot is
preferred if having trouble with managing energy or if the player
does not have access to Nightfall skills).
- Slot 2: Preferred: Throw Dirt
-
 Throw Dirt to blind though you should not be at
melee range. Good default emergency defense skill and can be used
almost anywhere for your own defense or others.
Throw Dirt to blind though you should not be at
melee range. Good default emergency defense skill and can be used
almost anywhere for your own defense or others. Pestilence can help further the
theme of spreading conditions because, since the conditions are
re-applied their timer is restarted. Especially good if fighting
foes that attack in large numbers (ie: minions, scarabs, afflicted,
etc.). However, please note that this will also spread conditions
to fellow party members so be very cautious if you choose to use it
and make sure to warn teammates. Not recommended for most
areas.
Pestilence can help further the
theme of spreading conditions because, since the conditions are
re-applied their timer is restarted. Especially good if fighting
foes that attack in large numbers (ie: minions, scarabs, afflicted,
etc.). However, please note that this will also spread conditions
to fellow party members so be very cautious if you choose to use it
and make sure to warn teammates. Not recommended for most
areas. Antidote Signet primarily to
remove Blindness first and foremost (removing Poison or Disease as a distant second use) but only if
expecting it to happen. Not recommended for most areas.
Antidote Signet primarily to
remove Blindness first and foremost (removing Poison or Disease as a distant second use) but only if
expecting it to happen. Not recommended for most areas. Epidemic in case Fevered Dreams is removed prematurely or
interrupted which will spread conditions to a smaller area but at
least allow you to still spread the conditions at your disposal
until Fevered Dreams is available again (though Fevered Dreams does
have a relatively fast recharge time). Or this can be used to
spread conditions after you are ensured they are applied first.
Not recommended for most areas.
Epidemic in case Fevered Dreams is removed prematurely or
interrupted which will spread conditions to a smaller area but at
least allow you to still spread the conditions at your disposal
until Fevered Dreams is available again (though Fevered Dreams does
have a relatively fast recharge time). Or this can be used to
spread conditions after you are ensured they are applied first.
Not recommended for most areas.
[edit] Notes
- Condition removal from the enemy isn't a big problem as most conditions can be reapplied with little to no difficulty.
- Teaming up with allies that add more conditions (like Deep Wound, Blindness, Weakness, Disease, or Burning) or a Fragility caster can make this build much more effective, especially if they follow your target calls to attack the hexed target.
[edit] R/Me Fissure Forest Farmer
This is a Ranger/Mesmer build designed to run to, and then farm the monsters in Forest of the Wailing Lord in the Fissure of Woe.
[edit] Attributes and skills
| Attribute Rank | |
|---|---|
| Expertise | 8 + 1 |
| Wilderness Survival | 12 + 1 + 1 |
| Marksmanship | 8 + 1 |
| Inspiration Magic | 7 |
|
|
 |
|
 |
|
|
 |
 |
Optional slot variations:
- Dodge Used as a secondary running skill.
- Dual Shot/Forked Arrow Used to kill faster.
- Ether Feast Used if you are having trouble taking down the Armored Cave Spiders.
- Favorable Winds This will increase damage and help your arrows move faster
- Distracting Shot Used to relieve pressure from the Spider's Apply Poison and Healing Spring as well as disable the Spirit Woods' Troll Unguent for an extra 20 seconds.
[edit] Equipment
- One or more of the following armor
- Studded Leather Armor Reduced damage from Spirit Shepherd.
- Druid's Armor Extra energy.
- Explorer's Armor Extra health.
- Longbow/Flatbow.
- Shortbow for convenience.
- Recommended. Drago's Flatbow or something equivalent.
- Recommended. Bow from Blankets for the Settlers quest, modified with a Poisonous Bow String and Bow Grip of Defense which is commonly used when farming the forest, do not use this with Spirit Shepherds as it has the properties of a hornbow and does not have enough range.
[edit] Guide
[edit] Running To The Forest
In order to get to the forest in Fissure of Woe, you'll need to do a couple things. First off, when you first enter FoW, back up to the wall. This will (almost) ensure that you don't aggro the Shadow Army and get Rastigan the Eternal killed, thus kicking you back to your port of entry. Now, you'll need to run to the right, staying along the back wall. You will more than likely aggro the shadow army closest to you on the right - make sure to cast Storm Chaser (or Dodge if you brought it). This will help you get past them and if you keep going along the wall, you will just barely miss aggro'ing another group of 3 from the shadow army. After this you'll need to leave the wall and run to the left, behind the 3 shadows and towards what looks like an open spot. Be careful as many patrols are close by, and it is advised not to aggro them.
After you have run a little ways, you will be on a plateau in between 2 valleys. Stay on the plateau all the way until it ends. Near the end, a Shadow Beast will appear. This is a good time to hit Dodge/Storm Chaser because this Shadow Beast and other nearby patrols will pursue you longer then you may expect if you don't get out of aggro range quickly. Continue running straight until you hit a large cliff wall. Stop here (as long as no monsters are following you) and heal. After you get here, turn right and run along the wall until it bears off to the left. There is a little straight here that you will want to take. You will most likely aggro another group here, but hitting a running skill should cause them to lose interest quickly. Run along the wall again until it juts out to the right. Rest here again, letting your running skill recharge as well. Now comes the tricky part. The 3 shadows up ahead aren't as big a deal as the skeletons at the bottom of the hill to your right. If these two groups are far apart, you may be able to run through the shadows and by keeping left, reach a very tiny ledge that will allow you to rest before taking on the skeletons. If not, you will need to try and aggro the skeletons into the shadows, as they will fight each other, letting you get away. To do this, run towards the skeletons at normal speed. Shoot one of them with an arrow, in order to aggro them, then draw them up the hill, running with your run skill activated. This is crucial because if you stay within range of the spell caster in their group, you could be hit with Deep Freeze, and not being able to move in this part of the run equals a long walk off a short pier. Once they start fighting or you have run around the skeletons, stay left, hugging the wall at the bottom of the hill. Here you can rest again, letting everything recharge and waiting for a patrol of skeletons to separate from the larger group ahead of you. You can either try and stay on the wall, sneaking past the larger group; or you can wait for the patrol to leave, and run around the skeletons. It really depends on how they spawn. Either way, once you are past that group, you are effectively in the forest.
[edit] Farming The Forest
Now that you are in the forest, you will see a group of 3 Spirit Shepherds and nearby, 2 Spirit Woods. Use Favorable Winds if you brought it, hit Mantra of Lightning, Kindle Arrows, swap to your Longbow/Flatbow. Target the nearest Spirit Shepherds and use Poison Arrow, if they start to cast any spells, turn around, run and lose them. Do not let them come close, as they will use lightning spells and inflict high damage and slow you down. You will also be required to be on the same height level otherwise you will be to far away to fire and forced to move inside their range to hit you with spells or you are to high and the Spirit Shepherds will move closer to get into range. It is recommended to use Poison Arrow on all of the Spirit Shepherds to do as much damage per second and quicken the battle as well as trigger the Edge of Extinction effect which the Spirit Woods put down. Keep Mantra of Lightning and Kindle Arrows up at all times.
Continue forward and 3 Rock Borer Worms will pop up to your right and another 1-3 Worms will pop up a little further on the left side. Use Mantra of Lightning, Kindle Arrows and Poison Arrow. Poison the first 3 Rock Borer Worms, when they reach 85% of health they will activate Lightning Reflexes which lasts around 5 seconds.
Move onto the Spirit Woods. Hit Physical Resistance and Kindle Arrows and shoot one of them with Poison Arrow, when their health reaches 75% they will begin to use Troll Unguent, use savage shot and interrupt this, now use your Troll Unguent and continue to attack, after 10 seconds the Spirit Wood will try to use Troll Unguent, again interrupt this.
If you wait around where the Spirit Woods died, a patrol of 3 Spirit Shepherds and a Spirit Wood will move close to this area. Put Physical Resistance on as the Spirit Wood will do more damage over time and quicky poison all the Spirit Shepherds, kill them and finish off the Spirit Wood. Keep Troll Unguent on from the beginning.
Slowly move up the road until you see a split in the road just before this area 3 Armored Cave Spiders will appear. These are considered to be the most difficult monsters to kill for this run and require a bit of timing and practice to kill. Run back out of the spiders aggro range, use Physical Resistance, Kindle Arrows and Poison Arrow. Use Troll Unguent before you initiate only one of the spiders. While it is possible to take on more then one, it decreases your chance of successfully completing the run. If you can safely get within Shortbow range, proceed as this will increase your chance to interrupt the spiders Apply Poison and do more damage over time. Armored Cave Spiders use Healing Spring which is an easily interruptible trap, using a normal bow attack will interrupt this, if you think you may miss use a Savage Shot. If you see the Armored Cave Spider use Healing Spring while you are activating Troll Unguent cancel this and quickly shoot a Savage Shot. If a Healing Spring gets activated by a spider, pull out a Longbow and step backwards so that it follows out of the Healing Spring. The spider will interrupt your healing skill (Troll Unguent) with Savage Shot, if your health drops below 20%.
After you have eliminated the spiders, go left and there will be 2 groups of 3 Shepherds walking as one group. Note there is a small ledge you walk up into the area where they walk and will decrease your Longbow range. Do not begin the battle if they are walking towards you, as they will have walked close enough to cast spells because of the flight time it takes for the arrow to reach the Shepherd. If you find getting the height correct hard, when they are furthest away from you, run past where they walk and move behind a rock cliff on the far side as this area is relatively the same height as the area where the Shepherds walk on.
Proceed along the path after killing the group and trigger a group of 3 Rock Borer Worms to pop up, after killing these move up the cliff and kill the Spirit Woods that you have passed.
At this point you have two options, pass the group of Skeletons standing on the edge of the bridge or go back out the way you came and proceed around the back way. The later being the safer options but longer. Refer to the Fissure of Woe page for a map.
Past Skeletal Bridge Method
Aim across to the other hill from the current hill were you killed
the recent Spirit
Woods and kill all the reachable Spirit Wood and Spirit
Shepherds. You will see a bridge with Skeletons standing on it.
Do not go over the bridge. Activate your running skill, and
run through them around the ledge to the other side of the small
hill that you just killed the Shepherds on. Do it quickly else they
will use Wild Blow
and end the stance. Now that you've cleared the hill you don't need
to fear aggro'ing the Spirit Mobs. Once you lose them a Spider will
pop right next to the river to your left. Swap to your Shortbow and kill him. Beyond
you there should be a group of Spirit Shepherds and Spirit Woods combined,
one group of Woods on the hill, and 1-2 groups of Shepherds only.
Hug the ledge to your right and shoot the Shepherds with your Longbow. Kill them and go
up the hill to your right. Kill the other group of Shepherds. Now
go back for the combined group of Shepherds and Woods. Use Physical
Resistance as it will balance the damage. Kill them all but
watch out as where they stood a group of 2 Spiders will pop. Don't
attack them, kill the Woods on the hill first, then you have place
to run away to heal and try to separate them. Kill them, and go
with the road.
Another Spider will probably pop up, but he won't be a problem for you. You'll see a group of Spirit Woods and Spirit Shepherds. They will be far enough from each other so you won't have a problem killing the Woods. After you kill them and go forward a group of Rock Borer Worms will pop as well as 2 Spiders. The Worms won't be a problem, but the Spiders are hard to separate. You might want to separate them or to attack them together. Your choice. When you kill them and the Worms, go to the Shepherds group and kill them too.
Back Door Method
Run back around and move north to the northern entrance, dodge all
the skeletal groups. There are 2 groups of popup skeletal rangers,
Skeletal
Impaler, along the shortest path but may be bypassed by
activating a running skill and losing them. Kill the first 3 Spirit
Shepherds, again attacking them as they walk away. Continue forward
after killing them and trigger the 3 popups of Rock Borer Worms.
You are now able to continue as best suits you in this area, using
the above methods to kill the enemies. In this area you will find
further popups of Rock Borer Worms and Armored Cave Spiders, stay
alert, scan areas and prepare to run.
[edit] Variants
- Replace Savage Shot with Distracting Shot for a longer interrupt.
- Replace Poison Arrow with Burning Arrow, and Kindle Arrows with Apply Poison, Use either a Fiery bowstring or bring Conflagration to convert damage into fire.
[edit] Template
Poison Arrow Version
|
|
ASRR4uImzYQ5YzYVfcfngkA |
Burning Arrow Version
|
|
ASRx4uKOz6obfMzGpjvJBkEOOA |
[edit] R/Me Underworld Speed Trap Solo
This build is designed to farm the Underworld as a solo ranger trapper. The build uses the skill recharge bonus and energy given by the Nature Rituals and Serpent's Quickness to spam as many Dust Traps as much as possible.
[edit] Attributes and Skills
| Attribute Rank | |
|---|---|
| Wilderness Survival | 12 + 1 + 3 |
| Expertise | 12 + 3 |
| Beast Mastery | 3 |
 |
|
|
 |
 |
 |
 |
|
[edit] Equipment
- Full Druid's Armor or equivalent in function
- Two Runes of Attunement
- The best Rune of Vigor you can afford (but at least a major)
- Any staff with 15 or 20 energy bonus with + 7 armor against physical damage
- For extra protection when pulling you could take a replacement armor piece for one of those with a superior rune in it and a staff with +60hp. This will allow you to survive two hits from a Bladed Aatxe.
[edit] Usage
This build is for experienced trappers who want more challenge and get all the loot for themselves. It is hard at first but with practice, becomes pretty easy to handle. The idea of the build is to keep the mobs on the Dust Traps for their full activation time. This is difficult as AoE damage causes the enemy mobs to flee.
- First, choose your trapping spot near an angle or any small confined space (e.g. in the Chamber, just under the stairs, close to the walls). You will want the mobs to be blocked by the walls when they try to flee the AoE damages. Once you've got the trapping spot, put down Energizing Wind and Quickening Zephyr just around the corner/angle, not too close to the wall (about the distance of activation of a trap).
- Start Arcane Echo and during its activation use Serpent's Quickness so that you have the stance before the casting of Arcane Echo finishes. Then use Echo, Dust Trap, Echo (copied with Arcane Echo), Dust Trap (copied with Echo), and Dust Trap (copied with Echo copied with Arcane Echo).
- Walk backwards a couple of steps, keeping clear from the wall(always about the distance of activation of a trap) and put down Barbed Trap. As soon as the Dust Traps have recharged, lay them down and keep SQ up (usually wears off at the end of the 5th Dust Trap, so recast) and spam Barbed Trap when possible.
- After the 7th Dust Trap, the spirits will end. Wait a couple of seconds for EW to recharge, put down EW and renew SQ. Then use Echo, Dust Trap, and the echoed Dust Trap. Keep the Barbed Trap that has recharged unused for your own safety.
- Now you can go pull the mobs. Hit Whirling Defense during aggro and run towards the spirit and stay put behind it. Usually Aaxtes will focus on it instead of you. Meanwhile they will take all the damage waves from the 9 Dust Traps as they try to flee through the walls.
- The usage of the build can be summed up with the following sequences (skills numbered from 1 to 8 from left to right):
- Laying down the spirits, the 3 Dust Traps and 1 Barbed Trap: 1, 2, 7, 4 + 3, 5, 6, 4, 5, 4 (3 is to be cast during activation time of 4)
- Laying down 4 other Dust Traps and 2 Barbed Traps: 7, 6, 5, 4 + 3, 7, 6 (with good timing you can renew SQ when 4 starts)
- Laying down a spirit and 2 Dust Traps and Barbed before pulling: 1 + 3, 7, 5, 6, 5
[edit] Counters
- The main flaw of the build is lack of self healing. Surviving in emergency situations and during pulling is possible with Whirling Defense, Barbed Trap, and clever movement.
- Whirling Defense will prevent most of the hits from foes. However Aatxes hit hard, so don't try to pull them from too far away or you'll have a greater risk to get hit and the traps set might start to go off on their own.
- When the enemy mob survives the initial traps, run away, put down Barbed Trap, lure the surviving enemies into it, and run far away from them. They should lose aggro.
- When Smites or Coldfire Nights survive, just run away from them until they break aggro.
- Coldfire Nights are the hardest mob to kill with this build. Avoiding them is the best tactic. If you can't, lay down your spirits far behind the trapping spot, and trap in multiple spots. 3 Dust Traps, step back a bit, Barbed Trap, step back, Dust Traps, etc... This is to ensure that when the Coldfires run after you they will activate all the traps on the way. To keep them in the traps, you can hit Whirling Defense and come into aggro distance so that the survivors focus on you and stay in the traps.
[edit] Variants
- You could replace Serpent's Quickness with Trapper's Speed. However, it seems that the benefit of SQ is much better as it can also be maintained during the whole trapping process.
- Replacing Whirling Defense with Flame Trap allows for quicker takedowns, and results in health degeneration on the Aatxes. The only drawback is its harder to pull, so use this variant at your own risk.
- Replacing Whirling Defense with Dryder's Defenses helps a lot when going against Terrorweb Dryders and Coldfire Nights. You can also echo it if you want to make a big pull.
[edit] Notes
- This build is for experienced trappers and is hard to use.
- Once you've got the trick, you can clear out the chamber, take out most of the smites, and come back and clear the mobs in the southern part of the chamber within 1 hour. It usually takes an average 2 minutes per mob. Once you've finished a group, your skills and energy should have fully recharged while moving to the next trapping place.
- This is the most efficient trapping build for farming considering the fact that there are no other players getting drops.
- You can replace Whirling Defense with Tripwire to farm the Stygian Veil.
- watch out for corners because you sometimes will get blocked in and will almost surely die.
[edit] See also
[edit] External Links
- Video of the build in action on a group of Aatxes can be found here.
- Video of the build in action on a Terrorweb Dryder here.
- Video of the build in action on Aatxes, Grasping Darknesses, Smite Crawlers, and Coldfire Nights. here
- Picture of a good and safe trapping spot: Image:Trapping spots.jpg
- You can even clear the Forgotten Village: Image:Soloing village.jpg
[edit] Templates
|
|
ASNhduMmDtvdkvElkclLcA |
[edit] R/Mo Basic Ranger Runner
This is a basic ranger running build, capable of completing all runs from Ascalon to the Crystal Desert, some of the Southern Shiverpeaks runs, most runs in Cantha, and even with a variant for the Droknar's Forge run. The build is also suited for mapping if you are going for the Grand Master Cartographer title.
[edit] Attributes and Skills
| Attribute Rank | |
|---|---|
| Expertise | 12 + 1 + 1 |
| Healing Prayers | 12 |
| Protection Prayers | 3 |
|
|
|
|
 |
 |
 |
 |
 |
[edit] Equipment
[edit] Armor
- Full Druid's Armor set for maximum energy.
- Full Sentry's Armor for extra armor (+10 AL in stance).
Note #1: It is possible to mix Druid's Armor for energy with Sentry's Armor for higher armor. Note that the armor bonus is location specific.
Note #2: If you use Sentry's Armor only, it is advised to polish up your energy pool with weapons as explained below.
[edit] Runes
- Rune of Vigor
[edit] Weapons
- Any one-handed weapon that increases health, energy and/or lengthens enchantments:
- Sword with +5 Energy and +30 hp or +20% Longer Enchantments
- Rajazan's Fervor
- Totem Axe
- Any shield with either stance and/or health modifications:
- Emboldened Carapace Shield from Hagnon Warblade [Health +60 (while hexed), Received damage -3 (while hexed)] - for hex passages of specific runs.
- Grognar's Defender - the Runner's Best Stance Shield Choice.
Note: Of course, you are free to use the collectors' shield versions instead of the Green ones.
- Fires in the East staff with a +5 energy Staff Head (+18 energy), and either a health or an enchantment lengthening mod.
[edit] Usage
[edit] General
The Running Sequence gives you a constant high speed boost and a high chance to evade missiles, and attacks. Holy Veil against hexes and the healing skills against conditions and degeneration help you survive.
[edit] Running Sequence
- Use Dodge, Zojun's Haste and Escape for a constant speed boost.
- Only Dodge and Zojun's Haste boost your speed to 33%, whereas Escape only provides you with 25%.
- Use Escape to avoid mass damage as it provides a 75% chance to avoid attacks. It also protects from knockdown from melee attackers.
Note #1: Dodge and Zojun's Haste only evade missile attacks.
Note #2: Avoid knockdown if possible.
[edit] Healing
- Cast Mending when entering a new area.
- Use Restful Breeze before engaging large damage dealing mobs. Remember to activate run skills first.
- Use Heal Area when taking large amounts of damage and when you are in need of instant healing. Be aware of your energy level.
Note: There are enemies which strip enchantments such as Stone Summit Heretics or Avicara Guile. You have to decide then which enchantment (Holy Veil or Mending) you want to use as cover, and which you do not want get stripped right away. Cast the cover enchantment that you want to get stripped last. Pay attention to Chilblains which mostly strips two enchantments.
[edit] Variants
[edit] General
- Use Storm Chaser to regain energy when running through elemental damage dealing mobs.
- Use Troll Unguent instead of Healing Breeze for lower energy cost. Remember to set points into Wilderness Survival.
- Use Smite Hex instead of Holy Veil.
- Use Smite Hex instead of Purge Conditions or Heal Area for a second hex remover.
[edit] Bold Forge Runner
The Bold Forge Runner variant can be used to solo-run Droknar Forge. It is highly reliable and you will notice that it is easier to run Lornar's Pass with, actually. Snake Dance and its Tundra Giants need a bit practice, though. Below are specific Ranger hints for this run:
Note #1: It is advised to use a weapon with 20% longer enchantments for the sake of Healing Breeze.
Note #2: Mend Ailment can replace Purge Conditions for countering two or more Barbed Traps. Crippled will always hit you last.
[edit] Worm Tunnel
- Cast Mending, and Holy Veil (in this order). You don't want the Avicaras to strip Mending right away. Holy Veil represents a cover enchantment here (unlike later).
- Use Healing Breeze before and during encountering dangerous situation, such as a run-through.
- Use Zojun's Haste and Dodge to outrun the worm(s).
- Use Escape when expecting mass damage from attacks, especially in melee by groups of Avicaras. It helps you survive grave danger situation by evading most attacks.
[edit] Worm Path
- Use Healing Breeze after you got knocked-down by the worm(s) and when he is just outside your aggro bubble. This helps to avoid interruption again. Recast Mending on you between knockdowns, in case it got stripped through Chilblains. Without Mending in coordination with HB you might get into trouble regarding your health.
- Use Escape for running through the groups of Grawls and when you get slowed down by hexes and take attack damage from melee.
[edit] Dreadnought's Drift
- Cast Holy Veil, and Mending (in this order). This time Mending is the cover enchantment for Holy Veil due to the high risk of encountering Heretics.
- Lose aggro and regenerate before encountering the Tundra Giants.
- Use Healing Breeze and Escape before running through groups of Giants. Make use of a Stance Shield here.
Note: When HB fades out, and after a Giant Stomp recast it as often as needed. Mending and HB should keep you alive without problems.
Attention: When Stone Summit Heretic(s) and Ice Golem(s) get spawned and you cannot avoid them, immediately run back and rezone. Reasons: 1) Two different slow-down spells (Crippling Anguish & Deep Freeze), 2) covered with different hex-spells 3) accompanied by Gnashers & companions 4) with a Tundra Giant group to be passed at full health with Healing Breeze, and fully recharged Escape only. Smite Hex and Holy Veil will not make you survive this - no matter how high your running level is.
[edit] Snake Dance
- Try to only aggro one group of Giants at a time.
- Aggro them before running through to make them stomp before your run-through comes.
- Use Healing Breeze as often as possible between stomps. The chances for an interrupt between two stomps are low.
[edit] SB Ranger Runner
The variant SB Ranger Runner is optimal for solo-running Copperhammer Mines -> Iron Mines of Moladune and vice versa as ranger. Spell Breaker lasts long enough to overcome the Mesmer spawns at the hardest parts of the run. The success rate with this build is very high.
Note: A weapon with 20% longer Enchantments is a must.
- Activate Holy Veil as Mending coverage, and as additional hex remover when Spell Breaker wears out.
- Follow the main ranger running principles listed above.
Note #1: It is known that bosses will still follow you, especially when running the route in a reversed way. This is the point where Holy Veil is of good use to get rid of the last hex-spell being a slow-downer if a Mesmer boss, or Golem boss got spawned.
Note #2: Mend Ailment can replace Purge Conditions for countering multiple traps. Downside is the longer casting time, and that you cannot clean up from all conditions at a time.
[edit] Notes
[edit] Possible Routes
Listed below are all the possible high-level routes that this build and its variants can be run with:
[edit] Prophecies
- Beacon's Perch -> Camp Rankor -> Droknar's Forge
- Camp Rankor -> Deldrimor War Camp -> Granite Citadel -> Copperhammer Mines Using henchmen as cannon fodder is important on most parts of this trip.
- Copperhammer Mines -> Iron Mines of Moladune and reversed.
- Iron Mines of Moladune -> Marhan's Grotto -> Thunderhead Keep
- Elona Reach (Mission) + bonus
[edit] See Also
- For the Ranger sister build have a look at Build:R/W Bold Forge Runner.
- For further tips on Droknar running have a look at Build:W/Mo Bold Forge Runner
[edit] R/N Shivering Marksman
This build is designed to produce constant interruption by combining Marksman's Wager with Spinal Shivers. It also utilizes the synergy between Tiger's Fury, Focused Shot, and Mark of Pain to produce relatively high DPS.
[edit] Attributes and Skills
| Attribute Rank | |
|---|---|
| Marksmanship | 10 + 1 + 3 |
| Expertise | 10 + 1 |
| Beast Mastery | 8 + 1 |
| Curses | 8 |
 |
 |
 |
 |
 |
 |
|
|
[edit] Equipment
- Druid's Armor
- An Icy Recurve Bow
- A Secondary, Non-Icy Bow for Mark of Pain
[edit] Usage
- Cast Favorable Winds
- Cast Marksman's Wager
- Choose a target
- Cast Spinal Shivers followed by Mark of Pain and Reapply these as necessary
- Mark of Pain can also be cast on a different target to aid your party
- Cast Tiger's Fury and reapply as necessary
- Spam Focused
Shot on the target
- Note that if your attacks are being Blocked, Evaded, etc., your energy will be rapidly drained by Marksman's Wager
- Use Throw Dirt as necessary
[edit] Counters
[edit] Variations
- Consider Replacing Mark of Pain with Barbs for more concentrated damage as well as a more effective cover hex due to the low recharge.
- Consider Antidote Signet if blind is a problem
- Consider Rigor Mortis if blocking is a common issue
- Consider Parasitic Bond for an even more effective cover hex
[edit] R/N Touch Ranger
A Touch Ranger makes use of a ranger's durability in getting close to his opponents and "touch" skills from the necromancer's arsenal to steal his opponents' health. This build uses a high rank in Expertise to reduce the energy cost of the key skills Vampiric Bite and Vampiric Touch.
[edit] Attributes and Skills
| Attribute Rank | |
|---|---|
| Expertise | 12 + 1 + 3 |
| Blood Magic | 12 |
 |
 |
 |
|
|
|
 |
|
Template Code: OgQTQY7c5hTUDlEoGhTqRTIAAA
[edit] Equipment
- Druid's Armor, With Rune of Superior Vigor and Rune of Superior Expertise
- Weapons (one of the following)
- A +5 energy axe/sword of shelter/defense/fortitude and a Blood Knife from Attendant Nashu or Jahn Pitz.
- A Blood Magic wand such as the one available from Karl Jakobs and Blood Magic focus such as the one available from Volsung Stoneketil.
- A +energy weapon set with otherwise same stats as the above.
- Milthuran's Staff for more energy
[edit] Usage
- Get close to your target and spam Vampiric Bite and Vampiric Touch.
- Use Dodge to chase down kiting targets and avoid attacks that can be harmful to the build (such as crippling attacks).
- Use Whirling Defense or Throw Dirt when targeted by warriors, rangers or assassins. This is not only important for avoiding the damage, but also the harmful conditions like crippling and Deep Wound.
- Use Offering of Blood when you can get the full benefit of the energy gain and you are not taking too much damage. Use it as often as it recharges if you can.
[edit] Counters
- Use anti-spammer strategies, such as Diversion or Distracting Shot.
- As the ranger needs to get within touch range, just kite away from them. Use any combination of snares, kiting and knockdowns to achieve this.
- The life stolen per second is not enough to overcome focused damage and health degeneration. However condition based degeneration won't work as they just use Plague Touch to pass it on.
- Signet of Humility, Arcane Thievery or Arcane Larceny can be used to shut down Offering of Blood, which is crucial for the build. When used in combination with even mild energy denial such as Energy Burn, the ranger will soon be out of energy.
- Blackout is devastating to touchers.
[edit] Variants
- Verata's Aura can take control of all minions around for a medium-short amount of time. Highly useful for AB.
- Frozen Soil can be hidden on the Touch Ranger skill-bar, and when used intelligently, can be a devastating skill in TA, and especially RA. This requires the extra skill points to be put into Wilderness Survival. This can easily replace Throw Dirt.
- Barbed Signet can replace Resurrection Signet in AB, giving the Touch Ranger a secondary distance attack to compliment Vampiric Gaze.
- Signet of Agony and Distracting Shot with a barbed bow to replace Throw Dirt and Whirling Defense gives the build an interrupt and the ability to inflict 44 second bleeding (significant damage over time.) You can still have Blood weaponry as a secondary set.
- Blood Ritual is useful especially in a team situation as it is affected by expertise and gives an energy gain. Similarily, a group of touch rangers could be effective using Blood is Power and Blood Ritual on each other.
- Zojun's Haste, paired with Dodge, gives an almost nonstop speed boost and protection against rangers. This is a good replacement for Resurrection Signet in AB.
- Blood Renewal makes a good self heal if used properly.
- Strip Enchantment in place of Resurrection Signet for Alliance Battles or 8-Team Competitive Missions such as The Jade Quarry and Fort Aspenwood, where Resurrection Signets are useless.
- Use the 6 left-over attribute points and put them into Wilderness Survival, then using Serpent's Quickness as a way to increase pressure on your target.
- Touch of Agony and/or Wallow's Bite should not be overlooked.
- For players who only own Factions, a spare points Melandru's Shot could be used, with Vampiric Bite and Wallow's Bite as the damage. This will be less effective and conditional to enemies faced, however.
- Storm Chaser instead of Dodge can help with energy management, but is generally not as useful.
- In Alliance Battles, Resurrection Signet may be replaced with Awaken the Blood for more powerful touch attacks.
[edit] Template
|
|
ACJBhv8UD5ESCUjwJ1oJEAA |
[edit] R/P Keen Shouter
This build uses "Go for the Eyes!" along with "Find Their Weakness!" to get big spikes with deep wound from keen arrow.
[edit] Attributes and Skills
| Attribute Rank | |
|---|---|
| Marksmanship | 11 + 1 + 2 |
| Expertise | 11 + 2 |
| Command | 8 |
|
|
 |
 |
 |
 |
 |
 |
|
- The Elite Skill is VERY flexible here, so if Prepared Shot isn't preferable or available, then some more reasonable options would be:
- Punishing Shot
- Melandru's Shot
- Crippling Shot
[edit] Equipment
- Scout's Armor for bonus protection
- 15^50 Sundering Shortbow of fortitude.
[edit] Usage
- Set up with Read the Wind and begin attacking a target.
- Once adrenaline is gained up enough, use "Go for the Eyes!" with "Find Their Weakness!" followed by Keen Arrow then Prepared Shot. This should deal around 150-160 damage +deep wound.
- If ever swamped by conditions, use Remedy Signet.
- When being melee'd, use "Never Surrender!" for self heal once health is below 75%.
[edit] Counters
- Stone Sheath.
- Massive Degen.
- Melee-hate hexes.
- Dulled Weapon
[edit] Variants
- In PvE, AB, or CM, use Screaming Shot instead of Res.
- The elite in this case can be very flexible. another option could be Punishing Shot for its quick activation for the DW spike. Melandru's Shot is another option for E-management. Infuriating Heat is one of the most practical uses to get faster adrenalin gain for "GftE!".
[edit] Faster Adrenaline Gain Variant
[edit] Attributes and Skills
| Attribute Rank | |
|---|---|
| Marksmanship | 11 + 1 + 3 |
| Expertise | 10 + 1 |
| Command | 8 |
| Wilderness Survival | 6 |
|
|
|
|
|
|
|
 |
 |
[edit] R/Rt Armed Assault
rmed Assault uses several Weapon Spells to greatly increase the efficiency and strategy of ranger attacks.
- The main combo of attacks uses Nightmare Weapon to deal a near instant spike of 126 armor ignoring, life stealing damage.
- There are several variants that are very useful in different areas and situations, including interrupting, using a pet, and barraging.
I'm sure the build will look odd at first glance, but read the notes below to see the individual strengths of each skill.
[edit] Attributes and Skills
| Attribute Rank | |
|---|---|
| Marksmanship | 10 + 2 |
| Expertise | 8 + 1 + 3 |
| Channeling Magic | 12 |
|
|
|
 |
 |
 |
|
 |
|
- To fill in the Optional slots, look in the Variants section for many different uses for this build.
- The attributes can be changed, and runes can be lowered if the health seems too low.
-
- Marksmanship can be lowered to 0 if the user doesn't need damage from the first two skills. NM Weapon makes all damage dealt exactly 42.
- Preparations(when not using Barrage) which cause conditions can be very useful to eliminating enemies.
- A defensive skill or some other interrupt skill can be put in the last slot. A Resurrect can also be used in PvP.
- Serpents Quickness or another recharge-time lowering skill can be useful for the main combo.
- Troll Unguent is a good out of battle heal, but points will need to be dropped from Marksmanship for this.
[edit] Equipment
- Use one rune of Superior Vigor and 2 runes of Attunement along with the 2 stat raising runes.
- Sundering/Zealous/Vampiric bows of Fortitude with +5 Energy. The type of bow is your choice.
- The health and energy levels should be 450 and 35 respectively, but these can be higher.
[edit] Usage
- Set up Favorable Winds outside of battle, but close enough for you to be constantly affected by it.
- Against single enemies use Nightmare Weapon + Dual Shot followed immediately by Distracting Shot for a quick, armor ignoring, life steal of 126 damage.
- Usages for the variants are listed below.
[edit] Counters
- Standard melee counters apply here(Blind, Hexes, etc)
- Kiting, conditions, and lack of healing may sometimes be a problem, but they can be covered by variants of the build.
[edit] Variants
Barrage + Splinter Weapon - Used in PvE and AB.
 |
 |
|
|
|
|
|
|
- Use Barrage + Splinter Weapon against large mobs of enemies to do massive amounts of richocheting damage.
- Recast Splinter Weapon every two shots as soon as it is available.
- Use Nightmare Weapon + Barrage against large mobs to gain 126 health.
Total Spike Variant - Very powerful in TA or GvG with coordinated spikes.
|
|
|
|
 |
|
|
|
|
- In the first optional slot, use either Kindle Arrows, Melandru's Arrows, Marksman's Wager, or Apply Poison.
- Use your preparation before the spike, then Nightmare Weapon.
- Attack with Dual Shot, Wielders Strike, then Distracting Shot for a huge spike of life stealing damage.
- If a non elite preparation is used, consider skills such as Melandru's Resilience for the other optional slot.
- Oath Shot can be extremely powerful in team builds for doing multiple spikes quickly.
Quick Shot + Warmonger's Weapon - Used in RA and TA.
 |
 |
|
|
|
|
|
|
- Use Warmonger's Weapon + Quick Shot to interrupt casters.
- Use Dual Shot followed by Quick Shot followed by Distracting Shot for a quick 4 hit burst.
- For the 8 seconds when Warmongers isn't up, Distracting Shot can still be used as an interrupt.
Animal Variant - Used mainly in TA and RA.
|
|
 |
|
 |
|
|
|
|
- Use Heal as One as a quick heal for when NM Weapon isn't enough, this can be switched for a different elite.
-
- Other possible elites are Rampage as One, Ferocious Strike, or an elite from a different attribute.
- Use Maiming Strike to cripple foes, and Disrupting Lunge on casters to disable skills frequently.
- The Pet Attacks can be switched for other skills.
- For this build, Marksmanship must be lowered to 10, and Expertise much be lowered to 11, so Beast Mastery can go up to 8.
-
- Marksmanship can actually go to 0 if you don't mind not doing any damage other than the NM Weapon combo.
Prepared Shot + Read the Wind - Useful in many situations.
|
|
|
|
 |
|
|
|
|
- This variant uses Read the Wind to allow arrows to travel twice as fast, with Prepared shot for good damage without NM weapon, as well as energy management.
- The idea with Splinter Weapon is to cast it and follow with Prepared Shot, Dual Shot, and two Needling Shots.
- It also uses Dual Shot and Needling Shot for the 3 hit combo needed for the NM Weapon spike.
- Needling Shot can also be used in conjunction with Prepared Shot for straight damage.
- Splinter Weapon can be dropped in areas with no mobs.
- Thanks to Defiant Elements for thinking up this build.
- Many more variants are possible with this build, feel free to post your own combinations of skills in the discussion page as variants!
[edit] Notes
Distracting Shot may seem like a very random spiking skill, but it is very interesting how it is used. Since it is a 1/2s cast time instead of no cast time, it is(for some reason) able to be used instantly after another bow attack, instead of having to wait to pull the string back as in other attacks. This, combined with Nightmare Weapon and Dual Shot, provides an instant 3 hit combo of 42 damage per hit, which also heals you.
- Needling Shot can be a useful skill in place of Distracting Shot if you want a more constant attack skill.
It appears that the weapon spells help the arrows to bypass most blocking. In extensive testing at FA I hardly ever got arrows blocked by Kurzick elementalists with sliver armor, and even Mine Cleaners with Displacement. This is not necessarily a fact, only an observation.
Enemy Minion Masters and Spirit Rits are your best friend when using Splinter/Barrage. Find them, shoot, and laugh at them when they realize they lost their army.
While using the Quick/Warmonger's build, find casters such as monks and unleash arrows on them constantly. Use Distracting Shot while Warmonger's is down to disable a few skills as well.
The Pet version of the build is very useful in RA and TA for its crippling and disabling abilities, as well as strong heals.
Every variant uses the massive life steal spike of Nightmare Weapon, Dual Shot, and a timed casting attack(Distracting or Needling Shot) for 126 Armor Ignoring/Healing power. This can turn into one of the strongest possible spike teams ever when used by several members of a party.
Most important of all, have fun with it. Most of the build is completely up to you, so suit it to your style and learn from it.
[edit] See also
[edit] R/Rt Brutal Glass Arrows
The Brutal Glass Arrows ranger combines the preparation Glass Arrows with the Ritualist weapon spell Brutal Weapon to apply continuous amounts of high damage with a minimum amount of time re-applying preparations.
[edit] Attributes and Skills
| Attribute Rank | |
|---|---|
| Expertise | 10 + 1 + 3 |
| Marksmanship | 11 + 1 |
| Communing | 10 |
|
|
|
|
 |
 |
|
|
|
- In the optional slot, use Antidote Signet or Troll Unguent depending on where you plan on operating.
[edit] Equipment
- Scout's Insignia or Brawler's Insignia if you feel the need for defense, Radiant insignia otherwise.
- A Vampiric Recurve or Short Bow and a Sundering Short or Recurve bow.
[edit] Usage
To use this build, maintain Glass Arrows at all times. When you're about to engage a foe, cast Brutal Weapon on yourself, then use Forked Arrow followed by Dual Shot for a quick spike, then simply shoot them until Forked Arrow and Dual Shot recharge. Repeat as necessary until foe is dead, maintaining Glass Arrows and Brutal Weapon.
If there is a Bonder on your team, tell them to not bond you unless its absolutely necessary.
[edit] Variants
- RA Variant: Use Troll Unguent and take one level away from Communing to put into Wilderness Survival
- TA Variant: Use Antidote Signet to keep yourself clean so your healer can focus on healing you.
- Use Needling Shot to apply constant DPS after spikes.
[edit] Counters
- Hexes such as Faintheartedness will prevent Forked Arrow from triggering and will slow your damage output
- Missing from Blind or hexes
- Blocking, to a lesser extent; you will still make them bleed.
[edit] Notes
This build was inspired by the name of Build:R/any_Brutal_Glass_Spiker however that build does not combine Brutal Weapon and Glass Arrows.
[edit] R/Rt Oath Spirit Spam
This build uses the ranger attribute Expertise to reduce the cost of spirits and uses the skill Oath Shot to spam them. The only disadvantage is that it doesn't have Spawning Power.
[edit] Attributes and Skills
- Offensive Variant:
| Attribute Rank | |
|---|---|
| Expertise | 10 + 1 + 3 |
| Communing | 12 |
| Restoration Magic | 8 |
 |
|
 |
 |
 |
 |
 |
|
- If doing Random Arenas or Team Arenas, use Flesh of My Flesh in the optional slot. If in AB use with another spirit of your choosing.
- Defensive Variant :
| Attribute Rank | |
|---|---|
| Expertise | 12 + 1 + 3 |
| Communing | 10 |
| Restoration Magic | 8 |
|
|
|
|
 |
|
 |
|
 |
[edit] Equipment
- Weapons - Recurve Bow with "I Have The Power!" inscription and Fortitude mod.
- Survivor and Vitae Runes.
[edit] Usage
- Use Whirling Defense while under attack or at risk of Ranger Interrupts.
- Keep Generous Was Tsungrai up, as opposed to using it when necessary, as it has a relatively low cost and the main limit on its healing comes from recharge, not energy.
- Use these skills preferably before oath shot if they have recharged to achieve full benefit.
- Against spell based group, set up dissonance first, whereas against melee groups, use shadow song. These spirits will reduce the damage done to your builds, as well as potentially devastating area of effect spells on spirits.
- Set up spirits spreaded out, as opposed to on the same spot, or else AoE spells or Dervishes (especially with Banishing Strike) would make short work of them.
- In some situations, use spirits to body block for effect. Set up dissonance offnesively near monks if your group needs offense, at the back defensively if you need help against assassins or melee.
[edit] Counters
- Anti-spirits or summoned creature skills such as Banishing Strike.
- Armor dependent damage spells, especially AoE ones.
- Blocking or Dodging Oath Shot, or Blinding you while it is being activated.
[edit] Variations
- Pain does not benefit as much from Oath Shot, but is a nice addition if more damage is needed, and it would also help the energy management of the build.
[edit] R/W Bold Forge Runner
This Bold Forge Runner build was especially designed for the Droknar's Forge run with a Ranger. It makes clever use of the Ranger's abilities to recharge skills faster to use Balanced Stance, and "Charge!" twice in a row. The downside is that one has to tank out hexes, and conditions successfully.
[edit] Attributes and Skills
| Attribute Rank | |
|---|---|
| Expertise | 8 + 1 + 1 |
| Wilderness Survival | 10 + 1 |
| Tactics | 12 |
|
|
|
|
 |
 |
 |
|
 |
[edit] Equipment
[edit] Armor
- Full Sentry's Armor for extra armor (+10 AL in stance).
- Full Fur-Lined Armor for the extra +15 AL against cold damage. This helps a lot vs. the ice imps and ice golems, which will usually be the reason you're stuck tanking in the first place. It's also the best option if you're limited to prophecies.
Note: Your armor level (AL) is more important than your energy pool due to hex- and condition-tanking, that is why it is not advised to use the popular Druid's Armor here.
[edit] Runes
- Rune of Major or Superior Vigor
[edit] Weapons
- Any one-handed weapon that increases health, and/or energy:
- Sword with +5 Energy and +30 HP
NOTE: There is a cheap +25hp axe that is given as a reward for completing the Scavengers in Old Ascalon quest. It makes a good beginning/budget running weapon since it is free and obtainable early and easily.
- Any shield with either stance and/or health modifications:
- Grognar's Defender - the Runner's Best Stance Shield Choice.
- Emboldened Carapace Shield from Hagnon Warblade [Health +60 (while hexed), Received damage -3 (while hexed)] - for hex passages of this runs.
- Crimson Carapace Shield from Lord Dorn Lendrigen [Health +45 (while in a stance), Received physical damage -2 (while in a stance)]
NOTE: The above shield has identical stats to Grognar's Defender, and can be obtained with greater ease.
- An additional weapon or shield with a -20% crippled mod.
[edit] Usage
[edit] General
The Running Sequence provides a constant speed boost, whereas the Anti-KD Sequence fully protects from knockdown effects for a long time. Pay attention to hexes, and conditions which can put you in grave danger if not tanked out correctly.
[edit] Running Sequence
- Use Dodge, Zojun's Haste and "Charge!" for a constant speed boost.
- Dodge and Zojun's Haste give a 33% speed boost, but "Charge!" only gives a 25% speed boost
Note #1: With Dodge and Zojun's Haste you can evade missile attacks.
Note #2: "Charge!" is the only Warrior running skill that can be used together with Balanced Stance, as it is a shout and not a stance. Remember: Only one stance can be used at a time.
[edit] Anti-KD Sequence
The Anti-Knockdown Sequence protects you from knockdowns by Frost Wurms, Tundra Giants, and Siege Ice Golems. Furthermore, it adds protection against damage.
- Activate Serpent's Quickness, "Shields Up!", "Charge!", and Balanced Stance (in this order). You will be able to use "Charge!" twice in one Balanced Stance recharge cycle. Balanced Stance will recharge immediately after that due to the enhanced recharge time that Serpent's Quickness (SQ) gives, but beware that there will be about a 2-3 second gap in coverage before you can reactivate it (assuming 12 tactics). Shields Up is optional, depending on the situation. It's good for going by Tundra Giants and the first wurm area with the Avicara. Use it whenever you know ranged damage is coming your way.
Note: If you run into a situation where you're going to run out of Balanced Stance before you're out of harms way, you can try the following. As soon as the Balanced Stance icon begins blinking, indicating that it's about to end, hit your Troll Unguent. You should be able to get Troll Unguent on just before Balanced Stance expires, thus giving you a little edge on tanking while you wait for it to finish recharging. If you miss this, then you may be unable to activate Troll Unguent because of the knockdowns.
Note: "Shields Up!" is used right away to protect you from extra damage. It is not an essential part of the Anti-Knockdown Sequence, but comes in handy for taking less damage.
[edit] Healing
- Try to use Troll Unguent before engaging large damage-dealing mobs. Be aware of the long casting time of 3 seconds.
- Use Healing Signet in safe areas where regeneration is possible.
[edit] Handling Hexes
This build has no anti-hex, or anti-condition mechanism. You are forced to tank out the damage and keep on jogging.
- Activate "Shields Up!", and Troll Unguent to counter damage, and/or degeneration.
- Try to avoid ice golems. If there is no way to get past one (or a group of them), use troll unguent before going by and then do Serpent's Quickness + Charge + Shields Up + Balanced Stance. You can also try to use Dodge or Stormchaser to get by them quickly and then do the mentioned combo when the first hex hits you. Sometimes if you're lucky you can get far enough away from them that by the time the first hex lands, they are out of attack range and they may not harass you any more than that. The main danger from the ice golems isn't really them killing you, but the other things that hang out with them killing you while you're slowed. This can either be Avicara and Frost Wurms at the first wurm area, Grawl at the large ice golem/Grawl field, or even trolls if you get that one ice golem that spawns at the second troll cave in Snake Dance. The first wurm area and the grawl field are probably the hardest parts of the entire run for this build if the ice golems spawn/patrol in such a way that you cannot sneak by them.
- Avoid Stone Summit Heretics like the plague. Crippling Anguish + Conjure Phantasm will snare and shred you quite quickly. The only place where this is really survivable is at the very end of Snake Dance when Camp Rankor is in sight. The Heretic that sometimes spawns there is by itself, other than some Blessed Griffons which are (thankfully) hostile towards it. If you get hexed there you actually have a good chance of surviving and getting to Camp Rankor. Sometimes the griffons even attack it before it tries to hex you, in which case you get a smooth end to your run through Snake Dance. Everywhere else Heretics spell almost certain death.
[edit] Variants
- Whirling Defense can replace Healing Signet for a better tanking out hexes, and conditions. Be aware that you have no quick-heal then.
- Storm Chaser can replace Zojun's Haste if you do not have Factions.
[edit] See Also
- For the R/Mo sister Droknar build, being a total different approach to Droknar running, have a look at R/Mo Bold Forge Runner.
- For further tips on Droknar running have a look at W/Mo Bold Forge Runner.
[edit] R/W Choking Gas Ranger
The Choking Gas Ranger utilizes the combination of Practiced Stance and Choking Gas to indefinitely interrupt spells with your arrows. It's specifically aimed at shutting down targets that cast spells. It also uses Seeking Arrows to ensure interruptions on the Ghostly Hero in the Hall of Heroes.
[edit] Attributes and Skills
| Attribute Rank | |
|---|---|
| Expertise | 10 + 1 |
| Wilderness Survival | 10 + 1 + 1 |
| Marksmanship | 11 + 1 |
|
|
|
|
 |
 |
 |
 |
|
- Optional slot can be Debilitating Shot, Concussion Shot, Whirling Defense, or Frozen Soil, depending on the team build.
|
|
|
|
|
|
|
|
|
[edit] Equipment
- Your armor of preference, Druid's Armor is nice for the Energy bonus.
- Best vigor rune possible. All minor runes to conserve health.
- A good Bow, preferably a Recurve Bow and a Shortbow since you need fast recharge and/or fast
arrow travel times.
- A Recurve bow should be used when interrupting the Ghostly Hero, a Shortbow should be used with Choking Gas.
[edit] Usage
- When only little time is left until start, use Practiced Stance.
- Make out your target.
- Once you're almost in range and the battles are starting, cast Choking Gas.
- Use Flurry whenever
possible after Choking Gas is applied. - Practiced Stance lengthens
Choking Gas when applied, the stance doesn't need to be kept up all
the time.
- Use Practiced Stance as a cover.
- Use Distracting Shot on enemies that use Resurrection Signet, Healing Signet, or Troll Unguent.
- Use Savage Shot on regular basis whenever you can interrupt something and your energy allows you to do so.
- When attacked by warriors, activate Whirling Defense or Lightning Reflexes (if you have either) or run away.
- When in Heroes' Ascent on an Altar match or in the Hall of Heroes, use Seeking Arrows and Distracting Shot/Savage Shot to guarantee interrupts on the enemy Ghostly Hero.
[edit] Counters
- Interrupt choking gas.
- No defense makes it dependent on being healed by someone else.
- Empathy, Spiteful Spirit or any other anti-attacking hex.
- Aegis, Guardian, or similar skills (assuming you can't interrupt them).
- Note: If an arrow is blocked it can still interrupt due to Choking Gas.
- Blindness and Crippled.
- You can time 1 sec cast time spells through arrow hits even when they have Flurry up.
[edit] Variants
- For PvE-Content, switch Seeking Arrows with Favorable Winds and use Troll Unguent as the optional.
- Switch Practiced Stance and Choking Gas with Broad Head Arrow and Apply Poison for a cover condition for single target Dazed effect.
- Flurry can be replaced by Heket's Rampage. Then the secondary class can be changed (e.g. to Paragon with Song of Concentration).
- Using Dual Shot as the optional, one can replace Flurry with Flail for extra damage.
[edit] Template
|
|
ASMxVxbWlHT1Ag+GrktgTAA |
 |
RmGyhUmosFTNkMLlsoSg07o8FA |
[edit] R/W Melandru's Jungle Runner
Originally based off of the W/R Melandru's Resilience Totem Axe Farmer, the Melandru's Jungle runner was first devised so I could run the Totem Axe farming route (with variations for fighting). It eventually evolved into a way to map all around the Maguuma Jungle effectively for me. Later, with even more variations, I started running the Sanctum Cay/ToA route from LA for greater profit. Eventually I was able to run most places (except for the Beacon's/Drok's route) quickly and easily.
[edit] Attributes and Skills
| Attribute Rank | |
|---|---|
| Expertise | 11 + 1 + 3 |
| Wilderness Survival | 11 + 1 |
| Tactics | 8 |
|
|
|
|
 |
 |
|
|
|
[edit] Equipment
- Armor - Druid's armor, for the extra energy.
- Weapons - A Stalwart Carapace Shield from Yorik Warblade and a Axe or Sword with +5 Energy, and +30 Health.
[edit] Usage
- Cycle through Dodge and Zojun's Haste as speed boosts. Storm Chaser is a cover stance, for the gap in stance time.
- When approaching areas heavily guarded by enemies with Hexes and/or Conditions, switch into Dodge or Zojun's Haste. Use "I Will Survive!" as a cover shout for now, so you do not cancel out the effects of the running stance for Melandru's Resilience.
- Once Dodge, Zojun's Haste, and "I Will Survive!" have both expired, switch into Storm Chaser.
- If your health starts to drop below 50%hp, abandon your running
stance for Melandru's Resilience.
- If "I Will Survive!" has recharged, use it.
- Typically, Your health will return to a safer amount.
- If this does not work, stop briefly, use "Shields Up!", Dodge, Zojun's Haste, (only if Melandru's Resilience has expired), and Troll Unguent for a heal. If you feel safe enough, use Healing Signet.
- Continue in this way to a secluded spot, regenerate health, and start out good as new again.
[edit] Counters
- Massive degeneration.
- Slowed movement such as Crippled.
- Body blocking by mobs in narrow passages.
[edit] Variants
- I usually do not feel the need for Healing Signet since I have Troll Unguent, But it is fully up to the user.
- Sprint instead of Storm Chaser. Storm Chaser is statistically better though. It costs 5 more Energy, but your attribute level in Expertise pretty much neutralizes it. Plus, It gives you energy upon Elemental damage.
- "Watch Yourself!" instead of "Shields Up!" or Healing Signet.
[edit] Warrior/Ranger Variant
[edit] Attributes and Skills
| Attribute Rank | |
|---|---|
| Strength | 11 + 1 + 3 |
| Wilderness Survival | 11 |
| Tactics | 8 |
 |
 |
|
|
|
|
|
|
- Optional: Sprint for Storm's Embrace.
[edit] See also
[edit] R/W Stance Tank
This is a PvE build that focuses on the stance renewing ability of "On Your Knees!" combined with a powerful ranger stance that increases attack speed and blocks attacks. With high elemental armor and near constant physical evasion, this build is highly resistant to most damage.
[edit] Attributes and Skills
| Attribute Rank | |
|---|---|
| Hammer Mastery | 12 |
| Expertise | 9 + 1 + 3 |
| Wilderness Survival | 9 + 1 |
 |
 |
 |
 |
|
|
|
|
[edit] Usage
- Lead with Troll Unguent before charging into combat if you think you might be the target of heavy fire (especially if charging a group of casters instead of physical attackers).
- Use Lightning Reflexes next to build adrenaline with Crude Swing to help (as you should be avoiding 75% of attacks you will have a lower chance of interruption).
- Use Dryder's Defenses if Lightning Reflexes runs out or use it first if you need extra elemental protection when charging enemies with elemental attacks.
- Make sure you are in a group of foes before executing the next step for the best effect. It is best to already be surrounded by foes rather than seeking targets.
- Start the chained attack sequence with Earth Shaker to knock down your foes, then Crude Swing to build adrenaline back up and damage opponents while they are down (which also helps avoid interruption), then Yeti Smash while they are getting up to finish the chain.
- Either Earth Shaker chain again or use Earth Shaker to knock down your foes and "On Your Knees!" to recharge your stances.
- Troll Unguent as needed.
- Crude Swing may get interrupted while in a stance but it helps a lot to build adrenaline (as well as spread poison, see the Variants section) so don't be afraid to use it early and often regardless.
[edit] Equipment
Armor:
- Sentry's Armor for additional armor while in a stance.
Weapons:
- Any max damage customized hammer (with either +15% damage while in a stance or +15% damage always, energy -5). Energy will likely never be a problem with this build unless you encounter very heavy energy denial.
Suggested Weapon Mods:
- Furious Hammer of Fortitude.
- It's often beneficial to bring along an extra hammer with an elemental damage mod such as an icy hammer grip to help damage Warriors.
Similar Green/Unique Hammers:
[edit] Variants
- Add in "For Great Justice!" and remove a skill of choice to help build adrenaline when you need it most.
- Replace Resurrection Signet with Apply Poison as needed.
- In situations where resurrection is not an issue, consider bringing Dodge/Zojun's Haste, Storm Chaser, or Natural Stride instead of Resurrection Signet.
[edit] Counters
- On hit hexes such as Empathy or Spiteful Spirit.
- Blindness and Weakness
- Heavy life degeneration.
- Adrenaline drain or prevention.
- Defensive stances, though the AoE damage from Earth Shaker and Yeti Smash will still connect with adjacent targets.
- Damage reducing hexes such as Faintheartedness or Spirit of Failure
- Anti-evasion skills such as Rigor Mortis, Griffon's Sweep, Warrior's Cunning, or Unseen Fury.
[edit] Notes
- Armor and Health are important as tanking requires these and you will not have any shield to help out. Having a teammate bond you helps considerably.
- A cooperative team allowing you to tank will make your damage even more effective as you will have the enemies around only you.
- AoE scatter skills used by your teammates will ruin the DPS of this build. Be sure to coordinate with them to avoid this.
- Beware larger enemies that are immune to knockdowns.
[edit] R/any Chkkr Thousand Tail Farmer
This build is used to farm Chkkr Thousand Tail by using Beast Mastery and the Enraged Lunge skill to farm Chkkr's Flatbow.
[edit] Attributes and skills
| Attribute Rank | |
|---|---|
| Beast Mastery | 12 + 1 + 3 |
| Expertise | 12 + 3 |
 |
|
|
|
 |
 |
|
|
- Poisonous Bite for more DPS.
- Brutal Strike for increased damage.
- Symbiotic Bond just in case your pet is attacked.
[edit] Equipment
- Full Druid's Armor with a Tamer's Mask.
- A Totem Axe or Rajazan's Fervor for the extra 5 energy (you could also use a Rotwing Recurve Bow). Any offhand item with at least +9 energy (but make sure it doesn't reduce your energy regeneration.)
[edit] Usage
Start from Saint Anjeka's Shrine and head out into Drazach Thicket. You may get the Kurzick Blessing if wanted, but it is not needed. Start running along the right wall, careful not to aggro the Dragon Mosses (these will be there only if you have the "A New Escort" quest), and keep on that wall until you run into the edge of the cliff looking into the small "valley." There will be a group of Mantises inside the "valley" so wait for them to leave before moving on. When the Mantises move, look straight ahead into the group of Dragon Mosses(if you have the quest). You should see and group of Wardens moving forward toward you, so wait for them to leave and quickly sprint down (using Run as One) towards the wall of the large mountain. Be careful, if you venture too far to the right, a group of Oni may spawn. Stay near the wall for your health to regenerate. When your health is full, run around the wall towards Chkkr, once again being careful to avoid the Dragon Mosses (if you have the above quest). Here you will cast both of your pet shouts. Run towards him until he starts to attack you, then slowly retreat behind the wall again so he can't hit you with his arrows. Once you are sure that your pet isn't taking any damage, start your pet attack chain. Use both of your pet attacks, and while they are recharging, use Enraged Lunge. You also may like to use Run as One while using your pet chain just in case only your two pet shouts are recharged (Enraged Lunge counts as its own recharging skill), to get the full damage bonus. With high Expertise this chain can go on for almost forever. Once he gets past about half health, he will start to use Troll Unguent much more often, so make sure you have Disrupting Lunge recharged to disable it (if you choose to bring it). If done correctly, you can kill Chkkr before your Call of Protection regenerates. Pick up all drops and repeat.
[edit] Counters
If Chkkr attacks your pet, then keep spamming all of your pet healing skills and pet attacks until the pet dies (hopefully this won't happen). Make sure Chkkr keeps attacking you, and use Comfort Animal to revive your pet. Then restart your attack chain, making sure to use Enraged Lunge while your other attacks are recharging. Note: Make sure to keep staffing/shooting Chkkr. If you keep staffing him he will stay focused on you.
[edit] Variants
If you do bring Symbiotic Bond, then I suggest switching Comfort Animal for Troll Unguent and moving all your excess points to Wilderness Survival. This is to heal yourself because your pet is sharing your health.
[edit] Notes
Sometimes, some of the other smaller monsters will gang up and attack Chkkr before you get there, and kill him. If this happens, simply re-zone and start again.
[edit] See also
- Build:R/Me Chkkr Thousand Tail Farmer (Unfavored)
- Build:A/any Chkkr Locust Lord Farmer
- Chkkr Thousand Tail
- Pet aggro model
[edit] R/any General Barrager
This build is a basic barrage ranger that can be used and modified for many situations and secondary professions, the main goal is to use the common elite skill Barrage so as to synergize with other skills for a better effect or at least other skills that compliment it in its most common uses. This is most often used to target groups of enemies as well as solo areas with increases to damage output or other effects on each barrage.
[edit] Attributes and skills
The base is below but to give a more detailed description of the attributes, the highest score is always in Marksmanship (often maxed at 16 but other times it can be as low as 12 depending on the secondary profession used - see below), 9 or 14 ranks in Expertise to effect 10 energy skills primarily (or 8 or 13 if all skills used are 5 energy), and Wilderness Survival is good at 8 or 10 for the use of Troll Unguent or to switch out for secondary profession skill ranks.
| Attribute Rank | |
|---|---|
| Expertise | 8-12 + 1 or + 2 |
| Marksmanship | 8-12 + 1 + 1-3 |
| Others | 0-12 |
- *The above attributes are a good baseline to work with and can be adjusted as playstyle/preference allows.
Common Core Barrage baseline:
|
|
|
|
|
|
|
|
|
[edit] Equipment
- Any armor can be used though Druid's is best if energy is lacking. Scout's is a poor choice as preparations will not be used in a Barrage build.
- A Flatbow is commonly used in a barrage build provided Favorable Winds is brought as well to lessen the large arrow arc from a Flatbow and to help speed the arrows to their targets. Otherwise, each bow has it's own ups and downs but can be used as preffered.
- Vampiric or Zealous bow strings are used a lot in Barrage builds as you get multiple hits per shot (provided the build doesn't call for an elemental string) though a Sundering string is a good stand by if you don't want to worry about the degen or makes a good switch out weapon.
[edit] Usage
- The function of a barrage build varies slightly but the overall effect is to do damage to a group of foes with each use. Therefore, attacking the central most target in a group is desired for the best effect rather than the closest.
- Placement of any spirits before hand is key as they usually increase the damage and speed the arrows fly at. Be sure to place them where they will be effective yet not attacked by enemies.
- Often, interrupt skills are brought along to take out any big skills or those that might hurt you like Meteor Shower or Resurrect as examples of big skills or Empathy and Spiteful Spirit as examples of skills that can seriously hinder or hurt you. Be aware that you will have to wait for the barrage animation to finish before the interrupt will fire.
- Some sort of self heal, condition removal (primarily for blindness), or defensive stance is popular as well though not required.
[edit] Counters
- Any standard melee/ranger counters such as blindness, on attack/hit hexes, and/or blocking.
- Energy denial.
[edit] Variants
- Support or damage enhancing skills often brought from the ranger skill line may include but are not limited to:
-
- Throw Dirt as an emergency skill to blind foes attacking you or your allies.
- Winnowing to add 4 damage to each arrow.
- Conflagration to change your bow's damage type to fire damage.
- Winter to change any elemental damage to cold damage.
Barrage/Pet Variant
- Adding a pet to the build with then turn you into what is referred to as a B/P ranger. Pet attacks will not slow your rate of fire as they are all shouts. Often, a team will consist mostly of these creating a pet wall and multiple barragers, or just have one around. Multiple variants can be found for this at Build:Team - Barrage/Pet (Tomb Ruins).
[edit] Variants with Secondary Professions
[edit] R/Warrior
- Attributes levels usually are in Tactics and at around 8-9 ranks should do it in most cases.
- Shouts can be used without interrupting the fire rate flow thus making them useful and often charged with the high adrenaline gain from barrage if they are adrenaline based.
-
- "Watch Yourself!" charges quickly and can increase the party's AL without any cast time. This also combines well with Soldier's Defense.
- "Fear Me!" can be used repeatedly to reduce the enemy's energy levels though this typically has a minor effect if any on an enemy's seemingly limitless energy pool.
- "Shields Up!" can be used to reduce the damage your party members take from projectiles.
- Healing Signet can be used as an alternate, energy free, though risky heal.
- Protector's Defense can be used to help those near you as you often will not move while barraging.
[edit] R/Monk
Solo Vigorous Barrager
Use: Cast and maintain Live Vicariously. Before battle put up Symbiosis to gain the extra health it offers from enchantments. When entering a battle, cast Vigorous Spirit. When enemies start to pile up, use Barrage to take full advantage of the healing provided by a vampiric bow, Live Vicariously, and Vigorous Spirit.
Other skills:
- Attributes levels usually are in Healing Prayers, Smiting Prayers, Protection Prayers, or none at all depending on what is taken/used and typically at around 8-9 ranks in only one of those areas should do it in most cases. Ranks in Wilderness Survival are usually sacrificed as healing from Trolls Unguent is often replaced with other skills. If Symbiosis is used just use whatever remaining ranks are left but no more than 8-9 ranks in Beastmastery at most.
- Live Vicariously will return health to you for every creature hit which can be up to 6 per Barrage. Commonly used for soloing areas.
- Vigorous Spirit will behave similar to Live Vicariously but without the drain on energy regen.
- Single target heal spells or healing enchantments can replace Troll Unguent as a self heal that can also be used on others. Healing Touch is an example skill that can be used as it's cost is reduced with ranks of expertise though it gains no benefit from Divine Favor with a Ranger primary.
- Judge's Insight to add Armor penetration to each arrow and typically defeat masses of the undead or others weak to holy damage.
- Mending Touch to remove blindness or other conditions.
- Watchful Spirit will sap your energy regen but provide +2 health regen with no needed attribute points spent.
- Renew Life and Restore Life's costs are reduced by ranks in expertise making them decent resurrects to exchange for the Resurrect Signet. Otherwise, there are plenty of reusable resurrection skills in the monks repertoire.
- Balthazar's Spirit or Essence Bond are usually used when soloing as you will be the sole recipient of damage and will often return massive amounts of energy.
- Hex removal skills like Smite Hex or Holy Veil can help eliminate damage from on attack/hit hexes like Spiteful Spirit, Empathy, or others.
- Symbiosis can be useful if using multiple enchants on yourself or others in your party.
[edit] R/Necromancer
- Attribute level of Death Magic, Blood Magic, or Curses is usually at around 8-9 ranks in most cases if at all.
- Many skills can be used to replace a self heal that either give you health, steal health, or exploit a corpse for health.
- Order of Pain will help add damage to every attack but for a very limited time. This is best left to another party member (who can also use Order of the Vampire) that can achieve higher attribute levels as it will slow your rate of fire and eat up your energy if you cast it.
- Mark of Pain may cause scatter but can be most useful in narrow passages.
- Plague Touch's cost is reduced with ranks of expertise and can be used to transfer any conditions from yourself with limited success as it is restricted to touch range.
- Many Necromancer skills can benefit a Barrager but usually they need to be cast by another party member that is dedicated to that role.
[edit] R/Mesmer
- Attribute level of Inspiration Magic, Domination Magic, or Illusion Magic is usually at around 8-9 ranks in most cases if at all.
- Interrupts like Leech Signet can be used to add to or replace bow interrupts.
- Hex removal skills are available like Hex Breaker or Inspired Hex.
- Distortion can be used with limited results as a temporary defensive stance.
- Energy management skills are available mostly from the Inspiration line.
- Ether Feast can be used as a self heal.
- Elemental Resistance, Physical Resistance, or any of the mantras can be used as a replacement for a defensive stance depending on the areas you may be in.
- Arcane Mimicry can be used to make use of another party member's Elite skill in combination with yours without spending any attribute points in a Mesmer attribute line.
[edit] R/Elementalist
Fiery Barrager
Use: Use the Glyph to reduce spell costs and cast Conjure Flame on yourself and Mark of Rodgort on your central most target. Fire a fiery bow using Barrage and you can keep the hexed targets burning. Some may prefer to use Fire Attunement instead of the Glyph to reduce energy costs.
Other Skills:
- Attribute level of Fire Magic, Water Magic, or Earth Magic usually start at around 8 to as high as 12 ranks in most cases if at all.
- Any Conjure skill with the appropriate bow string can add damage to each barrage.
- Stone Striker should NOT be used, as it will convert your attacks to earth damage, which will mean that your attacks will no longer trigger Conjure Flame or Mark of Rodgort, even if you have a fire bow, as Stone Striker overrides the normal damage type.
- If you wish to still have the benefits of a Vampiric, Zealous, or Sundering bowstring, you must bring Conflagration to convert your arrows to fire, so they can still trigger Conjure Flame and Mark of Rodgort.
- Multiple Earth Magic or Water Magic skills can be used for defensive options such as Stoneflesh Aura, Armor of Frost, or many of the different Wards.
- Though less popular and very energy intensive, Glyph of Lesser Energy and Meteor Shower (which causes exhaustion) can be used together to add repeated damage and knock downs on your targets, preventing them from escaping your Barrage area.
- Similar to the Meteor Shower combo, Deep Freeze can be used for a large slow down effect on your foes and no exhaustion though this is uncommon as well.
- If using 2 or more enchantments on yourself Symbiosis becomes a viable option as listed under R/Mo above.
[edit] R/Assassin
- Attribute level of Deadly Arts or Shadow Arts is usually at around 8-9 ranks in most cases if at all.
- Caltrops can be used to slow your targets though it requires a closer range.
- Shadow Refuge makes a good self heal.
- Viper's Defense and other stances can be used for defensive options.
- Way of Perfection can add healing with high ranks in Marksmanship and a lot of targets with minimal energy spent (similar to Vigorous Spirit as seen above but relies on criticals for health return) though it performs best if there is a Paragon in your party using "Go for the Eyes!" to drastically increase chances of critical hits.
[edit] R/Ritualist
Splinter Barrager
Use: Same as the usual barrage build but cast Splinter Weapon on yourself (or allies as time allows) and be sure to target a group of foes. Recast as needed and as foes are available. Especially good in tight passages.
Other Skills:
- Attribute level of Channeling Magic, Restoration Magic, or Communing is usually at around 8 to as high as 12 ranks in most cases if at all and often means the reduction of ranks in Marksmanship though only slightly.
- Nightmare Weapon can be useful for stealing health on up to 3 enemies hit per casting.
- Wailing Weapon can add interruption to a mass of attacking foes for the entire duration.
- Warmonger's Weapon can add interruption to a mass of non-attacking foes for the entire duration.
- Brutal Weapon can add damage to every arrow provided they aren't enchanted. This can be very tricky as many healers will enchant the entire group or those damaged and may ruin this weapon spell unintentionally.
- Guided Weapon can make your Barrages unblockable.
- Vital Weapon can add to your maximum health and others in the party.
- Wielder's Boon can be a useful self heal if under a Weapon Spell effect.
- Spirit Rift can be used as a spiking skill add-on if timed properly and especially effective when combined with Splinter Weapon. Cast Splinter Weapon, Spirit Rift, then Barrage and it all hits about the same time. Drawbacks include energy cost, casting time, and the enemy may move from where the Spirit Rift appears.
- Spirits: Often a R/Rt may also bring a spirit to add more damage or healing as the case may allow (also taking advantage of the cost reduction Expertise allows) though this rarely will enhance Barrage in any way but simply takes advantage of the party make-up. Expendable spirits (like Life or Destruction that give an effect when they expire) tend to make a good defensive "shield" of sorts to hide behind should you come under attack as well. The most commonly brought are:
-
- Recuperation to add health regen in spirit range to all things friendly - especially good for groups with multiple pets, minions, and/or large groups of players and/or friendly NPC's.
- Life to add cheap healing in spirit range to all things friendly and a "shield".
- Destruction to add cheap damage in spirit range to all things unfriendly and a "shield".
- Bloodsong to add a cheap attacker and possible "shield" that can steal health though less common.
- Pain to add a cheap attacker and possible "shield" that does a little more damage than Bloodsong but can't heal itself though also less common.
[edit] R/Paragon
"Go for the Eyes!" Barrager
Use: Same as the usual barrage build but spam "Go for the Eyes!" and "Find Their Weakness!" together as they charge to do critical hits to your targets and deep wound to one of your targets as well as add crits to the targets of those in your party that are effected. "Find Their Weakness!" only affects one ally and the first critical hit though so it is usually the skill to change out for others listed below.
Other Skills:
- Attribute level of Command or Motivation is usually at around 8-9 ranks in most cases if at all.
- Shouts can be used without interrupting the fire rate flow thus making them useful and often charged with the high adrenaline gain from barrage if they are adrenaline based.
-
- "Never Give Up!" can add energy to an unhealthy party.
- "Never Surrender!" to add health regen to an unhealthy party.
- "Stand Your Ground!" to add armor to your party while not moving.
- Many motivation skills can be used for party health, energy, defense and more though they don't benefit more from use with barrage unless adrenal based.
- Anthem of Envy can add some minor damage at the easy cost of adrenaline.
- Bladeturn Refrain can be used to add defense to yourself or others and last a long time if using other chants or shouts allowing you to cover the party or at least multiple members.
- Song of Concentration and Hexbreaker Aria can both be charged quickly though will slow you down with the long cast times. They will still benefit the group with less interruption or hex removal though.
- Chorus of Restoration or Energizing Chorus can be quickly charged and used for energy or health management on yourself or others that meet the conditions.
- Remedy Signet is a good condition removal skill.
[edit] R/Dervish
- Attribute level of Earth Prayers or Wind Prayers is usually at around 8-9 ranks in most cases if at all.
- Dust Cloak or Staggering Force can be used to change your weapon damage type to earth damage.(do not use if you are working with an orders necromancer)
- Heart of Holy Flame can be used to change your weapon damage type to holy damage.(do not use if you are working with an orders necromancer)
- Grenth's Fingers can be used to change your weapon damage type to cold damage.(do not use if you are working with an orders necromancer)
- Zealous Renewal can be used for energy management.
- Harrier's Grasp to cripple your targets.
- Harrier's Haste may add some damage to moving foes but works better with Harrier's Grasp.
[edit] Barrage in other primary professions:
- Barrage isn't limited to Ranger primaries and other professions can make good use of the skill. Many will make good use of their primary attribute skill line in combination which Ranger's can't (at least not as effectively with zero ranks).
See also:
[edit] R/any General Interrupter
This build is a basic interrupter skillbar that can be used and modified for many situations, the main goal is to decrease both the enemy group's healing and damage through the use of interruption. Fights should be shorter with one of these on the team, taking some pressure off the healers and often preventing as much damage as they would normally heal.
[edit] Attributes and skills
| Attribute Rank | |
|---|---|
| Expertise | 10...12 + 1 + 1...3 |
| Wilderness Survival | 9...11 + 1 |
| Marksmanship | 9...11 + 1 |
- *The above attributes are a good baseline to work with and can be adjusted as playstyle/preference allows.
Hard interrupts (Prophecies/Nightfall):
 |
|
|
|
|
|
|
|
|
|
OgATcZsmxIzPW1AA2C33CAA |
 |
|
|
|
|
|
|
|
Daze with cover conditions (Factions):
|
|
|
|
|
|
|
|
|
Spamming (Prophecies):
|
|
|
|
|
|
|
|
|
- Optional skill slot can include: Concussion Shot, Pin Down, Screaming Shot, Hunter's Shot, Throw Dirt, Serpent's Quickness, Seeking Arrows, Needling Shot (works great with the dazed effect from Broad Head Arrow) or Antidote Signet (or any condition removal skill from another profession).
[edit] Equipment
- Any armor can be used though Druid's is best if energy is lacking.
- A Recurve Bow is best for interrupting in general with the faster flight time though others can be used in combination with Read the Wind.
- A Shortbow or Flatbow is recommended if you are in need of a faster firing weapon to interrupt more often (when target is dazed or using Choking Gas for example) or just as a switchout weapon.
- For any build that inflicts a condition (like dazed or poison) a bow string of it's respective condition (like silencing or poisonous) is suggested to lengthen the desired condition.
[edit] Usage
- The function of these builds depends heavily on the party and environment, and thus the player should be observing his team as well as the enemy the first few moments.
-
- If the team seems to be lacking the healing power needed, one should go for interrupting high-damage enemy spells/skills first.
- If the team seems to be lacking sheer power, go for healers first.
- If the party is in need of specific enemies interrupted be aware of any targets being called or requested by your team leader.
- After using the build for a while and getting more comfortable with interrupting, all of the above points should be able to be achieved with the use of Distracting Shot. Disabling an enemy healer's main heal (knowledge of common skill recharges always helps) while also taking care of long-casting spells (perfect example: Meteor Shower or resurrection skills) is the main idea of these builds.
- Often if you daze a target that is being attacked by others you can then interrupt a second target with your remaining hard interrupts (Savage/Distracting Shot).
- Dazing a caster boss will often shorten the time the condition lasts but will spell doom for this enemy as they usually will only have spells and will be defeated with minor to no resistance while this effect is in place. As monk bosses in PvE seem to take the longest to defeat this condition can save the party a lot of time and effort in the long run if prepared for it though it is more frequently removed in certain areas, cover conditions can help prevent this.
- If using Choking Gas and Practiced Stance it's often a good idea to bring an IAS as you want to fire as often as possible with every shot being a potential interrupt. This will also interrupt in a small area and interrupt while blinded (as the gas does the interrupting and not you hitting the target) but it will not interrupt non-spell skills, thus a minimum of one other hard interrupt is recommended to be brought along.
[edit] Counters
- Any standard melee/ranger counters such as blindness, on attack/hit hexes, and/or evasion/blocking (though variants listed below can counter all of these downfalls).
- Energy denial.
[edit] Variants
Optional skills:
-
- Hunter's Shot/Screaming Shot for a cover condition or added degen.
- Concussion Shot for an additional spell interrupt or daze effect.
- Pin Down to help land Broad Head Arrow, prevent the target from fleeing, or a cover condition.
- Throw Dirt to blind melee foes that find their way to you or those in trouble near you.
- Antidote Signet primarily to remove blindness (unless using the Choking Gas variant, then it isn't needed) though at times to remove poison and disease as well. It can also be replaced by secondary profession skills (like Mending Touch or Remedy Signet).
- Serpent's Quickness to rapidly have interrupts/daze attacks available.
- Seeking Arrows to hit an enemy that is evading/blocking your attacks.
- Any other defensive/running stance to replace Whirling Defense, best option is Dryder's Defenses, as it also gives elemental armor though Lightning Reflexes can boost your interrupt rate temporarily if the target is dazed or if you are using Choking Gas.
- A running stance to replace a skill for more survivability. Dodge/Zojun's Haste in missions/quests to prevent a wipe or to get to a destination fast or escape if the need arises.
- Natural Stride can be substituted as a hybrid of a defensive stance and a running stance to get a little of each of the two above options.
- If attacking a dazed target or using Choking Gas, Needling Shot can often shutdown a target if their health is below 50%, or using an IAS (such as Bestial Fury/Tiger's Fury, Frenzy, Flurry, or others) can increase your interrupt rate.
- Adding a pet to the build can then activate the interrupts for you from the daze effect (if being used) allowing similar results as above without relying on your party to target either of your two targets (best with Broad Head Arrow or Concussion Shot) or just to add more interrupts on the one dazed target.
- Bringing hex removal skills can be beneficial if expecting to run into hexes that will hinder you like Empathy.
As a R/Me:
- Adding skills like Frustration or Arcane Conundrum can help increase the chance of interrupting with slower cast times from the target or even cause more damage to the target; if not added pressure.
- Replacing the Elite skill with skills like Migraine or Psychic Instability can severely hamper a caster as well when combined with daze and/or interrupting attacks.
- Epidemic can help spread conditions like daze, poison, crippled, and bleeding to more than your primary target.
- Skills like Inspired Hex, Revealed Hex, or Hex Eater Signet can help to remove hexes if you know that you will be frequently encountering hexes that may hinder you in some way without expending much, if any, energy in their use.
- A Mesmer's repertoire of skills may also add extra interrupting options should your target be obstructed, evading, or otherwise avoiding your interrupts. As these are not typically reduced in cost with ranks of Expertise it is uncommon to have more than one or two Mesmer interrupt skills and more common to use a signet at no cost (like Leech Signet or Signet of Disruption for example).
Interrupts in other builds:
- It is common to add a few interrupt skills like Distracting Shot and/or Savage Shot (for common examples) to another build to add interruption options. In this case it should be taken into account as to what else one might be doing. If the user will be spamming other skills or casting long spells the interrupts will not be as useful as the user will be busy and the interrupt skills wasted. Be sure to plan ahead when adding Interrupt skills to any build so as to make use of them appropriately.
- Many times it is common to bring along one interrupt skill so as to avoid that one large skill per battle (Giant Stomp, Meteor Shower, Wurm Siege, any kind of resurrect skill, and so on) and it is usually a good idea for such in many a situation as the user will often have a time and place (if not a specific foe/skill) for that skill's use as opposed to being occupied using other skills as above.
See also:
[edit] R/any Prepare to be Dazed
The R/any Prepare to be Dazed build is designed primarily for PvE. The purpose is to spread Poison and Dazed while maintaining strong energy management as well as dealing reasonable damage. It may also be useful in some PvP, but it is not as well suited to the purpose.
[edit] Attributes and Skills
| Attribute Rank | |
|---|---|
| Marksmanship | 11 + 1 + 3 |
| Expertise | 12 + 1 |
| Wilderness Survival | 6 + 1 |
|
|
|
 |
|
|
|
|
|
See Variants for the Optional Slot.
[edit] Equipment
[edit] Usage
- Activate Favorable Winds (if equipped)
- Activate Apply Poison
- Activate Troll Unguent
- Activate Concussion Shot --> Prepared Shot to daze
- Activate Marauder's Shot --> Prepared Shot for high damage
- Activate Antidote Signet as necessary
[edit] Counters
- General Anti-Melee
- Heavy Condition Removal
[edit] Variants
- Use a /Mo for a hard resurrection skill
- Switch Marauder's Shot for a second interrupt like Savage Shot or Distracting Shot
- Whirling Defense
- Throw Dirt
- Use Marksman's Wager rather than Prepared Shot for greater energy management at the expense of damage
- Needling Shot
- Epidemic
- Mending Touch
- Flail
- Screaming Shot
- Favorable Winds
- Read the Wind can replace Apply Poison in which case Screaming Shot should be added in the optional slot to cover the Daze.
[edit] R/any Prepared Needle
The Prepared Needle Ranger uses Read the Wind and Prepared Shot to increase damage per hit as well as supply an endless flow of energy for Needling Shot.
[edit] Attributes and Skills
| Attribute Rank | |
|---|---|
| Marksmanship | 12 + 1 + 3 |
| Wilderness Survival | 10 + 1 |
| Expertise | 8 + 1 |
|
|
|
|
|
|
|
|
|
[edit] Equipment
- Armor with Radiant Insignias and a max health rune and a Rune of Attunement.
- Vampiric Recurve Bow of Fortitude and/or Vampiric Longbow of Fortitude.
[edit] Usage
- Activate Read the Wind and keep it on at all times.
- Use attacks in the following order for maximum benefit: Needling Shot, Marauder's Shot, (Distracting Shot), Prepared Shot, Needling Shot
- When target is below 50% health, use Needling Shot until it is dead.
- Use Natural Stride and throw Troll Unguent in case of melee attacks.
[edit] Counters
- Blind, if you can't see you can't hit.
[edit] Variants
- Take Monk secondary if Rebirth is needed.
- Replace Read the Wind with Apply Poison for added pressure, or Kindle Arrows if elemental damage is preferred.
- Replace Marauder's Shot with Keen Arrow if a Paragon in your party has "Go for the Eyes!".
[edit] Notes
- A Vampiric bow is ideal for the increased damage per hit, but a Sundering Bow is also sufficient.
- This build works well with a supporting Necromancer who uses Order of the Vampire, or a Paragon using "Go for the Eyes!". If GFTE is on you, be sure to use Marauder's Shot or Keen Arrow as your next shot.
- All skills in this build have low energy costs after the effects of Expertise, and have fairly short recharge times; this allows for no energy problems as well as increased effectiveness.
- In PvE, this build can be extremely effective against bosses with high health counts, as they often will not be able to heal above 50% when they get to that point, allowing the Prepared Needler to Needling Shot the boss to death.
[edit] R/any Solo Desert Trapper
The R/any Solo Desert Trapper can be used to farm slowly but surely in the Crystal Desert. Its main purpose is to gather collectable drops, which can often be traded for decent weapons. Of course, a fair amount of keys, gold, and gold items can be found as well.
[edit] Attributes and Skills
| Attribute Rank | |
|---|---|
| Expertise | 12 + 1 + 1 |
| Wilderness Survival | 12 + 1 |
| Beast Mastery | 3 + 1 |
|
|
|
|
|
 |
|
|
|
[edit] Equipment
- Druid's Armor.
- A Flatbow or Longbow.
- A Recurve Bow or Composite Bow.
- Poisonous bow strings work very well.
[edit] Usage
See General Guidelines.
[edit] General Guidelines
- Use the Flatbow or Longbow to lure your enemies onto the traps and use the Recurve Bow or Composite Bow when firing Poison Arrow.
- Always activate Serpent's Quickness before laying traps.
Lay them in this order: Dust Trap, Barbed Trap, Flame Trap. You should be able to lay down two
sets of traps just as Serpent's Quickness ends. It's safe to lay a
third set afterwards, as well, but any more and you run the risk of
letting some traps self-detonate before any enemies reach them.
- Dust Trap causes Blindness, allowing you to set more traps right under the enemy if needed.
- Lay down a Spirit of Toxicity somewhere in the area but far enough away that it won't get attacked. In times of trouble, you can always run past it and let the enemies kill it instead of attacking you. Make sure Serpent's Quickness is up first; the recharge time is quite long.
- You can out-regen the damage of most but not all monsters with Troll Unguent - it's usually safe to cast it before activating Storm Chaser and running away.
The following can be farmed in Diviner's Ascent, leave from Elona Reach:
- Sand Drakes (Topaz Crest) - Approach these and stop just short of aggro range. Activate Serpent's Quickness and lay double sets of traps. Now, shoot off a Poison Arrow to each Drake and back up - let the Drakes run over your traps. They should be dead, if not, the degen will soon kill them. Sometimes Drakes are linked in aggro but are spread far apart - watch the radar carefully for any incoming Drakes. It can mess up your trapping badly if one or two don't hit the traps at the same time as the others. In this case it is best to pull a retreat or out-regen them with Troll Unguent and Poison Arrow.
- Rockshot Devourers (Bleached Carapace) - These are annoying, because they are also trappers and they carry Distracting Shot, but mostly because they tend to pop up at the most inopportunate moments. Follow a similar procedure as with Drakes, but keep a farther distance between you and the Devourers so as to avoid accidentally aggroing them prematurely. Once your traps are set, hit them with Poison Arrow and run slowly back to your traps. Devourers are less pull-friendly than Drakes so you'll have to give them more time. Do not try to set any more traps unless you are sure the Devourers are blind. It often takes two or more rounds of traps to kill Devourers, so you may wish to simply pick them off with hit-and-run Poison Arrows. A good counter-tactic to Distracting Shot is to start activating Troll Unguent and immediately cancel it by moving - the Devourers will use Distracting Shot and waste it. With a 10 second recharge, you have plenty of time to cast Troll Unguent in peace.
The following can be farmed in Skyward Reach, leave from Augury Rock:
- Hydra (Dessicated Hydra Claw) - They are very dangerous to farm with this build, but it can still be done. Lay traps safely away from them and then use Poison Arrow. They will always use Meteor or Fireball, so immediately use Storm Chaser and run away. They should still follow. Lead them over the traps - this will cause Crippled. Now it's just a matter of waiting for degen and dodging Fireballs. Don't try to take on more than two at once.
- Storm Kin (Shriveled Eye) - More dangerous than most but safer than Hydras. Follow the usual procedures, and you should be fine. Counter Conjure Phantasm with Troll Unguent.
The following can be farmed in The Scar, leave from Thirsty River:
- Dune Burrower (Dune Burrower Jaw) - These are stationary, so with the Flatbow or Longbow you can sometimes take them out without any opposition (try to get a height advantage). Otherwise, just hit them with Poison Arrow and move outside their range. They will try to counter with Healing Spring, just shoot them to disrupt it. There will always be Jade Scarab and/or Rock-Eater Scarab buried nearby, so it may be wise to take them out first.
- Jade Scarab and Rock-Eater Scarab (Jade Mandible) - These are more fragile than the other monsters and are often killed with the first sets of traps, so treat them like Sand Drakes. Remember that Jade Scarab carry Plague Touch, so try to not let them get within melee range. If they do, though, use Troll Unguent to counter the degeneration.
- Sand Giant (Massive Jawbone) - These have Plague Touch and are more sturdy than Jade Scarab, so they are a bit tough. They also knockdown with Giant Stomp occasionally. However they are fairly slow so you can generally use hit-and-run tactics after the first wave of traps. They also rely on self-caused Conditions and Plague Touch to transfer them - Crippled from Barbed Trap is very potent against them.
The following can be farmed in Prophet's Path, leave from Augury Rock:
- Desert Griffon (Iridescent Griffon Wing)- Requires a lot of patience, they use "I Will Survive!" to counter your Conditions. They are often more trouble than they are worth, but if you really need those Griffon Wings this build is a surefire way to get them...eventually. There are of course much more effective Tanking builds that have been made for Griffons especially, but this build can still do them.
- Minotaur (Minotaur Horn) - These are easy. Follow the same procedure as Drakes, but remember that Minotaurs often run in a patrol route rather than lazing around in one spot.
- Marrow Scarab and Scarab Nest Builder - for some reason neither of these drop any Collectible Drop, don't bother trying to kill them if you don't have to. They are hard to kill, anyways...Marrow Scarab will use Plague Touch and Virulence to devastating effect, and Scarab Nest Builder have Distracting Shot ready to interrupt Troll Unguent, as well as being Trappers themselves. In the event that comflict is unavoidable, lay down three or even four sets of traps to eliminate the Marrow Scarabs in one go. But stay out of Touch range!
- Salving Cactus (Spiny Seed) - While it can be hard to find them, they are very easy to farm. They don't move much and always cast Holy Wrath first - so start off with Dust Trap to blind them. After that you can finish them off any way you choose. Note, there are always one or two of these outside Heroes' Audience, beware the Sand Elementals though.
Notes on other creatures:
- Sand Wurm (Bleached Shell) - Good luck finding one, and good luck soloing it. Not recommended, but it could be done.
- Enchanted (Forgotten Seal) - They are immune to Poison and Bleeding and can't be farmed with this build.
- Sand Elemental (Encrusted Lodestone) - Like Enchanted, these are immune to Poison and Bleeding and thus can't be farmed. Besides that, they are very dangerous.
[edit] Counters
- Blind to some extent, though with Antidote Signet or another remedy (see Variants) this is no problem.
- Crippled, though no monsters in the Desert inflict this condition except the Barbed Traps of Scarab Nest Builders.
- Sudden spike damage, such as what occurs when facing Sand Elementals. Always use Storm Chaser and run away when in danger!
[edit] Variants
- Oath Shot, Spike Trap, or Trapper's Focus could be used instead of Poison Arrow for a purely Trapping build, though it plays a bit differently from the Posion Arrow one.
- For farming Minotaurs, Throw Dirt can be a viable skill to replace Toxicity. It will let you set more traps instead of having to run away.
- Antidote Signet, Mending Touch (R/Mo), and Remedy Signet (R/P) are also excellent skills to consider bringing along. In the event you step on a Dust Trap or Barbed Trap, these will let you counter them effectively. However, this is not too common an occurance, and generally bringing Toxicity will yield a better net effectiveness.
- Natural Stride is a viable alternative running skill to Storm Chaser if you're not facing enemies that use Hexes.
- Trapper's Speed is a good skill to consider bringing instead of Toxicity. Activate it just before Serpent's Quickness expires.
[edit] R/any Solo Totem Axe Farmer
This is a build designed for Totem Axe farming which utilizes the Ranger's superior speed skills to run past foes. When necessary, Apply Poison or Kindle Arrows skills are used to dish out large amounts of damage to quickly eliminate foes you must defeat.
[edit] Attributes and Skills
| Attribute Rank | |
|---|---|
| Expertise | 9 + 1 |
| Wilderness Survival | 9+1 |
| Marksmanship | 12 + 3 + 1 |
|
|
|
|
|
|
|
|
|
Escape can be replaced with Natural Stride, in case you either haven't capped Escape, or would prefer to use a different Elite. If you don't have access to Nightfall skills, Storm Chaser or Whirling Defense could also work.
[edit] Equipment
Armor - Any max set of armor will do. Druid's Armor is preferred due to the extra energy it provides. Most of the damage you will take while Totem Axe farming is a result of degeneration, which is not affected by armor.
Weapons - You MUST have a longbow or a flatbow. Bows with Poisonous and Fiery bow strings are handy but not necessary.
A shield or other off-hand item with a defensive bonus is recommended for the run.
[edit] Usage
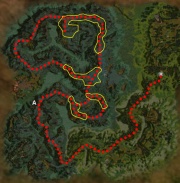
Start in Ventari's Refuge. If you have brought a shield and one handed weapon equip them and head into Ettin's Back. Cycle the speed stances repeatedly. You will have a constant speed boost along with a high block bonus. Head south towards Reed Bog. Along the way you will encounter some fire traps and possible bleeding from Hunter's Shot. If you are hurt badly keep moving until you have broken aggro or built up about 3/4 aggro bubble distance. Use Troll Unguent and keep moving.
Procede as before constantly using your three run buffs to rush past foes. When you are speeding through the area, the Trolls and Spiders are not able to attack effectively. If you see a large group of foes ahead, find a safe place and wait until your faster run skills recharge so that you can use them again.
When you have reached the southern-most part of your run there is a fork where you can go left (west) or right (northwest). The path to the right is usually easier since there are fewer Trolls. The Scarabs that pop out of the ground are only a problem if they are able to pin you - they use melee attacks and can only really damage you with Vampiric Touch. There are a few Spiders near the entrance to The Falls but you should be able to breeze past them. Even if they hit you with Pin Down keep moving since the duration of the Crippled condition is short-lived.
Now you have to deal with massive amounts of Maguuma Spiders. Luckily they don't do much damage and all your stances provide a hefty block bonus against their ranged attacks. If you get into trouble because of Pin Down or simply being poisoned for long durations, use Troll Unguent, but maintain your stances at ALL times, even if not moving. The Spiders are a pain but they seldom chase you very far and often by the time they have descended from the trees and activated Apply Poison you are almost out of range. The Spiders' spawn pattern is relatively consistent in The Falls, so find an area where they are not present and take a break to recharge.
Once you are past the Spiders you are faced with Jungle Trolls. The path is sometimes narrow here and a couple of Trolls often block the way. In order to get some clear space on the path, activate dodge and run towards the Trolls, then back up slowly so they will follow you. This should separate them, creating some space so you can run past. If necessary, activate Zojun's Haste on the way. If the Trolls pin you, you are dead. Even with the 75% attack Block provided by Escape, their Power Attack is lethal.
Once past the Trolls you will face Jungle Skale. The Skale are not really much of a threat because your Troll Unguent will offset Rotting Flesh (Disease). However there is a tendency for one or two Skale to constantly follow you which can be a real pain - even fatal if they follow you right up to the Wind Riders. Make sure there aren't any Trolls around, activate Apply Poison as needed and using the tab key hit several skale with Poison; use "shift/tab" to go back to the first one and restart the loop. Groups of 5 will be dead in around a minute and a half or less. Use Troll Unguent whenever you go below 3/4 health and slowly work your way through the Skale. Make sure you take out the patrols, especially before you get to the Wind Riders because you have to run from them.
Once you find a Root Behemoth make sure you attack it from higher or equal elevation - higher is preferable. (Being at a higher elevation than your target increases the range of your arrows; at a lower elevation your range is shortened.) The longbow or flatbow lets you attack the Root Behemoth without aggroing the Life Pods that are hiding there. Use Apply Poison to cause health degeneration on the Root Behemoth.
Next, creep forward slowly to aggro the Life Pods. The Pods will spring up one at a time if you're lucky. Hit a Pod once and try to pull it about half an aggro bubble away. Attack it using your two interrupt skills to interrupt Orison of Healing. If your poison is still active use it on lone pods. When Apply Poison runs out or if it is already exhausted use Kindle Arrows to do a massive amount of damage to the pods. (If two or more are aggroed don't use poison because they will use Mend Condition and with their other heals you won't be able to kill them.) If you get 2 or 3 aggroed try to lure them down hill as one will follow close and the other 2 will sit back and shoot at you, try to put as much distance as you can from the shooting ones and kill the on thats closest this is so the others can't heal the one your attacking. Then one of the others will get close to you and you can repeat this process until they are dead.
Keep moving through the area, using Troll Unguent as needed and picking up loot after ALL Life Pods are dead. If you run in to pick up your Totem Axe before you have killed the Pods you'll often aggro 3 of them. It's tempting to just run in and get the Axe but you may lose the rest of the run because Life Pods will often follow long distances.
When you get to an area with Wind Riders your strategy changes. Wind Riders have an interrupt (Cry of Frustration) that can affect non-spell skills. They also have Conjure Phantasm. This means that you will be constantly losing health while fighting them and everything you do will be subject to interruption. The solution is to try to pull them away from their group and kill them one at a time. Use Apply Poison while well outside of aggro range. Then move close but not quite into bow range. Use Troll Unguent and then attack one and only one Wind Rider. Hit it a few times to get its health low then run away using your stances and let the poison kill it. After you have broken aggro, immediately use Troll Unguent to ensure that you don't die. Repeat this process until the group of Wind Riders is dead. This is by far the hardest part of this run and takes a lot of patience to figure out. Don't get frustrated if you die. You may either continue the run (Candy Canes help) or restart.
[edit] Counters
- Getting Pinned.
This is the one thing you do not want to happen. Trolls can kill you with relative ease as soon as you stop moving with speed. As discussed above, it is sometimes necessary to get them out of your path. Also, the Scarabs can pin you if you are not paying attention. They spring up out of the ground and if you use the keyboard to move past them you often get hung up on them. If you click to move you need to keep clicking to make the game update its path so you can go around the new Scarabs.
- Interrupts.
Troll Unguent is an incredibly useful skill because it cannot be removed once it has been activated (except by the user's death). The drawback is that it has a 3 second casting time which means it is easy to interrupt. Wind Riders are capable of interrupting it and are more than capable of killing you.
[edit] Variants
- If you don't have Escape you can substitute Storm Chaser. The drawback is that Storm Chaser doesn't include attack evasion so you will get Crippled more often when facing spiders.
- If you have a Monk as your second profession consider bringing Purge Conditions or Mending Touch instead of one of your interrupts. This allows you to remove a Crippled condition if necessary. Bring a skill that removes all Conditions because otherwise just Poison will be removed, and it will be reapplied almost instantly.
- If you have a bow with a Fiery bow string you can use Ignite Arrows instead of Kindle Arrows. The important difference between these two skills in this setting is that Kindle Arrows changes the arrow's base damage from Physical damage to Fire damage. Ignite Arrows keeps the base damage as Physical, but the Fiery bow string converts the base damage to fire damage.
- If you have Factions, drop Savage Shot for Needling Shot as the RBs will die much faster once they get below 50%.
- If you have Nightfall, drop Distracting Shot for Forked Arrow to kill the Life Pods faster with Kindle Arrows going. (Use Forked Arrow and Savage Shot quickly to spike a single Life Pod)
- If you have Warrior as secondary, you can add the remaining points into Tactics and drop Escape for "Shields Up!". And then you can drop Kindle Arrows for Burning Arrow to add -10 degeneration to your target, if used together with Apply Poison (providing your Elite skill slot is open).
- Natural Stride can be used instead of Escape in order to give you the ability to use another elite skill. Due to Natural Stride's much shorter duration and recharge, you'll need to use your stances in this order: Natural Stride > Dodge > Natural Stride > Zojun's Haste. This will allow you to keep your stances up consistently. (recommended for ALL who have all 3 campaigns)
[edit] R/E Variant
[edit] Attributes and Skills
| Attribute Rank | |
|---|---|
| Expertise | 9 + 1 |
| Wilderness Survival | 9+1 |
| Fire Magic | 12 |
 |
 |
|
|
|
|
|
|
[edit] Equipment
- The Rotwing Recurve Bow is nice for the extra 5 energy.
- Alternatively, you can use a firestaff with +15 energy and swap distracting shot for Inferno or any other skill you might see fitting.
[edit] Usage
The only difference in this variant is the ability to kill the Life Pods faster. As they take double fire damage, they will be dead very quickly. Aggroing only 2 Life Pods is recommended, but 3 is possible. When you use your fire skills, use Phoenix first then Flame Burst. Make sure the life pods are as close to each other as possible.
[edit] Notes
This build was designed for Totem Axe farming but would also be useful in other running situations. The build is good for farming any item that requires running to get to and where your foes can be defeated with health degeneration (Poison).
The build is also useful for solo capping and in Alliance Battles. Several people using this build (one using Poison while others use Kindle) can capture points quickly and move on to the next very quickly as well.
[edit] Templates
R/Mo
|
|
ACMxFxZmnUDrE4MbiN+GVzjB |
R/E Variant
|
|
AiNhivJOnbBv4x4bAOsyUzsB |
[edit] R/any Tank Master
This is a PvE build. It also works well in PvP against Necromancers, Mesmers, and other rangers. It is also an excellent build for evolving a new pet into a dire pet (see animal companion for details), as the pet does incredible damage with Enraged Lunge. This is a Prophecies+Factions build.
[edit] Attributes and Skills
| Attribute Rank | |
|---|---|
| Beast Mastery | 10 + 2 |
| Expertise | 11 + 1 + 2 |
| Wilderness Survival | 10 |
|
|
 |
|
 |
|
|
|
|
- See "Variants" on the choice of healing skill.
[edit] Equipment
- Use a Longbow or a Flatbow to get your pet to attack foes while keeping the foes out of your aggro area.
- While your pet is attacking, use a staff that maximizes energy and health (Kole's Torment, Illyana's Staff, Bohdabi's Spire or a maximized Insightful Staff Of Fortitude are ideal). The sole purpose of the weapon is to tell the pet who to attack.
- Use Explorer's Armor to maximize health.
[edit] Usage
General usage of this build:
- As soon as you enter the explorable area, use Symbiotic Bond and Call of Protection. These will protect your pet, and will be the first two skills that will be recharging for you.
- As soon as combat starts, use Call of Haste and Predatory Bond.
- Now that you have 4 skills recharging, use Enraged Lunge repeatedly for +80 damage every 5 seconds.
- Use Troll Unguent repeatedly, as your pet is sharing your health.
- On the rare occasion that your pet does take heavy damage, use Comfort Animal to restore its health.
Key mindset of this strategy:
- With the exception of Charm Animal and Comfort Animal, no skill should ever remain fully charged in combat. You need your skills to be constantly recharging to fuel Enraged Lunge.
- With a high Expertise you should not run into any energy issues except when fighting multiple bosses. This is because each time a boss dies, your skills reset. With this build you need your skills to be constantly recharging, so killing a boss means a slight energy drain from using your 4 shouts again.
- Remember that you can use any of the shouts and the Enraged Lunge even while you are activating Troll Unguent.
[edit] Variants
- Replace Call of Haste and/or Predatory Bond with one or two pet attacks, such as Brutal Strike, for more damage. When using multiple pet attacks, however, remember to watch the pet's damage closely to ensure that the first attack hits before the second attack is played. Otherwise, only one of the attacks will succeed.
- If you are playing a R/W, replace Troll Unguent with Healing Signet, and redistribute all attribute points from Wilderness Survival into Tactics. This provides more healing (230 vs 160 over a given 10 second period), and uses less energy.
- Otyugh's Cry can replace Call of Protection, giving your pet an Armor bonus and unblockable attacks for a short time.
- If it will not be needed for a run, replace Symbiotic Bond
with an optional skill.
- An extra pet attack: Brutal Strike or Disrupting Lunge are good. Disrupting Lunge can be very annoying in PvP. Be sure to go R/W and carry Healing Signet if you do this so you don't have to spend energy healing.
- A nature ritual like Symbiosis or Edge of Extinction
- A defensive stance or shout like Whirling Defense or Watch Yourself!
[edit] Notes
- Your pet can take 900+ damage (with Symbiotic Bond, the pet shares your hit points)
- Deals 80-120 points of damage every 5 seconds in addition to normal level 20 dire pet attacks.
- Prevent up to 17 damage per hit (Call of Protection)
- Attack 25% faster (Call of Haste) and gain 25 points of life per hit (Predatory Bond).
- Ability to flee personally while still dealing damage with the pet, and the ability to resurrect the attacking portion (Comfort Animal).
- Ability to continuously attack while healing (Troll Unguent).
- Enraged Lunge only requires 3 skills to be recharging to deal its maximum damage if you have 13 beast mastery, as it counts itself as recharging.
- If using Zojun's Haste to solo, start the pull with the bow. Shoot two arrows, activate Zojun's Haste, and flee. Move until the encounter is about on the edge of the mini-map. Sit back, spam pet attacks and healing signet. After your target has died, select another quickly and move to attack, but cancel your attack immediatly; this will cause the pet to move to the new target. This works well with most mobs but large ones will kill the master due to Healing Signet being overwhelmed by the redirected damage from Symbiotic Bond.
[edit] Templates
|
|
ASNhVvLWHZ5phzoK/M+GazmB |

