Elona Reach (Mission)
From GuildWiki
This is a mission entry. For information on the location Elona Reach, see Elona Reach (Location).
Contents[hide] |
[edit] Objectives
Help the Ghostly Hero complete the ritual that will combine the three pieces of the Vision Crystal.
- Return Crystal Shard 1 to the Ghostly Hero.
- Return Crystal Shard 2 to the Ghostly Hero.
- Return Crystal Shard 3 to the Ghostly Hero.
- BONUS Use the Crystal Shards to awaken the three Ritual Priests of Elona
[edit] Walkthrough
[edit] Primary
This mission is considered one of the most difficult in the game. You need to collect three Crystal Shards and return them to the Ghostly Hero within 30 minutes.
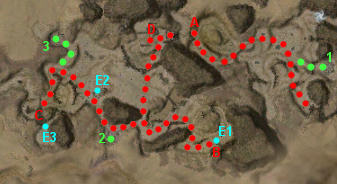
The first Crystal Shard is easy enough: you have no time limit for this one, so you can kill everything. Take it slow, don't get killed. Just go straight down the path (either over the bridge or under), and talk to the Ghostly Hero at the end (A on the map). He will start the countdown for the remainder of the mission. If you have awakened the first ghostly priest (see Bonus section below), the Ghostly Hero will give you the bonus objective.
The second Crystal Shard is in the base to the east. Go through the left gate at a 45 degree angle to the right to avoid all the enemies. Go past the bridge to your left; crossing it is usually a deathtrap because of the boss group guarding the far end of the bridge. Go around the bend to the left, and draw the first group of Forgotten out. Kill them quickly, and be careful not to draw out the group on the hill to the right. Both groups have Forgotten Sages and it will eat a lot of time if you aggro both at once, because the Sages will heal each other. If you take a bit of time to observe the patrol patterns, you will find you can deal with the first group when the group on the hill to the right moves off.
NOTE There are now either 4 or 5 groups spawning near the far end of the bridge and on the hill, 2 of them with bosses. This part has apparently been rewritten specifically to defeat the preceeding scenario, and getting through this area is correspondingly more difficult than it has been in the past.
After finishing off the first group, go up onto the hill on the right and take on the second Forgotten group with its Sage, being careful not to aggro any of the other groups. It can be difficult not to aggro the boss group guarding the near end of the bridge. (An alternative approach is to take out the boss group straight ahead guarding the near end of the bridge. However, this can be difficult while the second Forgotten group with its Sage is still up the hill to your right. If your team manages its aggroing and timing correctly, either approach will work.)
Now, at the top of the hill and to the left, you can take on the boss and his group protecting the second Crystal Shard (B on the map). There may be another group you will want to deal with separately just before you reach the boss group. Once you have retrieved the Shard, come back out the way you came. Bring the Crystal Shard to the Ghostly Hero, or you can leave it at point 2 on the map for now, and come back and collect it after you have the third Shard.
The third Crystal Shard is in the base to the west. Follow the small path at the U-turn outside the first base. Continue past the base and turn left when you hit the wall. Go up a small hill and the crystal is located just to the right (C on the map). Return the way you came from and give the Ghostly Hero the two remaining Crystal Shards (D on the map).
Tip: Try to battle only one group at a time and be sure to kill the Sages first.
Tip: Carrying a Crystal Shard into battle is dangerous. All nearby enemies will attack the player carrying the Shard. It is best to drop the Shard (press the Drop Item button) before enemies get close enough to lock onto the carrier. An alternative method, if your team has good protection and healing monk capabilities, is to have a warrior carry the Shard to aggro nearby enemies, and have the rest of the team take out these enemies while their focus is on the Shard-carrier. -->
Tip: The three ritual priests (see bonus) are all fairly resilient, strong Fire Elementalists. Even if the group is not interested in the bonus, it can be to your benefit to awaken the priests. Consider, for example, that one of the priests is capable of solo tanking a Minotaur - something an ordinary Elementalist would have trouble with. On the other hand, due to their slow movement speed, it may be undesirable to wait for them.
Tip: One of the best pieces of advice is: Ignore the clock. Rushing ahead usually gets the party killed, and the mission can be completed well within the time limit in almost all cases. One should only start to panic when the timer reaches 5:00 and there is still one Shard left to gather.
Note: There are Splinter Mines throughout the mission, which cause crippling and bleeding in a large AoE. They are set off when players get too close, and will then emit a green blast at regular intervals. They can be stopped by picking up the mine core, but there will be one last blast. If you leave the area of effect quickly, however, you can usually grab the core without being caught in it. Dropping a mine will have the same effect on enemies (remember that non-boss Enchanted can't suffer from Bleeding). Interestingly, the ritual priests can be inflicted with Bleeding and Crippled from Splinter Mines, even though they are technically undead.
[edit] Bonus
The bonus is to revive the three priests Hehmnut, Kahdat and Nahtem, one with each Crystal Shard. The trick, though, is that there is one before you get to the Ghostly Hero the first time. So, as soon as you get the first Crystal Shard, on your right there should be two Dune Burrowers. Behind them is the tomb of the first ritual priest (1 on the map). It is not necessary to keep them alive after reviving them.
Note that just getting near the priest will revive him; he will then start a slow march up to the Hero. He will engage any hostiles on the path and most likely die. That's not a problem, because your objective is only to revive him, not to ensure that he survives. But if you want to save the priest, you can drop the crystal, fight all the minotaurs (since the clock for the mission hasn't started yet) and then go back and revive him. Then he will have a peaceful walk.
The second priest is easy. After you get the second crystal shard (east base), head west, follow the small path at the U-turn and revive the second priest (2 on the map). Again, just getting near the tomb is enough and you need not worry about the priest's life.
For the third priest, after you get the third crystal, stick to the left wall (heading in a northerly direction) and you will pass one group of hostiles and get to an enclosure that has his tomb (3 on the map). Again, you can revive him from a distance and go about your business.
Incidentally, it is not necessary to revive each priest with a different crystal. Once you have the second crystal, if a spellcasting party member carries it (preferrably an Elementalist who can usually spare the energy storage cost of losing weapons), you can carry it with you and revive both remaining priests with it. This allows you, when you get the third crystal, to simply run with it.
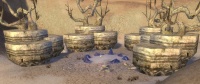
Assuming they are not killed on the way, the three priests eventually make it to the Vision Crystal altar (see adjoining image). They start out moving at a slow pace, but eventually pick up speed.
Note: if all you need is the bonus, you do not need the third crystal. It is possible to do the bonus quickly and with henchmen. After the first cut scene (after giving the hero the first crystal) head over the mound to the right exit. Wait until a patrol is alone and then take it out quickly, concentrating on the sage first. This is the hard part -- if you take too long you will engage another patrol and be overwhelmed. Using henchmen here is difficult because they will not draw back to avoid aggro from more monsters. After killing the first patrol, withdraw and wait for health and energy to regenerate, then engage the second patrol. Then move along the wall to the right, killing monsters as you go. You will pass the grave of the second priest, keep going. Eventually you reach a boss guarding a crystal. Kill him and bring the crystal back to the second grave site. Now, do not give this crystal to the hero, instead, keep it and go back along the wall past where you got the crystal (keeping the wall to your right), again killing as you go. Eventually you will reach a fork, turn right. The third gravesite is just ahead on the right. Bring the crystal close to revive the priest, and you are done with the bonus. Remember once the priests are revived, you can forget about them.
[edit] Creatures
[edit] NPCs
[edit] Monsters
[edit] Bosses (elite skill captures)
[edit] Dialogues
Briefing from the Ghostly Hero.
| Ghostly Priest: | "My master searches for the three shards of the Vision Crystal. If you bring them to him, he can complete the ritual that will fuse them back together. But be warned: The Forgotten hold two of the three pieces. They have set traps to keep us from getting them. Here is the first piece. Take it to my master, and he will begin the fusion ritual." |
| Bonus objective: | |
|---|---|
| Ritual Priest Kahdat: | "In our failing we learned the error of our ways. I will help our great hero complete his ritual. Thank you for this second chance." |
| Ritual Priest Hehmnut: | "It was greed and mistrust the drove my brothers and I apart. [sic] The glory of the gods will shine upon us once more. You have seen to that." |
| Ritual Priest Nahtem: | "Just as the crystal was in shards and scattered, so were my brothers. It destroyed us in the end. In death we can regain the glory of the gods." |
[edit] Cutscene 1
| Ghostly Hero: | "I am grateful. You have brought me the first shard. Now I can begin the incantation to fuse together the Vision Crystal. And so begins the test of the Elonians. This was where my people failed to Ascend. When assembled, the Vision Crystal can focus the gaze of the gods and deliver to you the Ascension that you seek. You've brought me the first shard, but you must still retrieve the others. Ultimately it was greed that was our undoing. The shards of the Vision Crystal were kept in separate camps, for we did not trust each other, not even our own kin. To pass this test, you must retrieve the remaining two shards. There is one in each base. Return here with the shards, and I will cast the ritual to fuse them back together. But you must hurry. Once the ritual begins it cannot be stopped. If I do not have all three pieces, then all of this will be for naught." |
[edit] Cutscene 2
| Ghostly Hero: | "The Vision Crystal is complete. Your day of judgment at Augury Rock is near. The gaze of the gods shall be focused upon you, and your path will be made clear." |
[edit] Follow-up
- Upon completion of the mission players will find themselves in: Augury Rock.
- If you completed Dunes of Despair and Thirsty River you now must defeat the Doppelganger.
[edit] Notes
- The difficulty of this mission is often attributed to the fact that it needs good party organization (something lacking in the average PUG), so you will now often find a "runner" build in a random PUG that is capable of snatching and returning both remaining crystals in under 5 minutes. They will not always advertise this, so if you were looking forward to doing the mission for the first time, ask as soon as a full party is formed.


