User:Malevolent
From GuildWiki
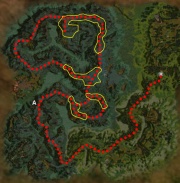
An Elementalist build for farming Totem Axes from Root Behemoths in The Falls. This build uses Obsidian Flesh to defend against casters, and Fire Magic to deal damage.
[edit] Attributes and Skills
| Attribute Rank | |
|---|---|
| Earth Magic | 11 + 1 + 3 (or + 1) |
| Fire Magic | 10 + 1 (or + 1 + 3) |
| Earth Prayers | 8 |
| Energy Storage | 6 + 1 |
 |
 |
 |
 |
 |
 |
 |
 |
[edit] Equipment
[edit] Armor
Radiant Armor is recommended for this build. Use a Geomancers Aura with a Superior Rune of Earth Magic for running, and then a Pyromancers Aura with a Superior rune of Fire Magic for killing.
[edit] Weapons
[edit] Enchanting Set
Preferably a Spirit of the Forgotten, Totem Axe or Rajazan's Fervor and a focus item with +1 Earth Magic. eg Galigord's Stone Scroll, or crafted from Sheco in Bukdek Byway, or swapped for 5 Stone Horns with Denos Makaluum in Vasburg Armory. A possible alternative is a Fire or Earth staff with a +20% longer enchantments mod.
[edit] Killing set
When engaging groups other than Wind Riders, a Fire wand and offhand both with 20% chance of halving recharge times(HRT)of fire magic are recommended.
It may be possible to get away with using an Earth Staff with +20% enchanting and HRT for the entire run.
[edit] Usage
[edit] General Usage
- Cast Glyph of Lesser Energy before any chain of spells, whenever it is available.
- Cast Obsidian Flesh only when engaging casters, never while running.
- Keep Sliver Armor and Stoneflesh Aura up as much as possible when running.
- Use Mystic Regeneration when your health is low. Remember maximum gain is when you have other enchantments on you as well.
- Use Meteor Shower and Immolate for Root Behemoths.
- Use Immolate and the point blank damage from Flame Djinn's Haste and Sliver Armor for other mobs.
- Wear your Geomancer's headgear when running, and when fighting Wind Riders or Jungle Skale.
- Wear your Pyromancer's headgear at all other times.
[edit] Detailed Usage
[edit] Areas
Starting the run at Ventari's Refuge, head out to Ettin's Back. Equip your Earth magic headgear. Cast Glyph of Lesser Energy before casting Mystic Regeneration, Stoneflesh Aura, Flame Djinn's Haste and Sliver Armor. Run towards the portal to Reed Bog. Recast your enchantments as they expire. Use the Glyph prior to casting enchantments as it becomes available. Flame Djinn's Haste and Stoneflesh Aura can be kept up indefinitely, and for most of the run, the downtime in Sliver Armor makes little difference.
Take the south eastern path through the Reed Bog to The Falls. Once again, cast skills 1-5 in that order, keep running and recast enchantments as necessary. Stoneflesh Aura negates just about all the damage in this area. Head into The Falls.
Once again, use Glyph of Lesser Energy, cast your first four enchantments, and run. You can stop to recast even whilst in the middle of spiders and Shepherds. As long as you use the Glyph whenever possible, energy is not a problem. Mystic Regen will give you 9 pips off health regen, or 12 when you have Sliver Armor cast, so degen and damage is not a problem. If you are in range of a Symbiosis spirit, you will have 800+ health!
From here on in, you will find the following groups of monsters. Below each group you will find the best method for dealing with them.
[edit] Enemy Types
Avoid these by running straight past them. It is unlikely you will be able to survive them in the large mobs that inhabit the area. Make sure that you do not get cornered by them, and just keep running until you lose aggro.
Tackling a full mob (or even 2 mobs) of Jungle Skale is little problem. Get them to bunch up as much as possible, and then get in close to one and cast your spells in the following order: Glyph of Lesser Energy -> Obsidian Flesh -> Mystic Regeneration -> Sliver Armor -> Immolate -> Flame Djinn's Haste. Cast Stoneflesh Aura to cover the short downtime in Obsidian Flesh. Recast your spells and Glyphs as they become available. Obsidian Flesh should be your priority enchantment, as the Skale will strip your other enchantments without it. A max damage fire wand can help things along nicely.
Keep your distance so that you don't cause any Life Pod pop-ups. Equip your Pyromancers headgear. Cast Glyph of Lesser Energy if you want to followed by Meteor Shower, Stoneflesh Aura(optional) and a few Immolates. Wanding helps again here. 1 Nuke and 3 Immolates later, your Behemoth should be dead.
Once your Behemoth is dead, you will almost inevitably have to run past it in such a way that the Life Pods will spawn and follow you. It is possible in some placements to run past the pods, or to avoid spawning them altogether, if the Behemoth didn't drop any loot you wanted. However, do not drag them into other mobs. Tackling 1 or 2 Life Pods is easy, but 3 can be more difficult. Careful advancement towards the Behemoth corpse and prompt running away can enable you to spawn just one Life Pod at a time. When facing one or two, the best thing to do is get in close, cast Flame Djinn's Haste and Immolate. This will usually kill single Life Pods or the first of a pair. If you have to run away, or you have spawned three, try to pull just one or two. Persevere and you should find one partially separates itself from the others. Get in quick and repeat the combo mentioned above to kill it before the others have a chance to heal it. They are also stupid enough to stand in a meteor shower a lot of the time if you don't mind waiting for the recharge before tackling the next Behemoth.
If you fight these without Obsidian Flesh active, you will die. Equip your Geomancers headgear. Cast Glyph of Lesser Energy and Obsidian Flesh before aggroing them! Much as with Jungle Skale, get in close and cast Sliver Armor, Flame Djinn's Haste and Immolate while Obsidian Flesh is up. Meteor Showers can help as well. Once Obsidian Flesh has run out, you can either run away, or try to exhaust your foes' supply of interrupts before recasting Obsidian Flesh. It is usually wiser to kill 2 Wind Riders at a time before running away. As you run away you will surely be under the effects of Conjure Phantasm, but just keep running until you lose aggro and then heal.
[edit] Counters
Wind Riders, if given the opportunity to cast anything other than Conjure Phantasm on you will usually kill you.
[edit] Variants
- Replacing Sliver Armor with Serpent's Quickness to keep Obsidian Flesh up (near-)indefinitely means that you can spend longer taking on Wind Riders and Jungle Skale, but with the loss of Sliver Armor's damage, and the increase drain on energy, the net result is a longer overall run.
- Change to E/R and swap Mystic Regeneration for Troll Unguent. This has the advantage of being unstrippable due to it being a skill rather than an enchantment. It makes the run through the spiders tricky though.
- You can swap out Glyph of Lesser Energy for Glyph of Elemental Power, but this makes energy conservation much more difficult.
[edit] See also
Build:W/R Melandru's Resilience Totem Axe Farmer
Build:R/any_Solo_Totem_Axe_Farmer
[edit] Duo Titan Farm
This build is designed to farm in The Foundry of Failed Creations with a Invincible_Monk and Famine Ranger in hopes of getting a Titan Gemstone as they go for a large sum of money.
[edit] 105 Monk Tank
| Attribute Rank | |
|---|---|
| Protection Prayers | 10 + 3 (+ 1) |
| Divine Favor | 11 + 3 (+1) |
| Illusion Magic | 10 |
| Healing Prayers | 0 + 3 |
| Smiting Prayers | 0 + 3 |
 |
 |
 |
 |
 |
 |
 |
 |
[edit] Equipment
- Any weapon with lengthening 20% enchantment time will work but I recommend Kepkhet’s Refuge for the extra energy given.
- All pieces of armor must have a superior rune on them bringing your health down to 105hp which is a variation of the 55 Monk build.
[edit] Usage
Cast the last 2 enchantments when loaded into the area and take the Anguish Hunt and Quest. Cast Protective Spirit, Spell Breaker, and then Shield of Absorption once Quickening Zephyr is up. Watch the group of Margonites to see where they ball up at. Once you are ready and they are about to ball agian. Cast your main enchantments and rush in, being sure to stand next to the Margonite Anur Ki and getting as close to other spell casters as possible. Note that the visages only work when being hit by melee attacks so do not continue to keep up if there are no melee attackers on you. Once the group of margonites is dead, pull the titans that spawn into the area between the wall and the broken wall in the corner of the room. Maintain Protective Spirit, Spell Breaker, and Shield of Absorption at all times. Stay close to the monks 1º, then spellcasters, necros and mesmers. After finishing them go for the melee enemies. If any non-melee targets manage to stay alive attack them with your wand, wait for their Healing skills (Troll Unguent, Leader's Comfort) and interrupt them using Lightbringer's Gaze or/and ask for the ranger's help with Apply Poison.
[edit] Counters and Problems
- Casting Spell Breaker when Quickening Zephyr is not up will result in it not recharging in time which then can lead to enchantment stripping and death.
- Not having all the spell casters in adjacent range to be hit by Visages.
- Healing spikes from Margonite Anur Ki
- Being interrupted by an Anur Vu's Magehunter's Smash (which only happens if you cast your Visages too late.)
- Due to Shield of Absorption nerf you now need to spam Shield of Absorption to keep yourself alive
[edit] The Famine Ranger
| Attribute Rank | |
|---|---|
| Wilderness Survival | 12 (+ 1 + 3) |
| Beast Mastery | 8 (+1 + 3) |
| Healing Prayers | 8 |
| Expertise | 5 + 1...3 |
 |
 |
 |
 |
 |
 |
 |
|
[edit] Equipment
- Radiant Armor with Superior Wilderness Survival rune and runes of attunement for any other slots available is recommended.
- A Staff with 15 or more energy.
- Any type of Bow (Longbow or Flatbow is recomended).
[edit] Usage
Cast last enchantments on Monk upon loading (Making sure that you have enough energy for your first spirits) and take Anguish Hunt and Quest. Use Serpent’s Quickness followed by Quickening Zephyr when Monk is ready. Cast Famine and keep Quickening Zephyr and Famine up at all times. Cast Edge Of Extinction when Margonites are close to death.
[edit] Variants
- Replace Apply Poison with Lightbringer's Gaze (depending on Lightbringer Rank) for different ways to deal with stragglers.
- Some people like to carry Succor in place of Balthazar's Spirit.
- Replace Serpent's Quickness with Lightbringer's Gaze. Cast Quickening Zephyr only while under the effects of Quickening Zephyr. The Margonite Anur Tuk will cast the initial one for you.
[edit] See Also
YouTube Video of similar build in action using a ranger hero
[edit] Ele solo boss
This build utilizes the elite Shadow Arts skill Shadow Form and the earth magic skill Sliver Armor to quickly take down bosses that are accompanied by medium/large mobs to efficiently farm their green items.
[edit] Attributes and skills
| Attribute Rank | |
|---|---|
| Earth Magic | 12 + 1 + 3 |
| Energy Storage | 3 + 3 |
| Shadow Arts | 12 |
 |
 |
 |
|
 |
 |
 |
 |
[edit] Equipment
- Archmage's Armor
- Enchantments last 20% longer weapon.
- Arius' Sai or Chimor's Daggers are recommended Daggers.
- Galigord's Stone Staff is a recommended Staff.
- Totem Axe/Rajazan's Fervor + Galigord's Stone Scroll are also recommended. Earth Scrolls with identical stats as Galigord's can be found at Collector Ohtah in the Undercity (5 Plague Idols) or Collector Denos Makaluum in Vasburg Armory (5 Stone Horns). Droajam's Storm is also very similar to Galigord's Stone Scroll (and may be preferable depending on what you are farming).
[edit] Usage
- Run to the boss using Dark Escape.
- When you are just out of aggro, activate Glyph of Elemental Power,Shadow Form and use Death's Charge to teleport in. Usually aggroing before teleporting in makes enemies clump together, giving Sliver Armor less of a chance to target the boss.
- Then activate Sliver Armor. Make sure you are closer to the boss than anything else, or you will not kill it! If Sliver Armor ends up targetting the wrong foe, try stepping away and then back to the boss, this will often give you the desired effect.
- Use Obsidian Flame, Teinai's Crystals then Crystal Wave to speed up killing.
- Just after the boss is dead, activate Shadow Form and use the speed buffs to run away to safety. You can use Shadow Form again since Morale Boosts recharges all skills.
[edit] Counters
- Shadow Form doesn't protect against signets, touch skills, traps and Area of Effect damage.
- Chilblains is a highly used skill by enemies which removes Shadow Form.
- Shadow Form will be removed by foes using Expunge Enchantments.
[edit] Variants
- Obsidian Flame, Teinai's Crystals, Crystal Wave, and Dark Escape may be switched out for other skills, depending on what you are farming.
- When fighting Warrior bosses, such as Sunreach Warmaker, it helps to use Rust so that their Healing Signet takes 3 times as long to cast. To do this, though, you will be required to take one point off of Energy Storage and put them into Water Magic.
- Caltrops is useful against bosses who attempt to flee when heavily damaged.
- Feigned Neutrality and/or Shadow Refuge is useful against groups which have mobs with touch skills which penetrate Shadow Form and is also required for the run to some bosses.
- You may also use Shock, Aftershock, & Teinai's Crystals in that order. Shock is a great interrupt on many bosses who cast their healing spells first to negate Sliver Armor.
- Shadow of Haste serves to give you an emergency out and is particularly useful when learning the build, taking the 'error' out of 'trial and error'. This serves particularly well when attempting to master a series of difficult bosses in a single run, such as the monk-mesmer-elementalist-necro constructs in Sunjiang District Explorable. Be warned - the speed boost offered by the skill makes pulling groups more difficult.
- See variant Build:E/A Gloom Farmer for farming gemstones in Gloom.
[edit] Notes
- Sometimes the skill Sliver Armor may start hitting other enemies instead of the boss and may change targets.
- If you have more than three melee opponents attacking you, the one being hit by Sliver Armor may flee.
[edit] List of soloable bosses
Total Number of Soloable Bosses: 134
- Please add info of the level of difficulty for each boss (Very Easy, Easy, Medium, Hard and Very Hard).
[edit] Prophecies
1 Current Boss
[edit] Monk (Mo)
- Protection Prayers
 Kepkhet
Marrowfeast - Hard (Make sure not to give the scarabs a
corpse before kill due to Well of the Profane. Most of the time the
area effect of traps placed below Kepkhet kill you, you turn into a
peice of toast.) I changed my build for this boss using Shadow
Refuge instead of Obsidian Flame. Before attacking the boss I cast
Dark Escape (to reduce damage taken in this case) followed by Glyph
of Elemental Power and Shadow Form, then use Death's Charge on the
boss followed up with Sliver Armor. Then cast Shadow Refuge to
neutralize the effects of the traps and start using Teinai's
Crystals and Crystal Wave until Kepkhet is dead. Personally I
haven't failed farming Kepkhet after this modification. Mark of
Protection could still be a problem though. If you also change
Crystal Wave and Teinai's Crystals for Shock and Lift Enchantment,
you can cast Shock when Kepkhet casts Mark Of Protection. If you
interrupt Mark Of Protection, than just continue killing him, but
if you are too late (what probably will be the case), you have to
cast Lift Enchantment, when Kepkhet is still knocked down. Than
Mark Of Protection will be removed and you will have enough time
left to kill Kepkhet. Also, make sure that no griffon has aggroed
Kepkhet, as it will spawn additional touch necros around her. Also,
if you died attempting to kill her, you have to rezone and retry,
as additional touch necros from surrounding area will come near
her. If you follow up all those tips, Kepkhet will be
Easy/Medium.
Kepkhet
Marrowfeast - Hard (Make sure not to give the scarabs a
corpse before kill due to Well of the Profane. Most of the time the
area effect of traps placed below Kepkhet kill you, you turn into a
peice of toast.) I changed my build for this boss using Shadow
Refuge instead of Obsidian Flame. Before attacking the boss I cast
Dark Escape (to reduce damage taken in this case) followed by Glyph
of Elemental Power and Shadow Form, then use Death's Charge on the
boss followed up with Sliver Armor. Then cast Shadow Refuge to
neutralize the effects of the traps and start using Teinai's
Crystals and Crystal Wave until Kepkhet is dead. Personally I
haven't failed farming Kepkhet after this modification. Mark of
Protection could still be a problem though. If you also change
Crystal Wave and Teinai's Crystals for Shock and Lift Enchantment,
you can cast Shock when Kepkhet casts Mark Of Protection. If you
interrupt Mark Of Protection, than just continue killing him, but
if you are too late (what probably will be the case), you have to
cast Lift Enchantment, when Kepkhet is still knocked down. Than
Mark Of Protection will be removed and you will have enough time
left to kill Kepkhet. Also, make sure that no griffon has aggroed
Kepkhet, as it will spawn additional touch necros around her. Also,
if you died attempting to kill her, you have to rezone and retry,
as additional touch necros from surrounding area will come near
her. If you follow up all those tips, Kepkhet will be
Easy/Medium.
[edit] Factions
52 Current Bosses
[edit] Warrior (W)
- Swordsmanship
 Sskai, Dragon's Birth - Hard/Very
Hard (it may prove difficult because off the boss's high hp
)
Sskai, Dragon's Birth - Hard/Very
Hard (it may prove difficult because off the boss's high hp
)- Sun, the
Quivering - Hard/Very Hard (Mobs may appear from the
roofs, making the run almost impossible)
- Warrior's
Construct - Hard/Very Hard( difficult to run to)
- Axe
Mastery
- Wing, Three
Blade - Hard (Difficult due to the high HP of the boss
and the lack of mobs)
- Hammer
Mastery
- Jayne
Forestlight - (drops Hammer)Very Easy/Easy (Wait until
the mobs let a clean run, after that get as close as you can to the
boss and jump in)
- Shield
- Strength
- Reefclaw
Ragebound - Medium (You will need to aggro a nearby
group for sufficient Sliver Armor damage)
- Strongroot Tanglebranch -
Easy/Medium (Run south of the Ritualist Construct to get to
him. Bring Rust for faster results)
- Tactics
- Sunreach
Warmaker - Medium/Hard (Can be difficult to get sliver
to target Warmaker due to several other melee wardens. Use Rust and
Shock on his healing signet.)
- Geoffer
Pain Bringer - Easy/Medium (Run his group into a Naga
group aproching from the NW then take him out right after their
fight, impossible with Outcast Deathhands around)
- Strength
[edit] Ranger (R)
To Be Added...
To Be Added...
To Be Added...
To Be Added...
To Be Added...'
[edit] Monk (Mo)
- Divine
Favor
- Untouched
Ancient Ky - Hard (Replace one of the Crystal skills
with Celestial Storm. Run west past the mob and
break aggro. Then return from the west and shadow step in)
- Ssuns, Blessed of Dwayna -
Hard (Running there is hard. Easier to die in Archipelagos
outside Luxon Jade Flats as a Kurzik and approach from
shrine.)
- Ziinfaun
Lifeforce - Very Easy/Easy (Leave from the Marketplace
into Bukdek and go into Xaquang Skyway from there. Bring Feigned
Neutrality instead of Crystal Wave)
- Healing Prayers
- The Scar Eater -
Very Easy/Easy (Also a fairly easy boss to practice on. Once
you enter the area, run to the res shrine and wait for the nearest
mob to patrol near him then run in and take him down.)
- Protection Prayers
- Jayne
Forestlight - Very Easy/Easy (Wait until the mobs let a
clean run, after that get as close as you can to the boss and jump
in)
- Monk's
Construct - Medium/Hard (The first mob may prove very
difficult to go near the boss)
- Smiting Prayers
- Scourgewind, Elder Guardian -
Medium/Hard (Cast Sliver Armor before using Death's Charge,
as Signet of Judgment will knock you down)
[edit] Necromancer (N)
- Soul
Reaping
 Doomed
Ancient Kkraz - Very Hard (Hard Run and u need to kill
Ancient Phi first to get there. Use Feigned Neutrality and
Celestial Storm instead of Glyph of Elemental Power)
Doomed
Ancient Kkraz - Very Hard (Hard Run and u need to kill
Ancient Phi first to get there. Use Feigned Neutrality and
Celestial Storm instead of Glyph of Elemental Power)
- Blood
Magic
- Kyril
Oathwarden - Medium (Earth Elementalists can kill you
with Shockwave)
- Foalcrest
Darkwish - Easy/Medium (Most of the time you can kill
him in one shot, but if that doesn't work aggro the nearby group of
Mantises and die yourself; he will make Bone Fiends which give you
just enough damage for Sliver Armor)
- Chan the Dragon's Blood -
Easy/Very Easy (The run is easy if you have Feigned
Neutrality)
- Death
Magic
- Ghial
the Bone Dancer - Hard/Very Hard (With more than 2 rits
just pull the group in front of the bridge with you using Feigned
Neutrality and no speed buffs.For beginners, bring Dash and Shadow
Refuge instead of Obsidian Flame and Crystal Wave. Also, bringing
Glyph of Concentration in place of
Glyph of Elemental Power is recommended; without it, your Sliver
Armor may be interrupted.)
- Sessk,
Woe Spreader - Easy/Medium (Sometimes Sliver Armor
targets other enemies, if you bring stone dagger you can kill him
in about 5 seconds)
- Curses
[edit] Mesmer (Me)
- Fast
Casting
 The Time Eater -
Very Easy/Easy (Add skills for more damage because very few
mobs are surrounding him)
The Time Eater -
Very Easy/Easy (Add skills for more damage because very few
mobs are surrounding him)
- Domination Magic
- Mesmer's
Construct - Hard (The mobs make it very difficult to go
near the boss)
- Milefaun
Mindflayer - Medium/Hard (Must be opposite of
controlling faction in order resurrect at NW shrine)
- Mina Shatter
Storm -Easy/Medium (Bring Feigned
Neutrality in place of Crystal Wave, bring Shock and Aftershock in place of Obsidian Flame
and Teinai's Crystals, the run is very
long.)
- Bezzr Wingstorm
- Easy/Medium (Bring Shadow of Haste and Dash (to cancel SoH in case you need to try
again). Die as a Luxon, you'll respawn near it. There will be
Mantis and Wardens around. If you time it right, you can make them
fight each other then kill the ones remaining. The mobs that spawn
when you attack Bezzr, do have skills that ignore Shadow Form so just
cancel SoH and try again.
- Illusion Magic
- Kenrii Sea
Sorrow
- Xisni Dream
Haunt - Medium/Hard
- Inspiration Magic
To Be Added...
[edit] Elementalist (E)
- Energy
Storage
 Rahse
Windcatcher - Easy
Rahse
Windcatcher - Easy- Chung, the
Attuned - Easy (Long run, use Dark Escape to run past
mobs on the way to Undercity)
- Air
Magic
- Amadis, Wind of the Sea-
Medium
- Fire
Magic
- Star
Ancient Koosun - Hard/Very Hard (Speak to Kuunavang for Celestial
Storm, bring Shadow Refuge and Dash)
- Lian,
Dragon's Petal- Medium/Hard (Bring Dash insted of Crystal Wave to break first aggros, challenging
because of Double Dragon)
- Water
Magic
- Elemental's Construct - Medium
(Use Shadow
Form to run to him and hide to rest on southeast corner of his
room.)
- Wiseroot Shatterstone -
Medium/Hard (Sliver Armor often will not target him, even if
you are closest to him.)
- Earth Magic
To Be Added...
[edit] Assassin (A)
- Piercing damage
 Assassin's Construct - Easy(Wait
until all mobs collect in the middle of the island)
Assassin's Construct - Easy(Wait
until all mobs collect in the middle of the island)- Chkkr Locust
Lord - Easy/Medium(Sliver Armor often doesn't hit
him)
- Darkroot Entrop
- Very Easy/Easy (Pull first mob of Wardens with you)
- Shreader
Sharptongue - Very Easy/Easy (Exchange Teinai's
Crystals or Crystal Wave with Shadow Refuge
- Silent
Ancient Onata - Medium/Hard (Add the Special Skill)
- Xuekao, the Deceptive - Easy
(run around the building he is in and approach from ramp. Aggro him
and immediatly use Dark Escape and run to the res shrine near by.
This will trigger a fight between him and some Jade
Brotherhood. After fight immediatly run in and start your
sequence. He should fall very easily.)
- Slashing damage
- Bramble
Everthorn - Easy/Medium (Because of the heals)
- Onis in Rhea's Crater for Ungues of the
Oni - Easy/Medium (The hardest part is getting there,
once there it's easy to kill them two/three at a time)
- Urkal the
Ambusher - Very Hard (Sliver Armor almost never targets
him - Shadow of Haste variant is highly recommended
to give you multiple attempts)
[edit] Ritualist (Rt)
- Spawning Power
 Cho, Spirit
Empath - Easy/Medium (Bring Feigned
Neutrality instead of Dash, come from Nahpui Quarter!!! Cast Feigned
Neutrality last, once you are already fighting, 50/50 chance monks
will heal him, if so run and rezone; the fastest way is to run
towards Nahpui Quarter (just a few feet west from
Cho). It will make the run a lot easier and shorter.)
Cho, Spirit
Empath - Easy/Medium (Bring Feigned
Neutrality instead of Dash, come from Nahpui Quarter!!! Cast Feigned
Neutrality last, once you are already fighting, 50/50 chance monks
will heal him, if so run and rezone; the fastest way is to run
towards Nahpui Quarter (just a few feet west from
Cho). It will make the run a lot easier and shorter.)- Ritualist's Construct -
Easy/Medium (Near by monk can prove difficult)
- Tomton
Spiriteater - Very Easy/Easy
- Chkkr
Brightclaw - Easy/Medium (Wait for plant mob to run past
the pool, when they are clear, sure to aggro enough of the pop-up
groups before casting Sliver Armor) The pool gives you 20% longer
enchantment because of Blessed Water.
- Channeling Magic
- Ssyn Coiled
Grasp - Easy/Medium( Silver Armor doesn't always target
him, just lose aggro if it doesn't)
To Be Added...
- Restoration Magic
- Flower
Spiritgarden - Medium/Hard (move in a litte until mobs
pop up, you need to time you Shadow Form and Silver Armor wisely,
needs some practise)
- Orosen, Tranquil
Acolyte-Medium/Hard (cast Obsidian Flame, Crystal Wave,
Teinais Crystals and then Obsidian again (with the other skills
applied). Foes can interrupt your skills.Also pull the group that
is right up the ramp near him)
[edit] Nightfall
80 Current Bosses
[edit] Warrior (W)
- Swordsmanship
- Reaper of Agony
- Hard/Very Hard (Since he has new position which requires a
very long and hard run)
- Axe
Mastery
- Chor the Bladed
- Easy (move to that rock on his right and bring the pop-ups
to him, don't cast Silver armour until he uses Frenzy, he should
die in 5 seconds after that, if he didn't cast frenzy within 4
seconds, just move out to top right, and do it again)
- Robah Hardback -
Medium/Hard
- Colonel
Chaklin- Medium/Hard (Easy to get to,try to aggro as
much as you can and avoid disrupts, if you die hope your shadowform
is recharged fast and reattack asap if hes halfway or more down in
health good chance second shot will finish him
- Hammer
Mastery
- Grabthar the Overbearing -
Medium/Hard (Need to also aggro the nearby harpy group to be
successful, if you wait a moment the harpies actually move closer
to Grabthars mob) Not much room for error.
- Riktund the
Vicious - Medium/Hard
- Shield
- Strength
- Onwan, Lord of the Ntouka -
Easy/Medium (Leave from command post and follow river into
lake. Attended to by several Mesmers and route to reach the boss
although short has a multitude of creatures)Easiest way to kill is
to deaths charge to him then run past him and wait for recharge of
skills then get the tusk howlers and boss to theirselves to keep
the rampaging nktoukas from stripping your enchants with chilling
victory
- Tactics
- Mahto
Sharptooth - Easy/Medium (Easy to kill a little more
difficult to get to)
- Strength
[edit] Ranger (R)
To Be Added...
- Hornbow
 Colonel Custo -
Medium(aggro amount helps its sometimes hard to get as much
as you want plus getting sliver armor on him directly can be
troublesome to
Colonel Custo -
Medium(aggro amount helps its sometimes hard to get as much
as you want plus getting sliver armor on him directly can be
troublesome to- Vah the Crafty -
Very Easy/Easy (Wurms make it real easy)
- Longbow
- Zelnehlun
Fastfoot - Very Easy/Easy (He is dead in 10 seconds if
Sliver Armor
targets him)
- Bearer of
Misfortune = Very Hard (A long run to get there, kill
Word of Madness first, then while within range of Quickening
Zephyr, shadow step in and damage him to about 1/3 health, shadow
step out, wait for Shadow Form to recharge, then shadow step in
again)
- Recurve
Bow
- Bolten
Largebelly - Medium (Can be difficult to target with
Sliver Armor)
- Shortbow
- Admiral Chiggen
- Medium/Hard
- Tenezel the
Quick - Medium
[edit] Monk (Mo)
- Divine
Favor
- Topo the
Protector - Hard/Very Hard (Difficult run. Once you get
to the temple, refuge in Balthazar's shrine. Get to Topo, let him
summon the Graven Monoliths and disappear. Die and go
back to him. He won't disappear anymore.)
- Healing Prayers
- Chidehkir, Light of the Blind -
Medium (Approach from Sunspear Sanctuary. You will need to
grab the group of Kournans that patrol around the fort to take him
down. Getting sliver to target him with the Kournan Guards on you
is a pain).
- Chiossen, Soothing Breeze -
Medium/Hard (The Rampaging Ntouka make this hard, use Feigned
Neutrality as the Rampaging Ntouka run towards you and it will
strip Feign Neutrality instead of Sliver Armor or even worse,
Shadow Form. Aggro the nearby hekets to the east of Chiossen's
group. Pack Obsidian Flame and Aftershock to speed up the killing, or Shock and Aftershock to interrupt a
heal.)
- Dunshek
the Purifier - Easy/Mediumclear sandgiants before
aproach(in wurm), use shock/aftershock combo
- Hahan, Faithful Protector -
Medium/Hard
- Protection Prayers
- Commander
Sadi-Belai - Medium/Hard (Aggro Skree group nearest to
his group. Shock + Lift
Enchantment AFTER he puts Shielding Hands on. Bring Obsidian
Flame. Spam as needed)
- Banor
Greenbranch - Easy/Medium (Bring Lift
Enchantment to remove Shield of Regeneration instead
of aftershock or deaths charge, need to aggro nearby Beetles)
- Smiting Prayers
- Flame of Fervor
- Easy (Wait till the patrol comes in.)
- Riseh the
Harmless - Easy/Medium
[edit] Necromancer (N)
To Be Added...
- Blood
Magic
- Lieutenant
Vanahk - Medium (it is easier if you manage to aggro the
previous mob)
- Death
Magic
- Jerneh
Nightbringer - Medium/Hard (When you reach the nearby
ressurection shrine, there is a mob ahead of you. It's best to try
and avoid them as they are usually filled with Water elementists
and Dervishes with a lot of aoe damage. If you cannot survive long
enought to kill Jereh due to Vile touch and the Dervish Aoe damage,
use Dark escape before you shadow step in for half damage)
- Eshekibeh
Longneck - Very Easy/Easy
- Terob Roundback
- Easy/Medium (when the two heket monks are near him it can
be hard at times
- Curses
- Creo Vulnero -
Easy/Medium
- Fondalz
the Spiteful - Medium
- Modti
Darkflower - Easy/Medium (Killing him is Very Easy, but
its much easier to reach him if you run through the middle of the
map till you reach the second resurrection shrine, only one group
of mandragors will be in your aggro on the way to him.)if sucessful
he can be killed in 3-4 seconds
- Master of
Misery - Very Hard (Very long and difficult run.
Moreover, if you die once it'll be using taste of death on his
minions to survive.)
- Tain the
Corrupter - Easy/Medium (Sometimes there's a Paragon in
the group which can make it more difficult cause of the shout
"Stand your ground")
[edit] Mesmer (Me)
To Be Added...
- Domination Magic
- Yammiron, Ether Lord - Easy
- Captain Chichor
- Easy (Wait until he crosses the bridge.)
- Illusion Magic
- Shepherd
of Dementia - Medium/Hard (Aggro the group to the right
of him too)
- Eshim
Mindclouder - Very Easy (Short walk and easy to kill, it
is like the Factions variant of Sessk,
Woe Spreader)
- Inspiration Magic
- Neoli the
Contagious - Easy/Medium (Must run by a skale lasher
group before using Death's Charge. Boss dead very quickly)
- Makdeh the Aggravating -
Easy
- Rual,
Stealer of Hope - Easy
[edit] Elementalist (E)
- Energy
Storage
- Setikor
Fireflower - Medium (Beware of the dervishes in his
group)
- Air
Magic
- Birneh
Skybringer - Very Easy (Lots of mobs for Sliver Armor to work)
great practice one of the easiest to farm
- Moteh
Thundershooter - Hard
- Fire
Magic
- Korr,
Living Flame - Hard (It is easier if you can aggro the
nearby group of djinns too.Also,Sliver armor rarely targets Korr,so
bringing Shadow of Haste for multiple tries would
help.)
- Korshek
the Immolated - Easy (Make sure to hit the nearby
Whispers Informant for some easy Lightbringer points)
- Exuro Flatus -
Medium/Hard (Madness Titans will damage you through Shadow Form)
- Hajkor,
Mystic Flame - Easy/Medium (Short run in a wurm, be sure
to bring Shadow
Refuge to heal Headbutt damage)
- Kormab, Burning Heart -
Easy/Medium (Somewhat of a long run, and you'll probably die
at least once due to Death Nova mobs but once there it's easy to
kill. Bring Shadow of Haste and Dash in case you need more than one try. If you
have finished Population Control, it's easier to start
from Dzagonur Bastion.)
- Water
Magic
- Storm of
Anguish - Very Easy/Easy (Environment effect slows cast
time)
- Buhon Icelord -
Medium/Hard
- Bosun Mohrti -
Medium (Will sometimes run from Sliver Armor's Damage. Bring
Shock/Aftershock as a snare)
- Earth
Magic
- Hajok Earthguardian (Insect) -
Medium/Hard (A difficult run to get towards him, when there
it is easy, Lure the nearby Kournans)
[edit] Assassin (A)
- Piercing damage
- Chimor the Lightblooded -
Easy/Medium (Nice pair of daggers if you don't have a
+Energy/+Enchantment Staff)
- Lunto Sharpfoot
- Easy/Medium (The only thing is the monk because of her it
will take a bit longer to kill him)
- Ravager of
Dreams - Very Hard (Long and difficult run; need good
timing to aggro plenty of mobs due to its armor)
- Slashing damage
- Admiral Kaya -
Medium/hard (Wait for the hekets to get near, sometimes
there are 2 monks which increases difficulty)
- Major Jeahr -
Medium (Approach from Camp Hojanu)
- Hanchor
Trueblade - Easy/Medium (Bring and spam Obsidian Flame
when needed. Nearby Skree Griffin can make it troublesome but still
easy)
[edit] Ritualist (Rt)
- Spawning Power
- Churahm, Spirit Warrior -
Easy/Medium (You may have to use this build to kill some
Ethers, which will make the run easier)
- Channeling Magic
- Lieutenant
Kayin - Very Easy (Just aggro one other group, and he
goes down in like 10 seconds)
- Bohdalz the
Furious - Hard/Very Hard (killing him is easy - getting
there is hard - maybe consider henchmen for getting to him)
- Podaltur the
Angry - Easy/Medium (body blocking during the run to him
may be a hassle due to the large amount of hekets on the way)hard
to directly attack when the heket warriors get in the way
- Shakahm
the Summoner - Medium/Hard (Take the path right next to
Exuro Flatus.
Run past the group of titans and shadows (Preferably not aggroing
either group). Clear path except for a Torment Claw. Keep going
past the Ressurection shrine until the group of shadows come
towards you. Hang out by the Ressurection shrine until they turn
back. Follow them. Right outside aggro, highlight Shakahm, hit Dark Escape, Shadow Form, and
Death's
Charge. Step to him. Use Glyph of Ele Power, Sliver Armor, one
of the Crystal's Skills (Teinai's Crystals or Crystal Wave) and
spam Obsidian Flame when you can. If he's close to you, it's a much
easier kill then if you have to run a decent distance just to Death
Charge to him.
- Communing
- Consort of Ruin
- Hard/Very Hard (Long and difficult run.)
- Restoration Magic
- Alem the
Unclean - Easy/Medium (Use Shock and Lift Enchantment to remove Shield of
Absorption)
[edit] Dervish (D)
- Slashing damage
 Onslaught
of Terror - Medium/Hard (Need to aggro at least one
other group, eles and mesmers can interrupt/slow. He also seems to
run at times, even though he is melee. As well, Sliver Armor might
not target him, or stray off.)
Onslaught
of Terror - Medium/Hard (Need to aggro at least one
other group, eles and mesmers can interrupt/slow. He also seems to
run at times, even though he is melee. As well, Sliver Armor might
not target him, or stray off.)- Shezel
Slowreaper - Medium/Hard (Easy Run, use Dark Escape before you
step in to receive half damage from Staggering
Force)
- Vahlen the
Silent - Medium (Aggro near by djinn and run to the
boss)
- Fahralon
the Zealous - Easy/Medium (will likely need Feigned
Neutrality and/or Armor of Earth to stay alive long enough,
otherwise easy farm. Abaddon's Chosen can stop this farm if he
uses it.)
- Marobeh
Sharptail - Hard/Very Hard (Kill the 2 groups before him
and wait for recharge of shadow form. When at marobeh himself it's
hard to get him with your sliver armor but i'ts possible)
- Corporal
Suli-Hard/Very Hard (Run like you would to go to the Ele
boss...but run back to get Suli after Shadowform Recharges...this
is hard but possible)
- Earth
damage
- Bubahl Icehands
- Hard/Very Hard (His damage ignors Shadow Form and usually
does 150+ so add Shadow Refuge, he also runs when he gets low
health)
[edit] Paragon (P)
- Spear
- Spear
Mastery
 Eshau Longspear
- Easy/Medium (You need to aggro the group of Mandragors
behind him rezone if that party has a Mandragor Imp in it.)
Eshau Longspear
- Easy/Medium (You need to aggro the group of Mandragors
behind him rezone if that party has a Mandragor Imp in it.)- Shrieker of
Dread - Hard (you'll need to aggro several (ideally 3)
patrols to take him down; wait for them to converge). Also watch
out for the Death Nova when killed.
- Pehnsed
the Loudmouth - Medium (Very close. Sometimes takes two
tries to get him down far enough that the next will kill him)
- Tureksin the Delegator - Medium
( Tough run, takes practice )
- Jishol Darksong
- Medium (drop Tenai's Crystals for Disrupting Dagger to
interrupt his self-heal, and aggro the mob of Cobalt to the south
as well. He has a habit of running out of Sliver Armor despite
being a melee foe, so be sure to keep tabs on him)
- Toshau
Sharpspear - Easy/Medium (Staggering
Force of Enchanted Brambles ignores Shadow
Form)
- Spear
Mastery
- Shield
- Command
- Lieutenant
Shagu - Medium/Hard (Must aggro at least 2 other groups
to overcome the healing. Be sure to hit the res shrine just to the
south)
- Briahn the
Chosen - Easy (Be sure to use obsidian flame twice, as
soon as it recharges. This extra shot should be just enough to
overcome the healing)
- Motivation
- Wandalz the
Angry - Medium/Hard (Killing him is quite easy due to
nice aggro, but getting there is quite a pain. Bring Feigned
Neutrality for better self heal during the run)
- Command
[edit] See also
- Build:A/E Solo Green Farmer
- Video: Green Farming
- Video: E/A Green Farming Showing Several Bosses
- Threads at GuildWars Guru and GWOnline.
[edit] Template
 |
A2NRiZznHdGuzYwD3GLxsRDE |
[edit] necro solo farm
This build is intended for quick and direct farming of bosses. It relies on the normal 55 standard and very high health regeneration for healing and damage reduction. Essence Bond and Balthazar's Spirit provide energy for the consistent spamming of regeneration skills. The main damage comes from Spoil Victor and possibly one Touch Attack. This build allows the user to charge directly for the boss monster and ignore the boss's mob.
[edit] Attributes and Skills
| Attribute Rank | |
|---|---|
| Blood Magic | 12 + 1 + 3 |
| Protection Prayers | 9 |
| Healing Prayers | 9 |
|
|
 |
 |
 |
 |
|
|
|
[edit] Equipment
- Each of your armor pieces need to have a superior attribute Rune. This will lower your base Health to 105. (The only required type is blood, but 5 are necessary to hit 105 health.)
- It is a good idea to bring a second set of armor. This will allow you to adjust your health manually based on any Death Penalty you might accumulate.
- Any +5 energy/20% longer enchanting sword/axe such as Rajazan's Fervor or Totem Axe.
- The -50hp Grim Cesta from the Cities of Ascalon quest. (This is not required if you don't mind dying once and using a -20 offhand to hit 13hp. This will work better in most cases.)
- For 13hp build, any -20hp offhand (preferably +12 energy). (Life is Pain Inscriptions help with this.)
- If you have any +hp offhands they could also be useful if any DP is accumulated.
[edit] Usage
- Cast your four maintained enchantments when entering the explorable area. Try to allow full energy regeneration after each one until you're used to an area.
- As you approach your target cast Protective Spirit and Healing Breeze.
- Target the boss monster and cast Spoil Victor.
- Get as much aggro as possible from the boss's mob of monsters.
- Begin using Vampiric Touch on the boss
- After any touch attempt refresh either Healing Breeze or Protective Spirit. Alternate the refresh between the two.
- Having the touches interrupted is not an issue. They have a fast refresh time.
- Refreshing Healing Breeze and Protective Spirit early is ideal when facing a boss whose mob has interrupt capability. If they are interrupted this is less problematic as they'll likely refresh before they expire.
- To keep melee foes from fleeing, keep hitting them with your axe or sword.
[edit] Counters
- Enchantment stripping spells such as Chilblains, Lingering Curse, Well of the Profane, Gaze of Contempt, Rend Enchantments, Strip Enchantment, Inspired Enchantment, Dark Apostasy, Shatter Enchantment, or Expunge Enchantments.
- Life Steal attacks will bypass the protection offered from Protective Spirit. This will usually kill you.
- Interrupts of Protective Spirit will usually kill you.
- You can't kill anything with self healing.
[edit] Variants
- Consider using Blood of the Aggressor instead of Vampiric Touch for lesser energy use and damage from a distance (safer against interrupts from warriors or rangers). Vampiric Touch is sometimes impossible to use in areas where there's a lot of energy degeneration such as Domain of Secrets.
- Some groups apply more degen than you can handle, in this case replace Vampiric Touch with either Life Siphon or Blood Renewal. Life Siphon is better for groups without a lot of interrupts, while Blood Renewal has a faster cast time, and the sacrifice will be healed before you notice it most of the time.
- Another skill you may consider in replacing Vampiric Touch is Wallow's Bite or Touch of Agony. With only 5 energy cost and 3 sec recharge time, you can definitely spam this skill to speed up killing. The 10% life sacrifice is hardly noticeable. A good example would be the case of farming Wing's Axe. If you encounter a mesmer with two ritualists, it's almost impossible to kill her with just Spoil Victor as she strips off hexes the moment you put it on her. Not to mention she strips off hexes from the her party too.
- Replacing Watchful Spirit with Vigorous Spirit and Vampiric Touch with Plague Touch opens up a lot of possibilities. Vigorous Spirit maybe be used as a cover enchantment versus enchantment removal or a cheaper heal than Healing Breeze when down to one or two attackers. When using Vigorous Spirit as a cover, it's usually best to cast Protective Spirit, then Vigorous Spirit, then Healing Breeze immediately before attacking the target mesmer or necro (Kournan Seers are one example of where this works very well). Plague Touch is useful to remove conditions such as Dazed from the Grasping Darknesses in the Underworld, or Deep Wound when fighting Stoneaxe Hekets while farming greens like the Eye of Argon and Balthazar's Fury though removing Deep Wound isn't always a good idea, since you end up taking less damage which makes you harder to kill.
[edit] Notes
- The ideal hp for this build is 19, although 55 and under should work in most cases. Also, Spoil Victor is more effective the lower your HP is as it is less likely a target will lower himself to below your hp. Going under 13 hp is not advised.
- See the boss strategies for notes, videos, and tips for specific bosses.

