Build:R/any Solo Totem Axe Farmer
From GuildWiki
 |
On May 1, 2007, all articles in the GuildWiki build namespace
will be deleted. After that date, no build articles may be posted
to the GuildWiki in either the main or build namespaces before a
new policy is decided on. Find the reasoning and the details behind
this at GuildWiki:Builds wipe. |
|
This build has been successfully vetted by the GuildWiki community according to the vetting procedure. This build has been designed for the following use: |
|
This is a build designed for Totem Axe farming which utilizes the Ranger's superior speed skills to run past foes. When necessary, Apply Poison or Kindle Arrows skills are used to dish out large amounts of damage to quickly eliminate foes you must defeat.
[edit] Attributes and Skills
| Attribute Rank | |
|---|---|
| Expertise | 9 + 1 |
| Wilderness Survival | 9+1 |
| Marksmanship | 12 + 3 + 1 |
 |
 |
 |
 |
 |
 |
 |
 |
Escape can be replaced with Natural Stride, in case you either haven't capped Escape, or would prefer to use a different Elite. If you don't have access to Nightfall skills, Storm Chaser or Whirling Defense could also work.
[edit] Equipment
Armor - Any max set of armor will do. Druid's Armor is preferred due to the extra energy it provides. Most of the damage you will take while Totem Axe farming is a result of degeneration, which is not affected by armor.
Weapons - You MUST have a longbow or a flatbow. Bows with Poisonous and Fiery bow strings are handy but not necessary.
A shield or other off-hand item with a defensive bonus is recommended for the run.
[edit] Usage
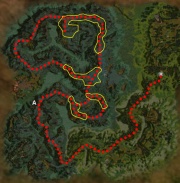
Start in Ventari's Refuge. If you have brought a shield and one handed weapon equip them and head into Ettin's Back. Cycle the speed stances repeatedly. You will have a constant speed boost along with a high block bonus. Head south towards Reed Bog. Along the way you will encounter some fire traps and possible bleeding from Hunter's Shot. If you are hurt badly keep moving until you have broken aggro or built up about 3/4 aggro bubble distance. Use Troll Unguent and keep moving.
Procede as before constantly using your three run buffs to rush past foes. When you are speeding through the area, the Trolls and Spiders are not able to attack effectively. If you see a large group of foes ahead, find a safe place and wait until your faster run skills recharge so that you can use them again.
When you have reached the southern-most part of your run there is a fork where you can go left (west) or right (northwest). The path to the right is usually easier since there are fewer Trolls. The Scarabs that pop out of the ground are only a problem if they are able to pin you - they use melee attacks and can only really damage you with Vampiric Touch. There are a few Spiders near the entrance to The Falls but you should be able to breeze past them. Even if they hit you with Pin Down keep moving since the duration of the Crippled condition is short-lived.
Now you have to deal with massive amounts of Maguuma Spiders. Luckily they don't do much damage and all your stances provide a hefty block bonus against their ranged attacks. If you get into trouble because of Pin Down or simply being poisoned for long durations, use Troll Unguent, but maintain your stances at ALL times, even if not moving. The Spiders are a pain but they seldom chase you very far and often by the time they have descended from the trees and activated Apply Poison you are almost out of range. The Spiders' spawn pattern is relatively consistent in The Falls, so find an area where they are not present and take a break to recharge.
Once you are past the Spiders you are faced with Jungle Trolls. The path is sometimes narrow here and a couple of Trolls often block the way. In order to get some clear space on the path, activate dodge and run towards the Trolls, then back up slowly so they will follow you. This should separate them, creating some space so you can run past. If necessary, activate Zojun's Haste on the way. If the Trolls pin you, you are dead. Even with the 75% attack Block provided by Escape, their Power Attack is lethal.
Once past the Trolls you will face Jungle Skale. The Skale are not really much of a threat because your Troll Unguent will offset Rotting Flesh (Disease). However there is a tendency for one or two Skale to constantly follow you which can be a real pain - even fatal if they follow you right up to the Wind Riders. Make sure there aren't any Trolls around, activate Apply Poison as needed and using the tab key hit several skale with Poison; use "shift/tab" to go back to the first one and restart the loop. Groups of 5 will be dead in around a minute and a half or less. Use Troll Unguent whenever you go below 3/4 health and slowly work your way through the Skale. Make sure you take out the patrols, especially before you get to the Wind Riders because you have to run from them.
Once you find a Root Behemoth make sure you attack it from higher or equal elevation - higher is preferable. (Being at a higher elevation than your target increases the range of your arrows; at a lower elevation your range is shortened.) The longbow or flatbow lets you attack the Root Behemoth without aggroing the Life Pods that are hiding there. Use Apply Poison to cause health degeneration on the Root Behemoth.
Next, creep forward slowly to aggro the Life Pods. The Pods will spring up one at a time if you're lucky. Hit a Pod once and try to pull it about half an aggro bubble away. Attack it using your two interrupt skills to interrupt Orison of Healing. If your poison is still active use it on lone pods. When Apply Poison runs out or if it is already exhausted use Kindle Arrows to do a massive amount of damage to the pods. (If two or more are aggroed don't use poison because they will use Mend Condition and with their other heals you won't be able to kill them.) If you get 2 or 3 aggroed try to lure them down hill as one will follow close and the other 2 will sit back and shoot at you, try to put as much distance as you can from the shooting ones and kill the on thats closest this is so the others can't heal the one your attacking. Then one of the others will get close to you and you can repeat this process until they are dead.
Keep moving through the area, using Troll Unguent as needed and picking up loot after ALL Life Pods are dead. If you run in to pick up your Totem Axe before you have killed the Pods you'll often aggro 3 of them. It's tempting to just run in and get the Axe but you may lose the rest of the run because Life Pods will often follow long distances.
When you get to an area with Wind Riders your strategy changes. Wind Riders have an interrupt (Cry of Frustration) that can affect non-spell skills. They also have Conjure Phantasm. This means that you will be constantly losing health while fighting them and everything you do will be subject to interruption. The solution is to try to pull them away from their group and kill them one at a time. Use Apply Poison while well outside of aggro range. Then move close but not quite into bow range. Use Troll Unguent and then attack one and only one Wind Rider. Hit it a few times to get its health low then run away using your stances and let the poison kill it. After you have broken aggro, immediately use Troll Unguent to ensure that you don't die. Repeat this process until the group of Wind Riders is dead. This is by far the hardest part of this run and takes a lot of patience to figure out. Don't get frustrated if you die. You may either continue the run (Candy Canes help) or restart.
[edit] Counters
- Getting Pinned.
This is the one thing you do not want to happen. Trolls can kill you with relative ease as soon as you stop moving with speed. As discussed above, it is sometimes necessary to get them out of your path. Also, the Scarabs can pin you if you are not paying attention. They spring up out of the ground and if you use the keyboard to move past them you often get hung up on them. If you click to move you need to keep clicking to make the game update its path so you can go around the new Scarabs.
- Interrupts.
Troll Unguent is an incredibly useful skill because it cannot be removed once it has been activated (except by the user's death). The drawback is that it has a 3 second casting time which means it is easy to interrupt. Wind Riders are capable of interrupting it and are more than capable of killing you.
[edit] Variants
- If you don't have Escape you can substitute Storm Chaser. The drawback is that Storm Chaser doesn't include attack evasion so you will get Crippled more often when facing spiders.
- If you have a Monk as your second profession consider bringing Purge Conditions or Mending Touch instead of one of your interrupts. This allows you to remove a Crippled condition if necessary. Bring a skill that removes all Conditions because otherwise just Poison will be removed, and it will be reapplied almost instantly.
- If you have a bow with a Fiery bow string you can use Ignite Arrows instead of Kindle Arrows. The important difference between these two skills in this setting is that Kindle Arrows changes the arrow's base damage from Physical damage to Fire damage. Ignite Arrows keeps the base damage as Physical, but the Fiery bow string converts the base damage to fire damage.
- If you have Factions, drop Savage Shot for Needling Shot as the RBs will die much faster once they get below 50%.
- If you have Nightfall, drop Distracting Shot for Forked Arrow to kill the Life Pods faster with Kindle Arrows going. (Use Forked Arrow and Savage Shot quickly to spike a single Life Pod)
- If you have Warrior as secondary, you can add the remaining points into Tactics and drop Escape for "Shields Up!". And then you can drop Kindle Arrows for Burning Arrow to add -10 degeneration to your target, if used together with Apply Poison (providing your Elite skill slot is open).
- Natural Stride can be used instead of Escape in order to give you the ability to use another elite skill. Due to Natural Stride's much shorter duration and recharge, you'll need to use your stances in this order: Natural Stride > Dodge > Natural Stride > Zojun's Haste. This will allow you to keep your stances up consistently. (recommended for ALL who have all 3 campaigns)
[edit] R/E Variant
[edit] Attributes and Skills
| Attribute Rank | |
|---|---|
| Expertise | 9 + 1 |
| Wilderness Survival | 9+1 |
| Fire Magic | 12 |
 |
 |
|
|
|
|
|
|
[edit] Equipment
- The Rotwing Recurve Bow is nice for the extra 5 energy.
- Alternatively, you can use a firestaff with +15 energy and swap distracting shot for Inferno or any other skill you might see fitting.
[edit] Usage
The only difference in this variant is the ability to kill the Life Pods faster. As they take double fire damage, they will be dead very quickly. Aggroing only 2 Life Pods is recommended, but 3 is possible. When you use your fire skills, use Phoenix first then Flame Burst. Make sure the life pods are as close to each other as possible.
[edit] Notes
This build was designed for Totem Axe farming but would also be useful in other running situations. The build is good for farming any item that requires running to get to and where your foes can be defeated with health degeneration (Poison).
The build is also useful for solo capping and in Alliance Battles. Several people using this build (one using Poison while others use Kindle) can capture points quickly and move on to the next very quickly as well.
[edit] Templates
R/Mo
 |
ACMxFxZmnUDrE4MbiN+GVzjB |
R/E Variant
|
|
AiNhivJOnbBv4x4bAOsyUzsB |

