User:Harry138/builds/sin/pveonly
From GuildWiki
[edit] A/D Dark Shadow Forge Runner
This build enables an Assassin to solo run from Beacon's Perch to Droknar's Forge, and with some modification is suitable for running other areas. Agility and protection skills from the Shadow Arts line, plus the Dervish's anti-knockdown Fleeting Stability enchantment, make this a fragile yet efficient Droknar's Forge runner. This build is even more efficient since the last game update that fixed the "enemies following you forever" bug.
The build takes practice, timing, and knowledge of the whole Droknar's Forge run, particularly Lornar's Pass, in order to successfully complete the run. Overall run times are at least on par with Warrior or Dervish runners. Ultimately, if nothing else, this is a challenging and fun alternative to experienced Drok's runners.
[edit] Attributes and Skills
| Attribute Rank | |
|---|---|
| Shadow Arts | 12 + 1 + 3 |
| Earth Prayers | 12 |
| Deadly Arts | 3 |
 |
 |
 |
 |
 |
 |
 |
 |
- Runes can be used to boost Deadly Arts, although it is not necessary.
[edit] Equipment
- Armor: Any armor with +energy mods and attunement runes. You want your energy as high as possible.
- Weapons: A perfect Insightful Staff of Enchanting or a Totem Axe with a shield.
[edit] Template
 |
AnOi38xr8oe5R6McXDcCqfRg |
[edit] Usage
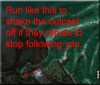
The skill bar above is laid out from left to right in the general order in which to use skills, depending on the situation. Deadly Paradox plus Death's Charge and Dark Escape are the main movement skills. Dark Escape can and should be kept up constantly for 1/2 damage and +25% speed. Dash should be used when Dark Escape fades out to gain as much distance from any enemies following you, especially if you need some extra time to use Signet of Pious Light to end Shadow Form. Death's Charge can be a massive overall speed buff (and self heal) if used efficiently. Almost all healing during the run can be accomplished while still moving.
Normal running sequence:
- Deadly Paradox -> Death's Charge -> Dark Escape -> Dash -> Deadly Paradox -> Dark Escape.
Anti-knockdown sequence (for wurms and giants):
- Fleeting Stability -> Deadly Paradox -> Shadow Form -> Death's Charge -> Dark Escape -> Dash -> Deadly Paradox -> Dark Escape.
Healing sequence when Shadow Form begins to fade out:
- Deadly Paradox -> Signet of Pious Light -> Heart of Shadow -> Dark Escape
Healing sequence when you have a place to rest with no aggro:
- Fleeting Stability or Heart of Shadow -> Signet of Pious
Light -> Signet of Pious Light
- Repeatedly cast an enchantment and Signet of Pious Light as many times as needed to immediately recharge Signet of Pious Light after each use.
When to use Deadly Paradox:
- Always before: Dark Escape and Shadow Form.
- Preferably before: Death's Charge.
When to use Shadow Form:
- To prevent Ice Imps and Ice Golems from slowing you down with hexes.
- Near Wurms and Avicara, use Fleeting Stability followed by Shadow Form, to prevent the Avicara from stripping Fleeting Stability.
- To nullify damage from enemies through intense parts of the run (Tundra Giants, Stone Summit, Avicara), although you can also tank through some enemies with Dark Escape, Heart of Shadow, and Death's Charge.
- Shadow Form should only be kept up as long as necessary. Disable it with Signet of Pious Light before you encounter Grawl Crones.
[edit] Counters
- Enchantment stripping, mainly from Grawl Crones casting Chilblains. Simply stay out of their range.
- Conditions will severely hinder your chances of survival in
most situations. Try to avoid Pinesoul traps -- NEVER use
Death's Charge on a Pinesoul as you will likely teleport into a
trap.
- Dash can also be used to run through Pinesoul traps without triggering them.
[edit] Variants
- Feigned Neutrality can be switched with Signet of Pious Light or Heart of Shadow, giving you an extra self-heal if needed.
- Vital Boon can be switched with Heart of Shadow, Dash, or Death's Charge for an alternate way of healing when Shadow Form ends. You must cast Vital Boon immediately after using Shadow Form so they end almost simultaneously. Additionally, using Signet of Pious Light to end Vital Boon can give you a massive health boost as soon as Shadow Form ends.
[edit] See also
- Google video of a successful run: Media
[edit] A/D Dark Shadow Forge Runner
This build works with the high damage generated from a critical hit by a scythe and the fact a scythe can hit multiple targets. It gives the user a near total condition removal (except blind), plus a cheap damage and Deep Wound inflictor without its usual drawbacks and a constant heal.
[edit] Attributes and Skills
| Attribute Rank | |
|---|---|
| Critical Strikes | 12 + 1 + 3 |
| Scythe Mastery | 12 |
 |
 |
 |
 |
 |
 |
 |
 |
[edit] Optional Slot
- Critical Defenses - This is the recommended skill but it loses effectiveness if the enemies are too spread out.
- Mystic Regeneration - Take two point out of Scythe Mastery and put 8 points into Earth Prayers. This is the recommended replacement for Critical Defenses. It has a very powerful constant healing effect.
- Guiding Hands - Put 3 points into Wind Prayers if there are enemies that will block your attacks.
- Critical Eye - If there are no or few enemies that will block your attacks.
[edit] Variants
- You can swap Reap Impurities for Chilling Victory for more dps.
- You can swap Assassin's Remedy for Signet of Malice or a condition remover that takes away blindness.
[edit] Equipment
- It is recommended that you use Vanguard's Armor Guise with Nightstalker's Armor Leggings, Gloves and Shoes.
- Use a Sundering Scythe of Enchanting 20%, Damage +15% (while enchanted).
[edit] Usage
- Maintain non-attack skills as long as possible.
- Use Wearying Strike at the start of a fight and whenever anyone with the condition comes near, follow it with Malicious Strike for weakness to be removed.
- Use Critical Defenses when necessary and possible and Malicious Strike whenever you need to renew it.
- Use Reap Impurities on someone who has a condition to regain health.
[edit] Counters
- Anything that takes off enchantments.
- Evasions, if people do use these against you it is recommended to choose a different target.
- Being blinded.
- Stone Sheath and Dulled Weapon both remove your ability to critical, destroying this build.
[edit] Notes
- With all the skills in place you will have a 70% chance of causing a critical hit.
- You will be able to make up to 4 hits while Critical Defenses lasts.
- The chance of getting at least 1 critical hit while attacking one person after 4 strikes is 99.2%.
- Weakness is applied after Wearying Strike hits and is taken away after the next Critical Hit is registered.
|
|
AnKyInyjn7MPAjzO3AcYWAA |
[edit] A/D Fox's Scythe
The Fox's Scythe is a PvE oriented build that focuses on quick scythe attacks along with critical strikes to deal a fair amount of damage to a group while using the enchantment Fox's Promise to insure the scythe attacks will land
[edit] Attributes and Skills
| Attribute Rank | |
|---|---|
| Scythe Mastery | 12 |
| Critical Strikes | 10 + 1 + 3 |
| Earth Prayers | 8 |
 |
 |
 |
 |
 |
 |
 |
 |
[edit] Equipment
- Radiant/Shrouded Armor
- Place runes of attunement on any empty armor pieces
- Zealous Scythe of Enchanting
[edit] Usage
- Before Battle cast Fox's Promise and Critical eye, maintain these as necessary
- Before enemy encounter begins cast critical defenses for
protection
- Follow Critical Defenses up with Mystic Regeneration and Conviction
- Use the scythe attacks in order
[edit] Counters
- Enchantment Removal
- Heavy Energy Denial
- Basic Anti melee counters
[edit] Variants
- The last scythe attack is variable and can be switched (Crippling Sweep if against human characters)
- Conviction to increase defenses if entering a magic damage heavy area
- Vital Boon can be replaced with a resurrection for PuG's or death heavy areas
- Assassin's Remedy if you're going into a condition heavy area
|
|
AnOyKmyj6wcbuQX08AU/xeFvA |
[edit] A/E Gloom Farmer
This build uses high damage PBAoE spells, with the added damage bonus from the Lightbringer title, to farm selected groups in Ravenheart Gloom for Torment Gemstones.
[edit] Attributes and Skills
| Attribute Rank | |
|---|---|
| Fire Magic | 12 |
| Shadow Arts | 12 + 1 + 3 |
|
|
 |
 |
 |
 |
 |
 |
|
[edit] Necessities
- Radiant or Shrouded Armor.
- 20% enchanting, +5 energy weapon, such as a Totem Axe.
- +12 energy rec. fire, +15 energy -1 regeneration, +30 health second hand item, such as those exchanged for Jade Bracelets.
- Lightbringer level 2 or above has been proven to work, Higher is better.
[edit] Usage
- Enter Ravenheart Gloom from the Gate of Anguish. Receive the bounty from the Whispers Informant.
- Run past the first group of foes with Shadow Form and Dark Escape.
- Now, near your position is a mob made entirely of spellcasters, lacking a Heart tormentor.
- Wait for combat between the Shadow Army and the Order of Whispers ends. Get closer to the mixed group.
- Cast Shadow Form and get into the middle of the enemy group with Shadow Walk.
- Now, cast Pheonix, Meteor Shower, Bed of Coals, Lava Font, Phoenix and finally Lava Font in that order.
- Once Shadow Form is about to expire (blinking slowly / quickly) use Dark Escape and run to safety.
- Once the mixed group has been cleared, repeat the above tactics for the group of six Curse of Darknesses.
- After that, you may want to attempt an attack on the group containing two Wind of Darknesses and one Scourge of Darkness.
- If a torment gemstone drops at any time, making a clean escape and retrieving it is always an option.
[edit] Counters
- Heart and Earth tormentors can severely damage, or kill you.
[edit] Variants
See Build:A/E UW Farmer for an underworld variant.
[edit] Notes
- This build works in other areas with tight grouping mobs.
[edit] See also
- Video of the run being done: http://www.youtube.com/watch?v=KdF5q-4_LyY
[edit] A/E Solo Green Farmer
This build utilizes the elite Shadow Arts skill Shadow Form and the earth magic skill Sliver Armor to quickly take down bosses that are accompanied by medium/large mobs to efficiently farm their green items.
[edit] Attributes and skills
| Attribute Rank | |
|---|---|
| Shadow Arts | 12 + 1 + 3 |
| Earth Magic | 12 |
| Air Magic | 3 |
|
|
 |
 |
 |
 |
|
|
|
[edit] Equipment
- Energy armor (i.e. Radiant or Shrouded Armor)
- +5 energy, enchanting 20% weapon.
- Galigord's Stone Staff is a recommended Staff, but any weapon with a max of Enchanting upgrade can be used, and it is preferred as when close combat enemies start to run away, a staff attack will bring them back, something that a totem axe can't do.
- A Totem Axe along with the Earth Scroll from Collector Ohtah is a good combination which will give more energy than a staff.
[edit] Usage
- Run to the boss using the speed buffs.
- When you are just out of aggro, activate Shadow Form and use Death's Charge to teleport in. Usually aggroing before teleporting in makes enemies clump together, giving Sliver Armor less of a chance to target the boss.
- Activate Glyph of Elemental Power, then Sliver Armor. Make sure you are closer to the boss than anything else, or you will not kill it!
- Use Shock then Aftershock to speed up killing.
- When the boss has died, activate Shadow Form and use the speed buffs to run away to safety. You can use Shadow Form again since Morale Boosts recharges all skills.
[edit] Counters
- Shadow Form doesn't protect against signets, touch skills and Point Blank Area of Effect damage.
- When Sliver Armor deals only half damage to bosses will also end your run.
[edit] Variants
- When fighting Warrior bosses such as Sunreach Warmaker, it helps to use Rust so that his Healing Signet takes 3 times as long to cast. To do this, though, you will be required to take one or two points off of Shadow Arts and put them into Water Magic.
- Shock, Teinai's Wind, Aftershock, Rust, Teinai's Crystals, Crystal Wave, Obsidian Flame and Shadow Refuge may be switched out for other skills, depending on what you are farming.
- Shock can be switched for other knockdown spells such as Dragon's Stomp for a bit more damage.
- For people who don't have Prophecies skills unlocked, remember that you can always unlock them in PvP and then buy them at the trainers in Lion's Arch or your Guild Hall, if you have bought a skill trainer that is and assuming that you have a Guild Hall.
- Caltrops can be useful against bosses who attempt to flee when heavily damaged.
- Feigned Neutrality is useful against groups which have mobs with touch skills, Signets, and AoE skills and that may penetrate Shadow Form.
- Exchange Dash for Deadly Paradox for a quicker Shadow Form recharge.
- Exchange Dash with Shadow of Haste to warp back if necessary and retry the process.
[edit] Notes
- This build was originally posted at GuildWars Guru and GWOnline.
- Sometimes the skill Sliver Armor may start hitting other enemies instead of the boss.
- Ranger bosses often cannot be killed because of their elemental resistance.
[edit] List of soloable bosses
Total Number of Soloable Bosses: 107
- Please add info of the level of difficulty for each boss (Very Easy, Easy, Medium, Hard and Very Hard) also add the location where the boss is, for easier preview.
[edit] Prophecies
2 Current Bosses
- Crystal Desert
- Prophet's Path:
 Kepkhet
Marrowfeast - Medium Use the following skill combo to
take Kepkhet down: Glyph of Elemental Power, Shadow Form, Death's Charge,
Sliver Armor,
Obsidian
Flame, Teinai's Crystals, Crystal Wave. Bring
an interrupt such as Shock,
Dragon's
Stomp, and Gale to
prevent Kepkhet from activating Mark of Protection. Furthermore,
when you use Death's Charge to get to Kepkhet, be sure to bring Feigned
Neutrality or Shadow Refuge as there are trappers in and
around the vicinity of Kepkhet. If Sliver Armor targets another
thing, you will die as one of the nearby necromancers will use Well
of the Profane.
Kepkhet
Marrowfeast - Medium Use the following skill combo to
take Kepkhet down: Glyph of Elemental Power, Shadow Form, Death's Charge,
Sliver Armor,
Obsidian
Flame, Teinai's Crystals, Crystal Wave. Bring
an interrupt such as Shock,
Dragon's
Stomp, and Gale to
prevent Kepkhet from activating Mark of Protection. Furthermore,
when you use Death's Charge to get to Kepkhet, be sure to bring Feigned
Neutrality or Shadow Refuge as there are trappers in and
around the vicinity of Kepkhet. If Sliver Armor targets another
thing, you will die as one of the nearby necromancers will use Well
of the Profane.
- Prophet's Path:
[edit] Factions
47 Current Bosses
- Kaineng
City
- Bukdek
Byway:
 Wing, Three
Blade - Medium (This may prove difficult because of the
high HP of the boss, lack of mobs and a Rt healing him)
Wing, Three
Blade - Medium (This may prove difficult because of the
high HP of the boss, lack of mobs and a Rt healing him)
- Wajjun
Bazaar:
 Lian,
Dragon's Petal - Easy/Medium (Switch out Dash for Feigned
Neutrality. Use Dark Escape to run past the first and second
group of Knights. Stop before you aggro Lian and make sure you
aggro the second group of Knights. Cast Shadow Form then Death's Charge
to her. Immediately cast Feigned Neutrality. Wait for her to cast
Double
Dragon. Glyph ,Sliver, Shock, then Aftershock.)
Lian,
Dragon's Petal - Easy/Medium (Switch out Dash for Feigned
Neutrality. Use Dark Escape to run past the first and second
group of Knights. Stop before you aggro Lian and make sure you
aggro the second group of Knights. Cast Shadow Form then Death's Charge
to her. Immediately cast Feigned Neutrality. Wait for her to cast
Double
Dragon. Glyph ,Sliver, Shock, then Aftershock.)- Sun, the
Quivering - Hard/Very Hard (Mobs may appear from the
roofs, making the run almost impossible)
- The
Undercity:
 Chan the Dragon's Blood -
Easy/Very Easy (The run is easy if you have Feigned and just
use aftershock on him once and then use feigned to heal because of
the signets)
Chan the Dragon's Blood -
Easy/Very Easy (The run is easy if you have Feigned and just
use aftershock on him once and then use feigned to heal because of
the signets) Mina Shatter
Storm - Easy/Very Easy (The run is easy if you have
Feigned and just use aftershock on her once and then use feigned to
heal because of the signets)
Mina Shatter
Storm - Easy/Very Easy (The run is easy if you have
Feigned and just use aftershock on her once and then use feigned to
heal because of the signets)- Chung, the
Attuned - Medium (The run is easy if you have Feigned
and just use aftershock on him once and then use feigned to heal
because of the signets)
- Baubao
Wavewrath - Medium (The run is easy if you have Feigned
and just use aftershock on him once and then use feigned to heal
because of the signets)
- Shenzun Tunnels:
 Cho, Spirit
Empath - Easy/Medium (Bring Feigned
Neutrality instead of Dash, come from Nahpui Quarter!!! Cast Feigned
Neutrality last, chance monks will heal him, if so run and rezone,
the fastest route is to run towards Nahpui Quarter (just a few feet west
from Cho) . It will make the run a lot easier and shorter.)
Cho, Spirit
Empath - Easy/Medium (Bring Feigned
Neutrality instead of Dash, come from Nahpui Quarter!!! Cast Feigned
Neutrality last, chance monks will heal him, if so run and rezone,
the fastest route is to run towards Nahpui Quarter (just a few feet west
from Cho) . It will make the run a lot easier and shorter.)
- Xaquang Skyway:
- Ghial
the Bone Dancer - Easy/very Easy (Feigned
Neutrality is NOT a neccessity for the run. Beware of the
mesmers for they will disrupt your sliver armor TIP: All mesmers
interrupt at once, so consider bringing a "scapegoat" spell with a
long activation time, such as Dragon Stomp or Obsidian Flame.)
 Shreader
Sharptongue - Very Easy/Easy (Exchange Shock or Aftershock with Shadow Refuge and
aggro as many groups as possible for most damage)
Shreader
Sharptongue - Very Easy/Easy (Exchange Shock or Aftershock with Shadow Refuge and
aggro as many groups as possible for most damage)- Ziinfaun
Lifeforce - Easy/Medium (Hit Ziinfaun with your weapon
to interrupt Ethereal Light)
- Orosen, Tranquil Acolyte -
Hard/Very Hard (When he starts charging for you, use Shadow
Form. Run past him just close enough to aggro the group before the
next bridge. Death's charge back to him, and Sliver armor.)
- Sunjiang District
(Explorable): (only after the mission)
- Warrior's
Construct - Medium (Pretty hard to get to him)
- Monk's
Construct - Easy/Medium Let the first group go near the
boss.
- Necromancer's Construct -
Medium You might encounter problems with keeping sliver
armor focused
- Mesmer's
Construct - same as Necromancer's construct. Slightly easier
(shorter) run, though.
- Elemental's Construct - [[He uses Lightning
Touch. Consider bringing Feigned Neutrality instead of
dash.
- Raisu
Palace:
- Star
Ancient Koosun - Medium/Hard (Depends on conditions of
run to the boss, can be done at 60% dp however)
- Untouched
Ancient Ky - Medium
- Pongmei Valley
- Xuekao, the Deceptive-
Easy/Medium (Be sure to let the Knight Brotherhood kill the
Am Fah before you approach the boss, as how the Knights will attack
the surrounding Am Fah making for a quick kill with 1-3 possible
attackers) ~ The dagger that he drops is really really nice for
Assassins using the Vigor Build where you use enchants every 30
sec.
- Bukdek
Byway:
- Echovald Forest
- Ferndale:
- Warden
of Saprophytes - Hard (Warden of the Trunks must be
removed first, resurrection portal nearby to keep going at it,
possible at 60% dp.)
- Melandru's Hope:
- Chkkr Locust
Lord - Medium/Hard (The most difficult part is to
maintain Sliver
Armor on the boss)
 Chkkr
Thousand Tail - Hard/Very Hard (Really hard to keep
going unless you have a backup for Sliver Armor, as it'll run out
to quickly)
Chkkr
Thousand Tail - Hard/Very Hard (Really hard to keep
going unless you have a backup for Sliver Armor, as it'll run out
to quickly)
- Morostav Trail:
- Falaharn
Mistwarden - Easy/Medium (Bring Shadow of Haste
should the attempt to kill fail and you must retreat).
- Sunreach
Warmaker - Easy/Medium (Bring Shadow of Haste
and Rust and if you feel the
need, Feigned Neutrality too. Go in first
without the boss in your mind, make Falaharn
Mistwarden appear. Warp back using a stance. Go in again and
aggro every mob, pull Sunreach with staff and cast glyph then
sliver then rust, he will go down quickly.)
- Strongroot Tanglebranch -
Medium/Hard (Go around the other way and aggro the nearby
kirin and dragon moss and use Rust and Caltrops to subdue him and
spam Obsidian Flame to kill him.)
- Kyril
Oathwarden - Medium/Hard (Hard to make sliver armor
target kyril; take feigned neutrality to survive traps.)
- Ritualist's Construct -
Easy/Medium (Very few mobs surrounding him, making it harder
to kill. Replacing run skills or Shock & Aftershock with
Obsidian Flame & Crystal Wave/Teinai's Wave can help overcome
this obstacle.)
- The Eternal Grove
(Explorable): (only after the mission)
- The Scar Eater -
Very Easy/Easy (Also a fairly easy boss to practice on, you
must follow the 1st group that comes near the shrine, when you get
near the boss aggro it and
jump near the boss, also a good idea can be to change shock and aftershock for gale and Obsidian
Flame)
- Jayne
Forestlight - Easy/Medium (Advisable to bring Shadow of
Haste, Watch out for warriors, as they can KD with "None Shall Pass!". If not
killed at first attempt, warp back with any stance and retry)
- Wiseroot Shatterstone - Medium
(Silver armor does not tend to stay on him,or will target
lately,must aggro both mobs before him and his mob to fully
kill)
- The Time Eater -
Easy/Medium (Add skills for more damage because very few
mobs are surrounding him.Time for his interruption
signet!!!!!)
- Bramble
Everthorn - Easy/Medium (need to aggro 1-2 warden or
plant groups to bypass his regen)
- Mourning Veil Falls:
- Darkroot Entrop
- Easy (Make sure to add some skills to cripple or
knockdown, such as Caltrops, as he tends to run at about half
health)
- Milefaun
Mindflayer - Easy/Medium (Aggro another group of wardens
near, may attract Rt wardens which increase difficulty)
- Foalcrest
Darkwish - Easy/Medium (Aggro the nearby group of
Mantises and die yourself; he will make Bone Fiends which give you
just enough damage for Sliver Armor.)
- Xisni Dream
Haunt - Easy/Medium (AddTeinai's
Crystals, Crystal Wave and Obsidian Flame. Use Shadow of Haste
for multiple tries.)
- Rahse
Windcatcher - Easy/Medium (Same build as with Xisni.
Walk to pick up the Warden group, hit Glyph of Ele Power, turn
around, hit Shadow Form outside his aggro and shadow step. If the
wardens follow, he should be dead)
- Ferndale:
- Jade Sea
- Boreas Seabed (Explorable):
- Sskai, Dragon's Birth - Medium
(This may prove difficult because of the high HP of the boss and
lack of mobs surrounding him)
- Gyala Hatchery (Explorable):
- Reefclaw
Ragebound - Medium
- Maishang Hills:
- Sessk,
Woe Spreader - Very Easy (Best for practice, sometimes
hard to target)
- Sarss,
Stormscale - Medium (bring along obsidian flame to
spam)
- Silent
Surf:
- Kenrii Sea
Sorrow
- Assassin's Construct -
Easy/Medium (Switch Shock for Stone Daggers and Death's
Charge for Obsidian Flame, after you cast Sliver just use stone
daggers 2-3 times, then Aftershock, then Obsidian Flame)
- Rhea's
Crater:
- Onis for Ungues of the Oni - Easy/Medium (The
hardest part is getting there, once there it's easy to kill them
two/three at a time, just watch out for the Outcast Deathhands, as
they WILL end your run!)
- Mount
Qinkai
- Tomton
Spiriteater Very Easy (Bring obsidian Flame
with you and aggro all the yetis near)
- Archipelagos:
- Ssyn Coiled
Grasp - Easy/Medium (Switch out Shock for Obsidian Flame
and try to not aggro group next to the bridge.)
- Ssuns, Blessed of Dwayna -
Medium/Hard
- Boreas Seabed (Explorable):
[edit] Nightfall
57 Current Bosses
- Kourna
- Sunward Marches:(Consider getting the +1
earth magic blessing from the Melandru's shrine outside Dajkah
Inlet. Although it is not necessary.)
- Mahto
Sharptooth - Very Easy/Easy "The run is sometimes a bit
tough." (Despite the temptation, do not aggro the ntouka, spam
obsidian flame & shock aftershock combo on him)
- Birneh
Skybringer - Very Easy/Easy (Lots of mobs for Sliver Armor to
work)
 Dabineh
Deathbringer - Medium (Switch out shock for Feigned
Neutrality. Exit Venta Cemetery. Head south hugging the wall.
As you get close enough to target him, check for the number of Tusked Howlers
nearby. If there are 2 then rezone. If there are 3 then count the
number of Crested Ntouka Bird. If there are 3 or 4
then you are in good shape to beat him. Before you aggro
Deathbringer, aggro the Howlers and cast Shadow Form. Next aggro
Deathbringer. Glyph then Sliver, before he gets to you, cast Feigned
Neutrality. Using his Intimidating Aura, you will lose Feigned
Neutrality but Sliver Armor will do its job before he can
remove another enchantment.)
Dabineh
Deathbringer - Medium (Switch out shock for Feigned
Neutrality. Exit Venta Cemetery. Head south hugging the wall.
As you get close enough to target him, check for the number of Tusked Howlers
nearby. If there are 2 then rezone. If there are 3 then count the
number of Crested Ntouka Bird. If there are 3 or 4
then you are in good shape to beat him. Before you aggro
Deathbringer, aggro the Howlers and cast Shadow Form. Next aggro
Deathbringer. Glyph then Sliver, before he gets to you, cast Feigned
Neutrality. Using his Intimidating Aura, you will lose Feigned
Neutrality but Sliver Armor will do its job before he can
remove another enchantment.)- Eshim
Mindclouder - Very Easy (Short walk so it is like the
Nightfall variant of Sessk, Woe Spreader Consider bringing
dancing daggers to spam instead of dash, you will kill much
faster)
- Marga
Coast:
- Chor the Bladed
- Very Easy/Easy (Just aggro the group of Mirage Ibogas near
him and try not to be interrupted while casting shadow form. Cast
Sliver Armor
when he uses Frenzy)
- Lunto Sharpfoot
- Medium/Hard (You must pull him towards the mirage ilbogas
and then usually only 1 of his monks will come and then its easy.
but you want to be beside the monk when you activate sliver so when
he uses shadowmeld sliver armor is still targeting him. then it
will be Easy/Medium)
- Bosun Mohrti -
Medium/Hard (Aggro the insects nearby and Frigid skales and
snare with Caltrops.)
- Bubahl Icehands
- Medium (Aggro nearby insects, snare with Caltrops, and heal with Feigned
Neutrality)
- Chidehkir, Light of the Blind -
Easy/Medium (Aggro nearby Kournan patrol)
- Neoli the
Contagious - Hard/Very Hard (Clear out Kuskale lashers
first with sliver armour, this may take quite a few runs, high
dp.)
- The Floodplain of Mahnkelon:
- Zelnehlun
Fastfoot - Very Easy/Easy (He is dead in 4 seconds if Sliver Armor
targets him)
- Terob Roundback
- Very Easy/Easy
- Admiral Kaya -
Easy/Medium (Wait for the hekets to get near, sometimes
there are 2 monks which increases difficulty)
- Jerneh
Nightbringer - Medium/Hard (Bring Feigned Neutrality and
use immediately after Sliver Armor to keep health up from Vile
Touch)
- Robah Hardback -
Medium/Hard (Bring Feigned Neutrality to survive surrounding
mob's vile touch)
- Buhon Icelord -
Medium/Hard
- Arkjok
Ward:
- Onwan, Lord of the Ntouka -
Medium (Leave from command post and follow river into
lake),(bring fiegned nurality as a cover over slither armor and
shadow form)
- Modti
Darkflower - Easy/Medium (Killing him is Very Easy, but
the run is a bit heavy)
- Lieutenant
Kayin - Very Easy (Just aggro one other group, and he
goes down in roughly 10 seconds)
 Eshau Longspear
- Easy/Medium (You need to aggro the group of Mandragors
behind him. Rezone if that party has a Mandragor Imp in
it.)
Eshau Longspear
- Easy/Medium (You need to aggro the group of Mandragors
behind him. Rezone if that party has a Mandragor Imp in
it.)- Captain Chichor
- Easy/Medium (Approach the small base from the north, and
wait for him to patrol outwards.)
- Dejarin Estate:
- Major Jeahr -
Medium (Approach from Camp Hojanu)
- Podaltur the
Angry - Easy (body blocking during the run to him may be
a hassle due to the large amount of hekets on the way)
- Barbarous Shore:
- Lieutenant
Shagu: - Medium (You must aggro nearby enemies. If you
do this, and silver armor keep targeting him, he will be down in
few seconds.)
- Bahdok
Caverns:
- Wandalz the
Angry - Medium/Hard (The hardest part about this boss is
getting to him. You need to learn the hiding spots on the map, as
the spawns in this particular area are quite massive to be running
around by yourself. You'll want to keep the original build intact,
and use speed buffs across the bridge. Once across, glyph, death's
charge, and sliver armor, he goes down rather quick. Throw a shock
and aftershock in there to see it go a little faster.)
- Jahai
Bluffs:
- To Be Added...
- Turai's Procession:
- Korr,
Living Flame - Medium/Hard (Don't lure the nearby water
djinn, Sliver armor will target them instead)
- Chiossen, Soothing Breeze -
Medium/Hard (The Rampaging Ntouka make this hard, use Feigned
Neutrality as the Rampaging Ntouka run towards you and it will
strip Feign Neutrality instead of Sliver Armor or even worse,
Shadow Form. Aggro the nearby hekets to the north of Chiossen's
group. Pack Obsidian Flame and Aftershock to speed up the killing.)
- Sunward Marches:(Consider getting the +1
earth magic blessing from the Melandru's shrine outside Dajkah
Inlet. Although it is not necessary.)
- Vabbi
- Resplendent Makuun
- Kormab, Burning Heart - Very
Easy/Easy (bring Shadow of Haste instead of dash, Obsidian Flame
and Teinai's Crystals instead of Shock and Aftershock. The hardest
part is geting there: to behemoths, use Shadow Form and run towards them, while a
little bit after their patrol point use Shadow of
Haste. Run back, they run like hell, so they will follow. When
form is about to end use Dark Escape to warp to a safe place, where they
can't get to you. While near the boss use Shadow of Haste
for multiple attempts if necessary, it should be dead in the first
attempt, if not in the second.)
- Wilderness of Bahdza:
- Eshekibeh
Longneck - Very Easy/Easy
- Forum Highlands:
- Grabthar the Overbearing -
Medium (Bring Rust and
aggro nearest Skree group)
- Korshek
the Immolated - Easy (Make sure to hit the nearby
Whispers Informant for some easy Lightbringer points)
- Commander
Sadi-Belai - Medium/Hard (Aggro Skree group nearest to
his group. Shock + Lift
Enchantment AFTER he puts Shielding Hands on. Bring Obsidian
Flame. Spam as needed)
- Churahm, Spirit Warrior -
Easy/Medium (You may have to use this build to kill some
Ethers, which will make the run easier. Another method is to simply
shadow step down to the area he is contained in using Deaths
Charge. Simply run away after he is dead, by running around the
Ethers and up on the ledge again.)
- The Mirror of Lyss
- Yammiron, Ether Lord - Medium
(Switch Dark
Escape with Obsidian Flame to spam)
- Riktund the
Vicious - Medium (aggro the beetles as well, he may kite
when close to death, bring along Obs. Flame)
- Holdings of Chokhin:
- Banor
Greenbranch - Easy/Medium (Bring Lift
Enchantment to remove Shield of Regeneration instead
of aftershock or deaths charge, need to aggro nearby Beetles)
- Setikor
Fireflower - Easy/Medium (Just switch Dash and Dark Escape for Shadow Refuge and
Feigned Neutrality)
- Tenezel the
Quick - Very Easy/Easy (Aggro very nearby Rock/Rain
Beetles)
- Hanchor
Trueblade - Easy/Medium (Bring and spam Obsidian Flame
when needed. Nearby Skree Griffin can make it troublesome but still
easy)
- Yatendi Canyons:
- Lieutenant
Vanahk - Easy/Medium (Very easy but sliver armor tends
to go off to another person.)
- The Hidden City of Ahdashim
- Shakor
Firespear - Easy/Medium (Surrounding mobs should be
aggroed.)
- Yammirvu, Ether Guardian -
Medium/Hard (May have to kill the dimond djinn first, but
nearby resurection portal helps. If pulling another group, be sure
to shadow form to pull them, or suffer from degen.)
- Leilon, Tranquil Water -
Easy/Medium (Dark escape is reccomended when Death's
Charging in.)
- Resplendent Makuun
- The
Desolation
- Crystal Overlook
- To Be Added...
- Joko's
Domain
- To Be Added...
- Poisoned Outcrops
- Fondalz
the Spiteful - Hard/Very Hard (Extra groups are not easy
to pull together, but you can launch one attack on the boss and his
group, flee, and repeat. Deadly Paradox may be useful.)
- The
Alkali Pan
- To Be Added...
- The Ruptured Heart
- Rual,
Stealer of Hope - Medium (exchange Dash for Shadow of Haste, Shock for Feigned Neutrality or Shadow Refuge and
Aftershock for Obsidian
Flame. Use Death's Charge from the top of the hill)
- Tureksin the Delegator -
Medium/Hard (Shadow of Haste instead of Dash in case he isn't the first
target of Sliver
Armor, Shadow Refuge instead of Shock and Obsidian Flame. Aggro nearby group of
margonites and undead.)
- The Shattered Ravines
- Dunshek
the Purifier - Medium (Pull a second group for a very
easy kill.)
- The Sulfurous Wastes
- Vahlen the
Silent - Easy/Medium (bring Shadow of
Haste, you might not get it at first, bring high damage spells,
and you might consider in taking Glyph
of Concentration. Watch out for Signet of
Judgment.)
- Crystal Overlook
- Realm of Torment - (Lightbringer title
in this area will alter effectiveness.)
- Nightfallen Jahai
- Chimor the Lightblooded -
Medium (Nice pair of daggers if you don't have a
+Energy/+Enchantment Staff)
- Onslaught
of Terror - Easy (Need to aggro at least one other
group, elementalists and mesmers can interrupt/slow, bring Feigned
Neutrality)
- Domain
of Pain
- Fahralon
the Zealous - Easy/Medium (Before entering battle, try
using Dark Escape to minimize the damage taken from AoE and
Dreadful Pain.)
- Domain
of Fear
- Shrieker of
Dread - Hard (you'll need to aggro several (ideally 3)
patrols to take him down; wait for them to converge). Also watch
out for the Death Nova when killed.
- Storm of
Anguish - Medium (Difficult to get to, try to slip
between the two first mobs, lure another mob for easy kill)
- Depths of Madness
- Reaper of Agony
- Medium (Time your run when he has moved near the two
groups of Margonites)
- Ravager of
Dreams - Very Hard (Approach from the north, and pull
2-3 groups along with the boss group, 4+ Lightbringer rank
reccomended.)
- Topo the
Protector - Hard/Very Hard (Aggro once, run, and wait
for him to fully summon his army, (about a minute), then shadow
form in for a rather easy kill, due to the surronding groups of
graven monoliths.)
- Master of
Misery - Hard/Very Hard (Pull together groups, beware of
scythe attacks and death novas, armor of earth, obsidian flame,
feigned neutrality all are good to have.)
- Consort of Ruin
- Hard/Very Hard (Pull groups, and make sure it targets him
and it will be easy, minions and blades of torment make this
tough.)
- Nightfallen Jahai
[edit] See also
- Build:E/A Solo Green Farmer
- Video: Youtube Video
- Video: YouTube
- Video: Videoclip killing 22 bosses using solo green farmer build
- Video: Another A/E YouTube video
- Video: Sunreach Warmaker/Falaharn Mistwarden tutorial
[edit] A/E UW Farmer
This build uses high damage PBAoE spells combined with the immunity given by Shadow Form in order to accomplish the smites run/farm in UW.
[edit] Attributes and Skills
| Attribute Rank | |
|---|---|
| Fire Magic | 12 |
| Shadow Arts | 12 + 1 + 3 |
 |
 |
|
|
|
|
|
 |
[edit] Necessities
- Radiant or Shrouded Armor.
- 20% enchanting, +5 energy weapon, such as a Totem Axe. Wand or Staff, max damage rec. fire to deal with Dying Nightmares.
- +12 energy rec. fire focus.
[edit] Usage
Walk up and take the quest from the Lost Soul. Watch out for any Dying Nightmare popping up.
Then cast in this order:
wait to get max energy back...
Then quickly grab one or two groups of graspings and run back. Then cast skills in this order:
- Glyph of Elemental Power
- Meteor Shower
- Bed of Coals
- Lava Font
- Flame Djinn's Haste
- Feigned Neutrality
There should be no survivors amongst the graspings. If they are any graspings remaining, they are at this time fleeing from your AoE damage, so Feigned Neutrality should give you sufficient defense and life back to stay alive in order to recast one or two offensive spells to finish them or wanding them. You have a 24s invulnerability with Shadow Form on for the pull and the killing, so you can take your time to insure your AoE spike.
Another option for the bravest, is to cast Fire Attunement + Shadow Form and to go straight ahead into the big group of graspings, Bladed Aatxes and an eventual Dying Nightmare, and then unleash hell on them, finishing the graspings off with Flame Djinn's Haste and running away with the speed boost after the spike (because the Bladed Aatxes are not really friendy!).
Once all the graspings have been eliminated, do the typical run to the smites using Flame Djinn's Haste. You can make a stop just before passing the arch if you have misjudged the path of Bladed Aatxes or graspings and Dying Nightmare patrol. If a Dying Nightmare pops up while you run and follow you, just pull him in a safe place and while going close kill him with a Flame Djinn's Haste burst. Anytime during the run you can use Shadow Form if you find yourself in danger (remind that you should be far from danger at the end of Shadow Form), with a 24s duration time (with a +20% enchanting) you should have plenty of time to reach the smites area.
In order to pull large groups of smites or while waiting before they are all balled up around you, you can start by using Feigned Neutrality to assure some good defense and survival. Then cast the skills:
- Shadow Form
- Glyph of Elemental Power
- Meteor Shower
- Bed of Coals
- Lava Font
- Flame Djinn's Haste
- Feigned Neutrality (that should be reloaded even if used in the beginning of the pull)
If any smites survives, do the same tactics as stated above for graspings or if anything goes really bad, you still can run away with Flame Djinn's Haste. Keep Fire Attunement up while casting fire spells as it's your only energy management.
For the Coldfire Nights, your best solution is to avoid them, but if you get caught, this build is safer than any other one, cast Shadow Form and stay far as they use Frozen Burst, the only spell that can hit you through Shadow Form and slow you down. Then hit your running enchantment and go out of their reach.
[edit] Counters
- Bad timing is the only real counter here.
- Energy Degen
- Knockdown/Interrupts by grasping
[edit] Notes
- This build is an adapted version of the A/E Gloom Farmer and E/Mo Savannah Heat Farmer builds.
http://www.youtube.com/watch?v=WyjhpGdhsys
[edit] A/Me Fever Outbreak
The Fever Outbreak assassin is built for dealing with a large amount of targets. Likewise, it excels in a PvE and AB environment where the sheer amount of players and NPCs usually make Sins underpowered to deal with all the targets, so the Fever Outbreak assassin attempts to solve this by the use of the Mesmer elite Fevered Dreams to spread four potent conditions amid a large area of targets, while also hitting the primary target very hard. Likewise, it can also solo cap shrines, which sins also have problems doing in a speedy manner. The initial build is aimed at teams with a dedicated healer. If you do not have one, variants exist to cope.
[edit] Attributes and Skills
| Attribute Rank | |
|---|---|
| Dagger Mastery | 12 + 1 + 2 |
| Critical Strikes | 12 + 1 |
| Illusion Magic | 3 |
 |
 |
 |
 |
 |
|
|
|
- To fill in the Optional slots, look in the Variants section for many different uses for this build.
- If you don't have a dedicated healer, drop Critical Strikes down to 10 and put 8 points in Shadow Arts.
[edit] Equipment
- Armor: Radiant Armor with Runes of Attunement.
- Weapons: Poisonous PvP Dagger of Fortitude with a 15% Modifier vs Hexed opponents. It is suggested however you bring along a Cripple, Deepwound, and Zealous Dagger set as well, using them as the situations call for it.
[edit] Usage
- Select a target, hopefully one in the center of a large collection of foes. The area radius of Fevered Dreams is extremely large, so you can even pick an outlining foe and still possibly affect everyone. Now, hex your target with Fevered Dreams. Hit them with Black Mantis Thrust to slow them down, followed with Black Lotus Strike to give you energy for Black Spider Strike and Twisting Fangs. Everyone in the area should now be crippled, bleeding, poisoned, and suffering from a deep wound.
- Note, this build is very flexible in relation to combo attack order. You can fire off all three of your attacks at any time except Twisting Fangs, which HAS to follow an Off-Hand attack.
[edit] Counters
- Hex removal before the combo can be carried out. However, Fevered Dreams only has a 10 second recharge.
- General other standard anti-melee counters can pose problems.
[edit] Variants
- If you wish to have a consistent tanking ability in PvE, add in Critical Eye and Critical Defenses. You can even further drop Black Lotus Strike, put 8 + 1 points in Shadow Art by lowering Dagger Mastery to 10 and add in Way of Perfection. The energy gain from Critical Eye should cover you. If you decide you don't need crippling, you can always replace Black Mantis Thrust for something else of use to you, such as Blinding Powder, which can be shot off after your first off-hand attack without disrupting Twisting Fangs.
- For Optional: Movement skills to close upon your target, such as Dash, Dark Escape, Shadow of Haste or Shadow Walk which will allow you to automatically teleport back after fulfilling your combo if you bring a secondary stance, like Deadly Paradox which will cut down the recharge on a healing spell, such as Feigned Neutrality.
- For Optional: Defensive skills, such as Signet of Malice which will clear you of conditions given the sheer many of them you'll spread around. Or Blinding Powder which can act in a defensive capacity with Fevered Dreams, blinding everyone in the area for 10 seconds with a 20 second recharge, which is considerably useful. Heart of Shadow, Feigned Neutrality, and Shadow Refuge will heal you.
- For Optional: Offensive skills, for even more of an edge in killing your target. Interruptions such as Disrupting Dagger or Web of Disruption which will also count as a cover hex or all around hex so you can carry out your combo might be useful. Expunge Enchantments is even possible to deal with generally unkillable 'Mystic Regeneration' tanks which are common in AB.
- If blocking foes become a problem consider using Way of the Fox to hit with all of the combo (at 5 shadow arts your next 3 attacks are unblockable and at 8 the next 4).
[edit] Fever Outbreak PvE
|
|
|
|
|
 |
|
|
 |
[edit] Notes
- This build is incredibly useful when used in conjunction with other builds that utilize dangerous conditions, specifically burning, daze, and blind. Teamed up with a Temple Strike sin for example and a barrage ranger or dervish that will 'hit' everyone while dazed, you can wipe out mobs very quickly if planned correctly.
[edit] A/Me Solo Sin
A devastating build capable of soloing most creatures of FoW and all of the Tomb of the Primeval Kings. This build uses Shadow Form to remain invincible and shadow stepping to avoid danger, while doing large amounts of damage from the Mesmer hex Empathy and condition-inducing dagger attacks.
[edit] Attributes and Skills
| Attribute Rank | |
|---|---|
| Shadow Arts | 9 + 1 + 3 |
| Dagger Mastery | 8 + 3 |
| Critical Strikes | 8 + 3 |
| Domination Magic | 11 |
 |
|
 |
|
 |
|
|
|
[edit] Equipment
- Shrouded Armor or Radiant insignias are a must.
-
- Because your health does not matter but your energy does, forgo a vigor rune in favor of two attunement runes.
- Since if you aggro monsters outside of shadow form you will die, armor level is not important. Save money and buy starter level armor.
- Daggers with a Dagger Handle of Enchanting and either bonus damage when enchanted or bonus energy. The Daggers of Xuekao or Chimor's Daggers or Arius' Sai are ideal.
[edit] Usage
- Activate Shadow of Haste when you have more than one aggro bubble's width between the edge of your aggro bubble and your target.
- Run close to your target (without aggroing) and cast Arcane Echo. (If this is removed before you go on to the next step, cancel Shadow of Haste with Dark Escape, wait for your skills to recharge, and try again.)
- Cast Shadow Form and charge into battle.
- Cast Empathy and follow up with Black Lotus Strike so you have your hex and enough energy; follow up with Black Spider Strike and Twisting Fangs.
- Once Shadow Form is between one quarter and one third recharged, cast the echoed copy.
- Shadow of Haste should run out just before the echoed copy of Shadow Form begins to flicker, and Shadow Step you back to your safe zone. If it does not, use Dark Escape to cancel.
[edit] Counters
- If Shadow form or Arcane Echo are interrupted, you will not be able to make the assault, and will most likely die. However, provided you activate the first skills in a safe area, this should never happen
- Touch skills (such as Vampiric Bite) or PBAoE (such as Symbol of Wrath) that are not affected by Shadow Form
- Damage skills that affect an ally instead of an enemy (such as Riposte, Shield of Judgment, or Sliver Armor)
- Enchantment removal that does not target an enemy (such as Chilblains or Expunge Enchantments)
[edit] Variants
Variants that do not require Nightfall skills:
- Replace Black Spider Strike with Golden Phoenix Strike for a spike skill which will recharge quick enough to be used twice in each assault. Note that the loss of degeneration from poision in Black Spider Strike will slow down the build, usually meaning a maximum of one kill in each assault.
- Replace Black Spider Strike with Repeating Strike for higher damage output. It is important not to spam this skill as energy will be consumed quickly.
Variants that do not require Dark Escape:
- Replace Dark Escape with Recall.
-
- Have a Hero or Henchman as a party member.
- Cast Recall on the henchman and flag to a safe area.
- Begin your assault. Recall to the henchman when Shadow Form ends.
- Be aware that patrolling mobs may enter aggro with your henchman, most likely resulting in your death.
- Using Recall enables you to drop Shadow of Haste in favour of another attack skill such as Death Blossom.
[edit] Notes
This build is not easy to learn, and you will tend to die at first, or not kill your target very quickly. Always use Shadow of Haste in a safe zone, or when it expires you will return to an enemy infested area and die. Be aware that this build is very slow for farming; you can kill one to two enemies in each assault. However, in theroy, this build is the most versatile farmer ever.
- This build can solo all creatures in the Tomb of the Primeval Kings. Beware of patrols and pop-ups, and choose your safe zones wisely.
-
- Banished Dream Riders are not fleshy creatures, so will not be affected by conditions. Recast Empathy immediately as it recharges to keep up your damage; you will find it difficult to kill them with dagger attacks alone.
- Chaos Wurms have very high health, but can be killed. Try to lure them into a position where they will remain above ground, beware of them following back to your safe zone.
- Chained Souls use Rend Enchantments which will strip Arcane Echo. Be aware of their positions when deciding on a safe zone.
- This build can solo some creatures in the Fissure of Woe. Beware of patrols and pop-ups, and choose your safe zones wisely.
-
- All Shadow Army creatures can be killed, unless they are covered by a Shadow Monk. Shadow Warriors will use Healing Signet, keep Empathy up to deal with them.
- All the creatures on the Fissure Shore can be killed; this is probably the most effective area to use this build, though you will have to run there using Shadow Form and Dark Escape. The abundance of Healing Springs will prevent you killing Armored Cave Spiders.
- Many creatures in the Forest of the Wailing Lord could concievably be killed, however Spirit Shepherds will use Lightning Touch which will damage you through Shadow Form. It may be best to avoid this area.
If you are on the last NPC in a group you do not need to recharge Shadow of Haste
[edit] Videos
Tomb Of The Primeval Kings: http://www.youtube.com/watch?v=PJF1g50scyY
Fissure of Woe Beach: http://www.youtube.com/watch?v=B2ADjYB5A0g
Fissure of Woe Forest of the Wailing Lord: http://www.youtube.com/watch?v=VkULhWSa-gA
[edit] A/Mo Vigorous Assassin
With offence being the best defense in mind, the Vigorous Assassin exploits the rapid attacks of daggers with the healing capability of monk spells.
[edit] Attributes and Skills
| Attribute Rank | |
|---|---|
| Dagger Mastery | 12 + 1 + 2 |
| Critical Strikes | 11 + 1 |
| Healing Prayers | 10 |
 |
 |
 |
 |
|
 |
 |
|
- Possible skills for the optional:
[edit] Equipment
- Armor: Since energy is not much of a problem, choose armor for elemental resistance. Nightstalker insignia is recommended. A clarity rune is useful.
- Weapons: Sundering or Zealous daggers of Fortitude are the preferred weapons of this Build.
[edit] Usage
- Cast and maintain Live Vicariously and Vigorous Spirit on yourself. If there are other melee in your group, use Vigorous Spirit on them to aid in healing.
- Activate Flashing Blades when engaging mobs. If you use Death's Charge for the optional skill, shadow step into the fray using Flashing Blades. Maintain Flashing Blades while you fight.
- Use Critical Eye for energy management.
- Combo: golden lotus strike, Wild Strike, Death Blossom. Because of its short recharge time, spam this over and over.
[edit] Counters
In order of concern:
- Heavy enchantment removal areas
- Anti-melee hexes like Spiteful Spirit or Empathy
- Blind
- Stance removal
[edit] Variants
- The last skill slot is versatile, pick and choose skills from the optionals.
[edit] Notes
- Inspired from the buff on Flashing Blades and Death Blossom.
[edit] See also
[edit] A/R Critical Barrager
The Critical Barrager uses the Assassin primary Attribute of Critical Strikes, and the skill Critical Eye to increase the chance of critical hits. Coupled with a zealous bow string, this character has to hit just 2 enemies per Barrage (on average) to recover the energy cost.
[edit] Attributes and Skills
| Attribute Rank | |
|---|---|
| Critical Strikes | 10 + 1 + 3 |
| Shadow Arts | 8 + 1 |
| Marksmanship | 12 |
 |
 |
 |
|
|
 |
 |
|
[edit] Equipment
- A zealous bow is required, a Flatbow like the Ironwing Flatbow or Chkkr's Flatbow is generally preferred for Barragers.
[edit] Usage
- Set up with Favorable Winds.
- Aim Barrage in the middle of tightly packed groups to maximize damage and condition spread.
- Keep Critical Eye up constantly and spam Barrage.
- Use Shadow Refuge to maintain your health and to counter Health Degeneration.
- Distracting Shot and Savage Shot are used to interrupt enemies, particularly ones that spam a single skill, allowing for easy interrupts through the spamming. The increased recharge time imposed by Distracting Shot is especially useful against Wurms using Wurm Siege.
[edit] Variants
- Antidote Signet or Assassin's Remedy for condition removal.
- Barbed Trap and Serpent's Quickness are optional skills. Set the trap under Serpent's Quickness right before engaging the foes.
- Sharpen Daggers for spreading Bleeding to foes.
- Way of Perfection can be used for impressive self-healing when Barraging into clumped foes.
- This build can be adapted for a Barrage/Pet group. Take Charm Animal and Comfort Animal instead of Shadow Refuge, moving attribute points from Shadow Arts do Beast Mastery.
- Critical Defenses for extra defense.
- Keen Arrow to deal additional spike damage
[edit] Notes
- A Barrage ranger deals more consistent damage with higher levels of Marksmanship. However, this build allows for more frequent spike damage thanks to a much higher chance of critical hits.
- A zealous bow string greatly helps with energy management, as hitting just two foes on average per Barrage is enough to fully recover the energy cost of Barrage.
[edit] Templates
|
|
AnMSG/hjqsYPmqp/euLjdCA |
[edit] See also
[edit] A/R Relentless Spiker
A PvE only retake on the Leet Ganker build. The only downfall to it is Assassin's Promise failing, which can be fully countered by wise target selection.
Similar to the Build:A/W Berserking Shadow this build is for PvE only and uses deadly dagger attacks coupled with degenerative conditions along with Assassin's Promise to swiftly kill your target and be able to move on to the next target without delay, while having Lightning Reflexes as not only an IAS, but a very high block rate. It is capable of taking out most targets by itself, but heavily armored or healed targets are best killed with team spikes just to be safe. If nothing else, this is probably the most fun build you will ever run.
[edit] Attributes and Skills
| Attribute Rank | |
|---|---|
| Critical Strikes | 10 + 1 + 2 |
| Dagger Mastery | 10 + 1 |
| Deadly Arts | 9 + 1 |
| Shadow Arts | 7 |
 |
|
 |
|
|
|
 |
|
[edit] Equipment
- A Full set of +Energy Armor, get energy around 35.
- Zealous and Vampiric Daggers of Fortitude, along with +5 Energy Daggers.
[edit] Usage
- Select your target and activate Assassin's
Promise
- Choose targets VERY carefully. Take out 'squishy' targets such as monks, elementalists, etc. first. Then when the mob begins to wind down to a few monsters, pile onto the heavier armored enemies such as warriors with your team to ensure the kill.
- Immediately follow with Death's Charge followed by Lightning Reflexes
- Use your attack chain: Black Lotus Strike, Twisting Fangs, Black Spider Strike, Blades of Steel.
- Your target should be dead or near death, finish him off and move to your next target.
- Use Feigned Neutrality as a self heal.
- A good tactic to use is to cast Feigned Neutrality before the enemy dies, and let the conditions kill him off so Feigned recharges.
[edit] Counters
- Standard melee counters: Blind,Empathy,Price of Failure etc...
- Failing to kill your target or having Assassin's Promise interrupted results in a very long downtime.
- Hex Breaker.
[edit] Variants
Sacrifices Twisting Fangs and Death's Charge for Death Blossom and Impale, works great to take out PvE mobs with effeciency.
- Other possible changes are listed here:
- Dark Prison instead of Death's Charge for a cover hex, but Lightning Reflexes will need to be cast after Black Lotus Strike.
- Shadow Refuge instead of Feigned Neutrality.
- Horns of the Ox instead of Blades of Steel.
- Lightning Reflexes can be switched for any IAS.
[edit] Notes
- Choose targets wisely. Low AL targets such as casters and other assassins should be killed first, while tanks and protection monks should be killed last by team spiking.
- If you fail to kill a target during Assassin's Promise, seek out other hex using players to remain effective.
[edit] See-Also
- Build:A/W Berserking Shadow - Favored, widely used.
- Build:A/W Leet Ganker - Unfavored, merged with above.
[edit] A/R Solo Rajazan's Fervor Farmer
This farming build is designed to farm the boss Cultist Rajazan to get his sword, Rajazan's Fervor.
[edit] Attributes and Skills
| Attribute Rank | |
|---|---|
| Dagger Mastery | 9 + 2 |
| Shadow Arts | 7 + 1 |
| Critical Strikes | 10 + 1 + 2 |
| Wilderness Survival | 10 |
 |
 |
|
 |
 |
 |
|
|
[edit] Equipment
- Infiltrator's Armor.
- 3 neccessary Weapon Sets:
- A pair of 15^50 sundering or vampiric daggers.
- One longbow.
- Any one-handed weapon of Fortitude and a shield with health bonuses in stance. The Crimson Carapace Shield from Lord Dorn Lendrigen is a good choice.
[edit] Usage
[edit] Running to Rajazan
- Leave Harvest Temple into the Unwaking Waters (Explorable) while wielding the weapon set with health bonuses.
- Dash down the stairs until you have only a little space between you and the first group of Shiro'ken.
- Cast Troll Unguent; while doing so the first patrol will come up into your aggro circle, immediately activate Storm Chaser and rush past them. Do not engage the melee Shiro'ken.
- As you approach the second group, be careful not to be body blocked.
- As you approach the third group, your Storm Chaser will be about to end. As soon as it ends, activate Dark Escape and run past the next two groups.
- After Dark Escape ends, activate Dash to finally shake all the Shiro'ken groups off.
- Take the lower path until you reach a group consisting of 3 Creeping Carp. Run past them with Storm Chaser while under Troll Unguent. You may find it useful to use Dash, then immediately use another stance, so as not to get that stance ended by the Carps' Wild Strike.
- Follow the path as described on the map (take the path immediately to the left). If you time everything correctly, the Kraken Spawn will not be in your path.
- If Outcast Assassins appear, activate Dark Escape and run past, they probably won't even move if you do this. If you're still under Siphon Speed from the Creeping Carp (which is likely), Dash should be able to break their aggro. Beware, if Siphon Speed runs out while you are NOT in a speed-enhancing stance, they will run after you from beyond the aggro bubble.
- Follow the path north until you approach the next group of Shiro'ken. Run towards them until they start moving, then immediately stop and apply Troll Unguent. The Shiro'ken will enter your aggro circle just as you finish casting Troll Unguent. Activate Storm Chaser and run past this group and the next group.
- The final group of Shiro'ken will appear in front of you. Run past them with Dark Escape. If you time it right, no enemies will be at the right wall. Occasionally, there will be a group of 3 Creeping Carp here, which makes things a lot more difficult. Try to run past them without aggroing the dangerous Saltspray Dragons and their boss. Use all your stances here, it'll help to avoid a group of enemies in the next area.
- Hug the right wall from this point, and you should get into range of Cultist Rajazan without encountering any enemies. (You can get past the Saltspray Dragons by hugging the wall.) If you timed everything right, you should encounter Rajazan's group at the same time as, or slightly before, a pack of 3 Creeping Carp from the left. Activate Dark Escape (which should be ready by now) and run past Rajazan and the Carp. Do not run near any Outcast Assassins: they will use Leaping Mantis Sting and cripple you, wasting your run.
- Run to the very end of the path. Use Storm Chaser as soon as Dark Escape ends to shake off any enemies that still follow you.
[edit] Running Notes
- A single Carp often follows you at the end. Stand at the westernmost point where you can't walk any further. It will come very close to you, often use a last skill and then retreat. Don't attack it.
- Timing is critical. Remember that one death means starting all over again from the Harvest Temple.
[edit] Pulling and Killing Rajazan
Now it is time to kill Rajazan. Equip your longbow.
- Attack Rajazan with your bow and immediately retreat to the west with Storm Chaser. This is neccessary to make him use Cultist's Fervor so he is enchanted.
- As soon as you shake off your pursuers, hurry back and attack Rajazan again.
- Then run to the west again without any speed enhancing stances. If everything goes right, the Outcasts will retreat. When they do, stop walking; Rajazan will come alone. If the Outcasts don't break off, activate Storm Chaser or Dark Escape!
- If he has a staff in his hands, walk towards him until he equips his sword and slowly pull him backwards.
- Killing him is the easiest part. Take out your daggers and use your first 3 skills regularly and use Troll Unguent whenever it is ready. Rajazan will soon be below 50% health.
- When his health is <50%, repeatedly use Moebius Strike and Death Blossom (while remembering to stay under Troll Unguent).
[edit] Notes on pulling
Several factors will determine how easily Rajazan is pulled.
- If Rajazan is wielding his staff, he will be harder to pull than if he is wielding a sword.
- If Rajazan is on the western side before the group, he will be easier to pull than if he is on the eastern side, behind the Outcasts.
- Pulling him alone can really be tedious but don't give up!
- Sometimes, outcasts will follow you even with Storm Chaser. Try to run in circles with speed enhancing stances, as shown in the adjoining picture.
- Often, simply using Dash after pulling Rajazan the first time is enough to ensure that you are not followed.
- The perfect run time from Harvest Temple to Rajazan is approximately 2 minutes and 30 seconds, this should ensure that the runner avoids unnecessary and sometimes fatal groups.
[edit] See Also
- Screenshots can be found here.
- Build:W/Mo Rajazan Farmer
[edit] A/R Solo Securing Echovald Forest
This is a build for solo-running the quest Securing Echovald Forest given out by Scoutmaster Arne in Melandru's Hope which is good for 400 Kurzick faction and is a repeatable quest.
[edit] Attributes and skills
| Attribute Rank | |
|---|---|
| Shadow Arts | 12 + 3 + 1 |
| Wilderness Survival | 12 |
|
|
|
|
|
|
 |
|
|
- Also, you may only need one running skill, but bring both just in case you can't get to the RH (Regen Health) spot before it ends.
- If you have Nightfall you can choose to bring Deadly Paradox and drop the rest of your unused attribute points into Deadly Arts
[edit] Equipment
- Weapons
Any dagger with a dagger Handle of Enchanting (Preferably 19-20%)
[edit] Usage
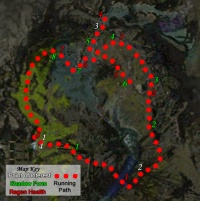
You'll start out by taking the quest from Scoutmaster Arne at the first PoI (Point of Interest, marked by the white numbers (refer to the map I've made to the right on this page)). From there you will slowly make your way over to the first SF (Shadow Form, marked by the green numbers). From there, cast Shadow Form immediately followed by either Dark Escape or Storm Chaser. Before Shadow Form runs out (which should be 24 seconds after you cast it) get to the first RH (Regen Health, marked by the red numbers). Regen your health with Troll Unguent and Shadow Refuge (not at the same time) and start to make your way to the second SF. On your way to the second SF, at PoI 2, you might notice two red dots on your compass running across your route. Just wait at PoI 2 until they pass and then continue on to SF 2. Continue this pattern till you reach RH 4. Now, it's not really rare that a group of Undergrowth and Stone Kirins will pass by at the third PoI so be careful and watch your aggro circle! They will make their way up the stairs and will be out of your hair soon. :) Also, you may need to climb a few steps of the same stairs to reach the quest star but you won't be in any enemy's aggro circle. Slowly continue on with the same pattern being careful not to aggro everything in your path. :) Now you'll reach RH point 8 and the final PoI! Congrats! Claim your 400 Kurzick faction, 150 gold, and 2K XP!
[edit] Notes
Aggro is your enemy. For the love of God, do your best not to aggro anything when you're not running from a Shadow Form point to a Regen Health spot! :)
[edit] See also
See Build:Team - Lutgardis FFF for a beginner's guide to farming the same quest with a team.
[edit] A/Rt Splintering Nightmare
The Splintering Nightmare alternates splinter weapon and nightmare weapon to deal high level of damage while providing a means of a self heal.
[edit] Attributes and Skills
| Attribute Rank | |
|---|---|
| Critical Strikes | 8 + 1 |
| Dagger Mastery | 12 + 1 + 3 |
| Channeling Magic | 10 |
 |
|
|
|
 |
 |
|
|
Optional Elite:
-
- When survivability is an issue, use Flashing Blades instead of Moebius Strike to provide extra defenses
- Altenatively, Critical Eye can be replaced by Critical Defenses at the cost of some energy gain
[edit] Equipment
- Either armor with blessed insignia or a mix of nightstalkers and blessed Armor can be used.
- Any Zealous Daggers.
[edit] Usage
- Use Splinter Weapon before a combo (Jagged -> Wild strike -> Death Blossom) to deal a lot of AoE damage. Remember to target clusters of enemies for maximum effectiveness.
- Use Moebius Strike strike to reset the combo, and allow a second application of Death Blossom immediatly afterwards
- Use Nightmare Weapon before a combo for a self heal while still dealing a lot of damage.
- Use Flashing Blades or Critical Defenses for extra defense if selected just before you engage
- Remember to kite around to avoid enemy spells or to allow a more heavily armored character take the majority of damage.
- Sins are not a tank. Don't play like one in PvE.
[edit] Counters
- Blindness
- Cripple
- Anti-melee hexes
- E-denial
- Blocking stances and abilities
[edit] Variants
- Flashing Blades instead of Moebius for more defense.
[edit] A/any Blind Promises
This is a PvE build that uses an easily spammable attack chain and Assassin's Promise to spread blindness to a large number of foes.
[edit] Attributes and Skills
| Attribute Rank | |
|---|---|
| Dagger Mastery | 11 + 1 + 3 |
| Critical Strikes | 2 + 1 |
| Shadow Arts | 12 + 1 |
| Deadly Arts | 6 + 1 |
|
|
|
|
 |
|
|
 |
|
[edit] Equipment
- Armor
- Nightstalker's Armor for the additional armor while attacking
- Weapons
- Perfect vampiric daggers for added damage. eg. Urkal's Kamas or Chkkr's Pincers
[edit] Usage
- Choose your target and move into melee range.
- The attack chain is Jagged Strike, Wild Strike, Death Blossom, Impale, Jagged Strike, Wild Strike, Death Blossom...
- Due to the fast recharge of the attack skills you should be able to cycle through the chain over and over.
- After hitting with Wild Strike, use Blinding Powder.
- Just before the target dies, use Assassin's Promise on them. Blinding Powder will recharge and you will be able to continue spreading blindness.
- Use Death's Charge to move to the next foe.
- Maintain your health with Shadow Refuge while fighting.
[edit] Counters
- Blindness
- Blocking stances are a challenge.
- Hex removal can strip Assassin's Promise before the target dies and you get stuck with a recharging skill bar.
- Plague Touch can be tough as when fighting groups of necromancers. They'll all blind you in turn, using the blindness you put on them.
[edit] Variants
- To handle blocking stances, use Unseen Fury instead of Death's Charge. If Blindness is a problem, use Plague Touch instead.
- Also, to increase your ability to use your attacks repeatedly, try using zealous daggers.
[edit] Template
|
|
AHNS3+pj64w8fHM+nLbB28wd |
[edit] A/any Chkkr Farmer
The A/Any Chkkr Farmer uses Critical Defenses combined with Moebius Strike and dual attacks to maintain a constant physical defense, while dealing more DPS than many other builds.
This build is used to farm EVERY variety of Chkkr bosses in the factions campaign. This includes the Locust Lord, Thousand Tail, Ironclaw, and Brightclaw. It is also capable of soloing any other boss that deals physical damage and is able to be pulled away from surrounding mobs, including Shiro Tagachi in both campaigns.
- This is also a great all-around PvE build for Assassins due to the low recharge time, high attack power, and fantastic e-management. It is also very versatile and you can edit it in many ways to your own style.
[edit] Attributes and Skills
| Attribute Rank | |
|---|---|
| Critical Strikes | 11 + 1 + 3 |
| Dagger Mastery | 11 + 1 |
| Shadow Arts | 8 + 1 |
|
|
|
|
 |
|
|
|
|
- Shadow Refuge or Dark Escape can be switched out for Way of Perfection or a different healing skill.
- Feigned Neutrality can be used for PvE areas where in battle heals aren't as neccessary.
- There are many useful variants posted below, this is a very versatile build that you can shape to your own style.
[edit] Equipment
- Any Max Armor, try to get energy as high as possible and at least 400hp.
- Zealous daggers of Enchanting with +15% damage while enchanted are ideal here.
- Also bring a longbow of some sort for pulling some of the bosses away from mobs.
[edit] Usage
[edit] Running
- To Chkkr Locust Lord:
- Run normally north until you can go east to enter the lagoon area, wait for mantises to move away before you run.
- Activate Dark Escape and run quickly to the clear area to the north of Chkkr, be very careful not to aggro the small groups!
- Equip your bow and be patient while you wait for the mantises to move away from Chkkr, then fire and pull back.
- Move behind the large tree stump that is sticking out of the water to avoid aggroing any mantises and begin killing.
- To Chkkr Thousand Tail:
- Move up to where the wardens are and wait until they all form into one small spot.
- When this happens activate dark escape and run past them to the right to quickly lose aggro.
- Be careful not to aggro the group coming from the right side of your screen, and wait for all of the mobs to move away.
- No use in using a bow here since this Chkkr is a ranged boss, so move ahead to killing him.
- To Chkkr Ironclaw:
- This is by far the hardest one to do!
- Run to the southwest, past the mesmer boss Xisni, and keep going until you hit a series of rivers and waterfalls where Chkkr is.
- Try to avoid aggro as best as you can, its a very hard run, but eventually you can get through the the north of Chkkr.
- Stay in the wide open area north of him, and shoot him with a bow. The entire group will come, but they SHOULD shake off.
- Continue to go north until his group leaves, but Chkkr stays following you, now begin killing him.
- It is very difficult to make this run, and also to get his group to leave without him, just try to be patient.
- To Chkkr Brightclaw:
- The run is nothing, just walk out of the Jade Flats and walk to the west.
- When you approach him be careful, a lot of mantises will spawn when you get too close.
- To pull him, stand near the top of the stairs and shoot at him, this should cause him to leave his group and come after you.
- Watch out for the group of stone scale kirin and dragon mosses, for some reason they like to run across the map and kill you when you attack Chkkr...
[edit] Killing
- This is pretty standard for any boss/PvE mob you will face.
- Activate Critical Defenses as soon as the boss gets close, then use the first attacks.
- Now just spam Critical Strike when you need to renew Critical Defenses or when you need energy. Otherwise use Death Blossom for damage.
- Use Shadow Refuge/Way of Perfection as needed to keep up your health, as CD is only a 75% chance to block.
[edit] Counters
None. :) At least none on the Chkkr bosses. Unless you end up aggroing other monsters of course. (dreamweavers hurt, the rest are actually killable)
[edit] Variants
[edit] Shiro Solo
- Heres one more variant I decided to add, its the one I use to SOLO Shiro Tagachi himself at the Gate of Madness. This allows the rest of the team to go ahead and get the bonus without having to worry about him! Its also easy to kill Shiro in Factions with it if you have a few heroes to get past Med. of the Reaper.
|
|
 |
|
|
|
 |
|
|
- This build adds in Wild Blow as a quick stance remover that doesn't interrupt the attack chain to easily remove Battle Scars.
- Here is a VIDEO of me Tanking Shiro Tagachi. -Samurai-JM-
- The full battle took about 8 minutes, but it was too big for youtube so I had to cut the first half off. The first half of his hp goes down very slowly anyway, and it is basically the first 30 seconds of this part repeated over and over while the team got the bonus.
- The monk hero is not necessary to do this, I just wanted to be perfectly safe in case I messed up. (and I did while talking to teammates) :)
[edit] Other Variants
- For a much stronger degen/DPS build, maybe for PvP areas, equip fiery daggers and try something like this:
|
|
 |
|
|
|
|
 |
|
- For more degenerative build that can easily take on defensive stances, use something like this:
|
|
 |
|
|
|
|
|
|
- For much more of degeneration to counter things like Troll Unguent and Shadow Refuge, try this:
|
|
|
|
|
|
|
|
|
- Feel free to try out different variations of this and fit it to your own style. Also try to post your own versions on the discussion page to share them with everyone!
[edit] Notes
- Be patient, don't always expect a green drop on your first run. The runs can take time to perfect, but these builds are flawless in killing the boss on every trip as long as there are no aggros.
- Try it out! Go out and explore other farming possibilities, and post your finds in the discussion page.
[edit] See also
This build is a counter to the Build:A/E Solo Green Farmer. It uses vastly different tactics to take on different types of bosses.
[edit] A/any Chkkr Locust Lord Farmer
This build is designed to farm Chkkr Locust Lord to get the item Chkkr's Pincers.
[edit] Attributes and Skills
| Attribute Rank | |
|---|---|
| Dagger Mastery | 10 + 2 |
| Critical Strikes | 11 + 1 + 2 |
| Shadow Arts | 10 + 1 |
 |
 |
 |
|
|
|
|
|
- Optional: Dash or another running skill
- Optional: Shadow Refuge or another healing skill
[edit] Equipment
- Nightstalker's Legs and Chest
- Daggers of Xuekao work very well here, any longbow
[edit] Usage
Exit Lutgardis Conservatory into Melandru's Hope and talk to the Kurzick Priest to get the Blessing of the Kurzicks. Run a bit north of Chkkr Locust Lord, avoiding aggroing creatures. If you do aggro any creatures, use Dash to get them away from you. If there are mantises surrounding Chkkr, wait until they move away, if they don't, start again. Use your longbow to lure him out, and when he is inside of your aggro bubble run north so no mantis will interfere with your farming. Then use Critical Eye, Palm Strike and Blinding Powder as quick as you can. Follow up with Horns of the Ox, Falling Spider and Critical Defenses. Keep using the dagger combo until Blinding Powder recharges. Blinding Powder and Critical Defenses take priority, so whenever they are recharged use them as quick as you can. Keep critical eye up at all times. The bleeding and the poison will negate the healing from Shadow Refuge. He will soon be dead.
If Critical Defenses runs out, run around Chkkr Locust Lord until Critical Defenses or Blinding Powder recharge. He might run back to his island whilst running around him - if this happens just run towards him and he'll start attacking you again.
[edit] Variants
- Fill the optional slot with whatever you like, Dash works well, or another running skill depending on your secondary profession (Sprint, Windborne Speed etc.)
- You can replace Palm Strike with Golden Phoenix Strike. This enables you to use a different Elite.
- An A/W variant can be made by replacing Horns of the
Ox, Falling Spider, and Twisting Fangs
with Golden Lotus Strike, Wild Strike, and Wild Blow. Way of
Perfection would be placed into the optional slot.
- Note that Wild Blow recharges fast enough to keep up Critical Defenses, but you have to watch it.
= A/any Critical Fox = This PvE build is built around the Assassin's primary attribute, Critical Strikes. Using Way of the Assassin and Critical Eye to raise your chance of a critical hit to about a 77% chance per hit, and Critical Defenses for a near-permanent 75% chance to block, nearly every hit you land will net you +4 energy. Using a skill chain of unblockable attack skills, you can be sure to consistently get your damage through.
[edit] Attributes and Skills
| Attribute Rank | |
|---|---|
| Critical Strikes | 12 + 1 |
| Dagger Mastery | 11 + 1 + 2 |
| Shadow Arts | 6 + 1 |
|
|
 |
|
 |
|
|
|
|
- Your optional slot is quite flexible, but there are a few especially good options, most of which will be based on your setting (PvE or AB).
-
- Resurrection Signet is obviously an important choice in PvE, but near-useless in AB.
- Way of Perfection is useful as a long-term heal, and can serve to keep Way of the Assassin active (the downside is the short duration and small heals at lower levels of Shadow Arts).
- Critical Eye will grant a huge boost to energy-management, not to mention the sizable extra Critical Hit chance.
- Siphon Speed is a huge boon in AB especially, allowing you to chase down other Assassins and force one-on-one fights (which is an optimal situation for this build in many cases).
- Expunge Enchantments is a very useful enchantment removal skill, which will serve well in AB (though not so useful in PvE). Especially deadly against Elementalist Tanking builds and 55 Monks.
- If survival is an issue, you can go A/D and switch Shadow Arts for Earth Prayers (see Variants, below). The A/D variant loses a bit of the original build's flexibility, but more then makes up for it in pure staying power.
[edit] Equipment
- Nightstalker's Armor is recommended.
- Daggers with an "of Enchanting" mod is best, and preferably a "+15% while enchanted" or "+15% while in a stance" mod. Daggers of Xuekao may be the best green daggers for this build.
- The build's defense is high enough that you'll be able to afford the HP loss from adding Superior runes to the build. A Superior Daggery Mastery can increase both your damage output and your critical hit chance by a small amount. You should always be careful with having too many high-end runes on a single build though, as the health loss might outweigh the offensive boosts.
[edit] Usage
- The build centers around keeping three key skills up at all times: Shroud of Distress, Critical Defenses, and Way of the Assassin. In the heat of battle, you'll need to remember to check your status bar often, and make sure to keep all your skills up as much as possible.
- When first initiating battle, activate Shroud of Distress as you charge. Right before you engage, activate Critical Defenses (make sure not to activate this skill too soon, or you run the risk of not getting a critical hit fast enough to recharge it). Once you engage, activate Way of the Assassin. Be careful when first starting this all, as you will lose a pretty sizable chunk of energy. Once you get a few hits in, your energy should recharge quite quickly.
- Make sure to use your attack chain often, as it will deal a large amount of consistent, unblockable damage thanks to your high critical chance. Keep an eye on your status at all times. When anything starts to run out, make sure to re-activate it right away. Pay special attention to Critical Defenses in particular. When your target dies, make sure to switch to a new target as quickly as possible to keep Critical Defenses up.
- Shroud of Distress serves two major purposes here; keeping Way of the Assassin active, thanks to its long duration, and also granting you a very sizable amount of evasion when your health gets low. At seven Shadow Arts, it should last for 44 seconds (not counting any bonus from Daggers of Enchanting). This should be more then enough to last the duration of the battle, and the recharge time is one second longer, in case you need to re-activate. With your Enchanting Daggers, you can easily keep it up constantly.
- Keep in mind that you have an increased chance of a critical hit when attacking lower-level monsters (this increased chance is more easily noticeable when attacking creatures around level 10 or below). Target a nearby spirit or a weaker monster if you're in desperate need of a critical hit (Ritualist Spirits are normally easy to find in AB).
- When facing foes with Enchantment removal, keep in mind that Critical Defenses will almost always be the first to go, regardless of the order you activate your enchantments. This is because whenever you land a critical hit, Critical Defenses will re-apply itself, thus moving back to the top of the list. If you know that you're going to be losing an enchantment, it's probably a bad idea to get yourself in a fight with another melee character.
[edit] Counters
- There are a few counters, but most of them are too narrow to consider a real threat. Your main worry is Enchantment removal and the Blind condition. When Blinded, your best bet is to get out of combat. Without a critical hit, you'll lose Critical Defenses and be easy prey for most attacks. Enchantment removal can also get rid of Critical Defenses, but this can normally be fixed by killing whoever is wielding the enchantment removal.
[edit] Variants
- For superior self-healing and defense, consider going A/D and switching all of your points from Shadow Arts into Earth Prayers. This will allow you to use Vital Boon and Mystic Regeneration (replacing Shadow Refuge and Shroud of Distress). The large Block chance granted by Critical Defenses, in addition to the +9 Health regeneration provided by Mystic Regeneration (at 8 Earth Prayers and with all three enchantments active), should serve to keep you alive for a much greater amount of time and especially against other melee classes (don't forget the +72 maximum health bonus you'll gain from Vital Boon). Your attribute points should be re-ordered, like so:
| Attributes and Skills | |||||||||
|---|---|---|---|---|---|---|---|---|---|
| Critical Strikes | 11 + 2 | ||||||||
| Dagger Mastery | 11 + 1 + 2 | ||||||||
| Earth Prayers | 8 | ||||||||
|
|
|||||||||
- This variant works much better against melee foes than casters, and the quick recharge times on the Dervish enchantments means you don't suffer nearly as much against foes with enchantment removal, as it's not a big deal to simply re-cast one of your cheaper enchantments to keep Way of the Assassin active.
- With this setup, you can add yet another good choice for your optional slot; Pious Restoration, which grants you a quick and simple way to deal with Hex skills. Make sure to activate Vital Boon just before though, so you can take full advantage of the large health gain when you remove it. This also reduces the risk of removing Critical Defenses by mistake.
- If a Dervish secondary isn't what you're looking for, Assassin's Shadow Arts attribute has plenty of tricks to boost your survival even higher. Drop your Critical Strikes attribute down to 11 and add a Major Rune of Critical Strikes (11 + 2), and drop Dagger Mastery down to 10, keeping the current rune and headgear setup (10 + 1 + 2). This will allow you to boost your Shadow Arts attribute all the way up to 10.
- You'll need to switch out Shroud of Distress for Way of Perfection, and switch Shadow Refuge for Critical Eye. With your Shadow Arts all the way up at 11 (10 plus the minor rune), Way of Perfection lasts 28 seconds out of the 30 second recharge, and grants a 32-health heal every time you land a critical hit. With Critical Eye as well, you'll gain tons of energy, and everything up and running grants you a massive critical hit chance, which will keep health and energy topped off during nearly any fight. The optional slot can be anything, but preferably you'll want to bring either a resurrection skill (when in a party), Shadow Refuge as an out-of-battle self-heal (just in case), or even Sharpen Daggers to add bleeding to the attack chain. If enemy casters are a problem, you can bring Disrupting Stab or Disrupting Dagger, both of which are nice, easy interrupts skills (D. Stab can also help to start your attack chain, while D. Dagger won't mess up the chain if used halfway through).
- In some cases where the unblockable chain isn't needed, good options as a replacement attack chain are attack chains like Golden Phoenix Strike, Horns of the Ox, and Falling Spider, or maybe a chain with Jagged Strike, Wild Strike, and Death Blossom for faster damage. Using Golden Phoenix Strike will also allow you to use just itself and a Dual Attack, thus leaving you an extra skill slot as well.
- If Blinding skills are a common occurrence, skills from other professions, such as Remedy Signet (Paragon), Antidote Signet (Ranger), Mending Touch (Monk), and Sight Beyond Sight (Ritualist) are easy to add to the build with no investment into other attributes.
- Going A/E will allow you to replace a skill (preferably Shroud of Distress) with Conjure Flame/Frost/Lightning, which will not only enable Way of the Assassin (thanks to the fact that they're Enchantments with a long duration), but grant an additional +1...17 damage per attack. This of course will require a slight investment into the Fire/Water/Air Magic attribute, and your Daggers will need the corresponding Elemental damage modifier (Fiery/Icy/Shocking).
[edit] Templates
|
|
AHMS3+Zj8cALzMMtXceA6yAA |
Below is the skills template for the A/D Variant:
|
|
AnOS3Our4UmZYav4M7dAKeBA |
[edit] See also
[edit] A/any PvE Attack Spammer
The PvE Attack Spammer makes use of cheap fast recharging attack spells in PvE to allows the assassin to continually make attacks without having to wait for attacks to recharge while still conserving energy.
[edit] Attributes and Skills
| Attribute Rank | |
|---|---|
| Critical Strikes | 11 + 1 |
| Dagger Mastery | 12 + 1 + 2 |
| Shadow Arts | 7 + 3 |
|
|
|
|
|
|
|
|
|
[edit] Equipment
- Any Armor can be used, provided it has max AL.
- Any Weapon, although Zealous Daggers are helpful.
[edit] Usage
- Keep Critical Eye and Flashing Blades up at all times.
- Open with Jagged Strike.
- Follow Jagged Strike with Wild Strike.
- If there are lots of enemies around, finish with Death Blossom, otherwise finish with Critical Strike.
- Heal with Shadow Refuge as necessary.
- Options - Use the optional slot to tailor your effectiveness
against specific enemies in an area
- Against enemies with stances, bring Way of the Fox.
- Against enemies who cause conditions, bring Signet of Malice.
- For more defense, bring Critical Defenses.
- For more damage, bring another attack like Malicious Strike.
- For more energy during long fights, bring Way of the Lotus.
[edit] Counters
Defensive stances and Blindness will put you out of the fight, and prevent you from regaining energy from critical hits. Getting Crippled will allow enemies to kite you.
[edit] Variants
Trade Death Blossom for a more powerful dual attack like Twisting Fangs. This does more damage to a single target at the cost of using more energy.
[edit] Notes
This build will eventually run out of energy, but the energy usually last long enough for most PvE encounters. This build is meant to be used with a group, and all of the skills used in this build can be obtained before you finish Vizunah Square.
[edit] Template
|
|
AHMSH/Zj74w8f7vDm+TC6yEA |
[edit] A/any Shadow Blossom
This is a build designed for fun, as well as PvE damage dealing. It uses degeneration and area-of-effect attacks to take down foes while making use of the Assassin's unique ability to Shadow Step to move in and out of combat.
[edit] Attributes and Skills
| Attribute Rank | |
|---|---|
| Dagger Mastery | 11 + 1 + 2 |
| Critical Strikes | 11 + 2 |
| Shadow Arts | 8 + 1 |
|
|
|
|
|
|
|
 |
 |
- Users with Nightfall should replace Return with Death's Retreat for added healing.
- As this is a PvE build, Rebirth would be a good way to fill the 8th slot but non-Monk secondaries can use the Resurrection Signet just fine.
[edit] Equipment
- Nightstalker's Armor for extra protection.
- Any Daggers would work, but since Assassins tend to be fragile,
consider:
- Extra Armor, with daggers of Defense or of Shelter
- Extra Health, with daggers of Fortitude
- For extra damage, you can use Vampiric or Sundering daggers. I prefer Sundering because I don't like to deal with the pip of health degen, which can get worrisome.
- The best Vigor rune you can afford, a Rune of Major Dagger Mastery, a Rune of Major Critical Strikes, a Rune of Minor Shadow Arts and any other rune you like. I use Vitae.
[edit] Usage
This is a fairly easy build to use. Early on, identify a party member who will likely be staying away from melee (like a Ranger). Remember his location on your party window, since he's going to be the one you shadow step back to when things get nasty.
Let your warriors charge in first, since they're good at it and it makes them happy. It also helps keep the heat off your much more fragile self.
If possible, position yourself so that Death Blossom's AoE will hit several foes. When you can, use Moebius Strike to hit a target with Death Blossom several times.
Keep pressure off your monks by using Shadow Refuge whenever your health begins to get low. You can also use Death's Charge on a healthy foe for an emergency burst of healing.
You are not a tank. Don't be afraid to Return to the back line, heal yourself, and pop right back into combat. Not only does this help keep you alive, but it helps take the pressure off your monks. With practice, you can be a fully self-sufficient damage dealer: use this to your advantage, because if the Monk has to choose between healing you and the tank, he will likely choose the tank.
If you want to be a little more creative and save Death's Charge for when you need healing, you can wait for a Warrior to engage, then use Return on him to enter melee. This lets you save Death's Charge for when you need a quick heal, or for more critical targets.
[edit] Counters
Blindness and spike damage can really hurt this build. A target using a defensive Stance such as Shield Stance can make your attacks hard to chain. Also, keep a watchful eye out for enemies who like to use spells that punish melee attackers.

