Dasha Vestibule (Mission)
From GuildWiki
This is a mission entry. For information on the location Dasha Vestibule, see Dasha Vestibule (Location).
Contents |
[edit] Mission Objectives and Rewards
Margrid the Sly must be in your party to enter this mission.
If your character chose to follow Master of Whispers (after the primary quest Mysterious Message) and has not yet gained Margrid, you can still enter this mission (after completing the primary quest Calling the Order) by partying with another player who can bring her. It is not necessary to complete the Dzagonur Bastion mission, but it must be available.
- The entrance to Dasha Vestibule is hidden and can be difficult to find without following Margrid's side of the story. See Getting There below for instructions on how to find it.
[edit] Objectives
Gain access to the vault's inner sanctum and rescue the two princes.
- Complete the trial in each chamber to open the way into the inner sanctum. X of 3 trials complete.
- Goren must survive.
- ADDED Defeat the Eternal Guardians to complete the Trial of Eternity.
- ADDED Answer the riddles posed by the Divine Djinn to pass the Trial of Divinity.
- ADDED Solve the crystal puzzle to complete the Trial of Wisdom.
- BONUS Help Margrid collect the Treasure of Ahdashim.
- # of 3 treasures found.
[edit] Rewards
-
Reward Treasures of Ahdashim XP Gold Skill Points Standard 0 1000 100 1 Expert's 1-2 1500 150 1 Master's 3 2000 200 1
[edit] Primary
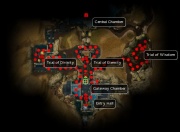
Each room must be cleared in order to proceed to the next area. Be on the lookout for traps consisting of jets of flame or cold that shoot from the walls. These will damage and/or slow your party.
[edit] Entry Hall
Directly ahead will be Goren. Talk to him and he will join your party as an ally. Beyond him is the Entry Hall, which is populated by 3-4 mobs consisting of one Ruby Djinn and two Sapphire Djinns. Some are patrolling, while others pop-up. Clear them all and the door to the center chamber will open.
[edit] Trial of Eternity
The center chamber is filled with the Djiin and Roaring Ethers. In addition, there are six Eternal Guardians, each of which controls 1 of 3 special environmental effects. There are two of each of the following:
-
- Eternal Guardian of Suffering (causes Eternal Suffering, -1 and -2 health degeneration)
- Eternal Guardian of Lethargy (causes Eternal Lethargy, 10% and 20% slower movement)
- Eternal Guardian of Languor (causes Eternal Languor, 10% and 20% slower skill recharge)
There is a lesser and a greater variant to each effect - the Guardians you first meet control the lesser effects, while the ones at the top of the stairs control the greater effects. Each Guardian that is slain will remove one of the effects. Note that Goren is not affected by these effects.
As you enter, you will encounter the first set of Guardians at the base of two stairways on the right and left. Once you kill the enemies before you, you must choose a stairway to climb. The right side is the easier route, because at the top of the left staircase is a chest, which is required for the Bonus (below). Nearing this chest will cause three more enemies to spawn, and you must fight them from below along with the enemies already there. Taking the right staircase and circling around to the left side makes this area easier, though degeneration from the Guardians of Suffering will take a greater toll. Once all the Guardians in this chamber are killed, this trial will be completed and the left-most door (from the Entry Hall) will open (Note: it is not necessary to kill all the mobs in the room, only the Guardians).
[edit] Trial of Divinity
The leftmost chamber is populated by mobs consisting of Djinn and Roaring Ethers. Kill or avoid these to reach a line of Divine Guardians. Each one will ask a riddle/question, where the answer is one of the Gods of Tyria. A wrong answer will spawn a mob of one Ruby and two Sapphire Djinn for the party to fight, while a correct answer will allow you to advance to the next questioner. Answer all the questions (or defeat the mobs spawned upon a wrong answer) to complete this trial and open the door to the final trial.
The answers are mostly obvious if you have been reading at least some lore regarding the Gods. The answers in order of the riddles posed:
- Balthazar
- Dwayna
- Grenth
- Lyssa
- Melandru
- Abaddon
[edit] Trial of Wisdom
The rightmost chamber is populated by four Thunders of Ahdashim that must be defeated prior to taking the test, which is a math-oriented quiz. There are four obelisks arranged in a square, numbered 2, 3, 5,and 7, and in front of them are six pedestals, numbered 6, 10, 14, 15, 21, and 35. Two crystal keys lay on the ground, each of which must be placed on a pedestal; doing so will activate some of the obelisks. All four obelisks must be activated to pass the test.
The solution to the puzzle is simple multiplication - placing a key on a pedestal will activate the two obelisks whose product equals the pedestal number. There are three solutions that will activate all four obelisks: 6-35, 10-21, and 14-15. If you get it wrong you will be confronted by more Thunders of Ahdashim.
[edit] Central Chamber
Once all three trials are completed, you will gain access to the
Central Chamber, from Trial of Eternity. This chamber is populated
by three bosses: ![]() Kormab, Burning Heart ,
Kormab, Burning Heart , ![]() Hajok Earthguardian (Djinn) and
Hajok Earthguardian (Djinn) and
![]() Shakor
Firespear. Although the three bosses patrol the same area they
are not grouped together, thus it is possible to take them one at a
time by careful pulling. Kormab, who uses Searing Flames,
might cause some trouble, sometimes with the risk of wiping out the
entire party, but skills like Concussion Shot or Signet of
Humility can significantly blunt his power. Upon killing all
three, you will gain access to the inner sanctum and the two
Princes.
Shakor
Firespear. Although the three bosses patrol the same area they
are not grouped together, thus it is possible to take them one at a
time by careful pulling. Kormab, who uses Searing Flames,
might cause some trouble, sometimes with the risk of wiping out the
entire party, but skills like Concussion Shot or Signet of
Humility can significantly blunt his power. Upon killing all
three, you will gain access to the inner sanctum and the two
Princes.
[edit] Bonus
The bonus is easy and there is really no reason not to do it. Each of the initial three chambers contains a special Djinn and a special Chest:
-
- Trial of Eternity Chamber: Sapphire Guarded Chest of Ahdashim and the Ruby of Ahdashim (which drops a Ruby Key)
- Trial of Divinity Chamber: Diamond Guarded Chest of Ahdashim and the Diamond of Ahdashim (which drops a Diamond Key)
- Trial of Wisdom Chamber: Ruby Guarded Chest of Ahdashim and the Sapphire of Ahdashim (which drops a Sapphire Key)
As you would expect, each key opens the corresponding chest, each containing a Treasure of Ahdashim. Simply collect all the keys, open all the chests, and pick up each treasure to complete the bonus objectives. The key that drops in the first chamber opens the chest in the third chamber, the key that drops in the second chamber opens the chest in the second chamber, and the key that drops in the third chamber opens the chest in the first chamber. However, no backtracking is required because you must return to the first chamber anyway to complete the mission. Note that a pop-up mob (consisting of 1 Ruby and 2 Sapphire Djinns) will appear the first time you approach each chest.
[edit] Creatures
[edit] NPCs
[edit] Allies
 18 Goren
[edit] Monsters
[edit] Bosses
 28 Kormab, Burning Heart (Djinn): Searing
Flames
28 Kormab, Burning Heart (Djinn): Searing
Flames 28 Shakor
Firespear (Djinn): Angelic
Bond
28 Shakor
Firespear (Djinn): Angelic
Bond 28 Hajok Earthguardian (Djinn): Zealous Vow
[edit] Follow-up
- Upon completion of the mission players will find themselves in: The Kodash Bazaar.
- To continue the storyline, take on the following Primary Quest: Pledge of the Merchant Princes.
[edit] Getting There
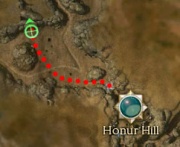
- If you picked Margrid the Sly (earlier in the storyline when you chose between Margrid and Master of Whispers), the Primary Quest Greed and Regret will lead you to this mission.
- If you picked Master of Whispers, you must complete the quest Calling the Order before you can access this mission. You will do so in the same way as in Margrid's quest Greed and Regret: leave from the northwest exit of Honur Hill, heading straight northwest, until you come to a Resurrection Shrine of Melandru, guarded by a Sunspear Scout. A secret door will open in the rock next to the shrine, behind which will be a portal that transports you to Dasha Vestibule.
[edit] Tips
- You need to keep Goren alive, but if you have any other squishies in aggro range of the mobs, they tend to focus on the squishy and Goren shouldn't take much damage. The only other dangerous time is if you have to beat a retreat, Goren may not follow fast enough. Remember that he will not obey henchmen/hero commands because he is an allied NPC in this mission.
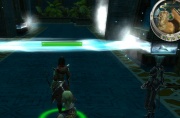
- The traps are pretty straightforward, although there are some Sapphire Djinns roaming near the cold traps at the entrances to the Trials of Divinity and Wisdom (see pic). Try not to fight them while in the traps.
- When facing the Djinn mobs, always take out the Ruby Djinn first. Left unchecked, their fire skills can destroy the party very rapidly, so make sure you take plenty of interrupts to shut them down. Since you'll have Margrid, equipping her with Broad Head Arrow works well.
- Recovery, the Ritualist Spirit, is also highly effective against Ruby Djinns as it cuts the Burning duration to about 2-3 seconds meaning that Searing Flames cannot deal damage. It's also effective on a secondary Ritualist, so Razah is not needed.
- Empathy and Spiteful Spirit work well on the Sapphire Djinns.
- The Roaring Ethers will raise each other using Resurrection Signets (but they only target other Roaring Ethers), so once you kill the first one, kill it again after it is resurrected so that it doesn't resurrect the other one (this way, you only kill 3 Roaring Ethers total, not 4).
- It is highly recommended that an experienced interrupt ranger or mesmer be brought along for this mission. The elemental boss, Kormab, Burning Heart, uses the elite skill Searing Flames which can easily wipe out an entire team of experienced players in one fell swoop. It is also a very tight corridor that you fight the boss in, making Searing Flames all the more effective.
- Another, somewhat easier way to stop the Searing Flames carnage is to bring Signet of Humility. At 10 inspiration, it will disable Searing Flames for 11 seconds out of every 22 seconds.
- Since there are a lot of enemies which cause Burning, a Paragon with Cautery Signet can save the party a lot of damage. This is especially helpful for the final battle, where a quick signet cast can save the entire party from burning to death when Kormab, Burning Heart uses his Searing Flames. It may make a martyr of the paragon, though. Sogolon, a paragon henchman, is available in Dasha Vestibule and has Cautery Signet as well as Aria of Restoration. He can be employed to help remove conditions and well as help heal spell casters.
- Of course, the spell Extinguish will counter the effects of Searing Flames, although not for long.
- It may also be to your advantage to include in your party an Elementalist with the spells Ward Against Elements and Ward Against Harm. Both of these wards help to negate the primary source of damage in this mission, fire magic used by the Ruby Djinns. Also, Maelstrom is an excellent skill to take because it can completely shut down a Ruby Djinn for 10 seconds which should be more than enough time to kill it. Whereas many other spellcasting monsters are quick to move away from the area effect, Ruby Djinns don't seem to be inclined to do so. The fact that Ruby Djinns are equipped with Fiery Dragon Swords instead of a wand or a staff might have something to do with it.
- The mission ends immediately when all three Djinn bosses are defeated. If you are planning to capture one of their skills make sure not to kill your Djinn boss last, or you will not get the chance to capture the skill. Fortunately it is not too difficult to pull the three bosses separately.
- Do not take a Minion Master as there are not many corpses
- As a Dervish, Avatar of Melandru is suggested because then you cannot be affected by conditions, and Searing Flames will have no effect on you.
- It is very easy to pull the final bosses one at a time using longbow or flatbow. If you are using heroes and henchmen set the flag back from the the stairs to keep them from attacking until the boss has reached the top of the stairs. Use the same method to pull the Thunder of Ahdashim back up the hill to avoid having to fight more than one at a time. Use Cripple or a snare (for target foe) to keep the Thunders from running away when their health gets low.
[edit] Notes
- The ice traps 'cast' Ice Spikes at 0 Water Magic roughly once per second while active.
- The fire traps cause 50 damage and inflict Burning and Crippled (for unknown durations) roughly once per second.

