User:Olah/Build:N/R Stygian Solo Farmer
From GuildWiki
This build is made specifically to farm the Stygian Demons associated with the Breaching the Stygian Veil quest in the Stygian Veil for Stygian Gemstones and shiny weapons. It is capable of destroying all mobs, although the later mobs take more time and are much more difficult.
Contents |
[edit] Attributes and Skills
| Attribute Rank | |
|---|---|
| Curses | 12 + 1 + 3 |
| Wilderness Survival | 12 |
| Soul Reaping | 3 + 1 |
 |
 |
 |
 |
 |
 |
 |
 |
[edit] Equipment
- You'll need one high-health set of armor and weapons and one 55 set (see Invincible Monk for details on 55 equipment).
[edit] Usage
- When you enter the Stygian Veil, there is a mob in the trench immediately to your right (S-SE) that may be (mostly) killed easily for fun and profit and to get the first few no-drops out of the way. If you get a great drop from these, use Consume Corpse and retrieve it. This will end this farming run. Watch out for the patrol - particularly the Mind Tormentors and Water Tormentors that often spawn will hurt.
- Head East, dodging the nasty Shadow patrols. Talk to the Whispers Informant to receive Anguish Hunt. Then talk to the Adept of Whispers, take the Breaching the Stygian Veil quest, and immediately run NE along the wall above the Dreadspawn Maw. Wait for three mobs of six Stygian Hungers to gather around the Adept of Whispers.
- Carefully run along the wall to the lower area around the Dreadspawn Maw - there's just enough room to get down there from either side without aggro'ing any of the groups.
Now the fun begins....
[edit] Part 1 - The Hunger Mobs
- Stygian Hungers are touch/AoE necros with Grenth's Balance as their elite. Switch to your 55 health setup to counter Grenth's Balance. Repeat the following:
- Use 'c' to select the nearest target - make sure it is in one of the side mobs - save the center mob for last.
- Cast Suffering.
- Run away around the Dreadspawn Maw using a running skill until aggro is broken. Occasionally, this will be difficult. Do not stop running until aggro is broken.
- Make sure you have the nearest target of the same mob, and cast Desecrate Enchantments. The Hungers use Dark Aura, making this do a decent amount of damage to the mob.
- Run away and break aggro.
- Nearest target, cast Feast of Corruption.
- Run away.
- Go back to the first step, and repeat until their health is low.
- You really want to finish them off with Feast of Corruption or Desecrate Enchantments. If you let them degen to death while you're not in the area, you may not get any drops. They should be in an easily killable range with either skill once their health bar is into the 'Lvl' text. If you are using your 55 armor, then all can be killed simultaneously.
- When a mob dies, it will be replaced by another one from a spawn point behind the gates the first three mobs came from. You have a lot of time to run around the Dreadspawn Maw to lose aggro from the other two mobs, but do try to avoid aggro'ing the new one.
[edit] Part 2 - The Brute Mobs
- Stygian Brutes are hammer warriors. While facing them, you can switch to your high-health armor if you wish, but you're still probably dead if they actually hit you. Use the same techniques as on the Stygian Hungers, except only cast Desecrate Enchantments when you have energy to burn, as it is considerably less cost-effective for damaging the Brutes.
-
 Path to run away from Fiends
[edit] Part 3 - The Fiend Mobs
- Stygian Fiends are rangers with Crippling Shot, Choking Gas, and other fun skills to mutilate necromancers with. Once again, you really don't want to get hit by these. Unfortunately, if they even shoot at you and miss, Demonic Miasma will make it hurt. Use the high-health armor when dealing with these, as you're likely to at least be *missed* by a barrage or two of arrows.
- Once again, hit and run. If possible, run up the nearby hill while running away to minimize any height-advantage and additional range the Fiends may get. See the highlighted path in the map:
-
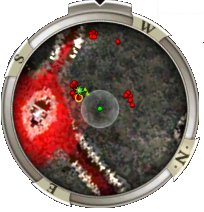 Placement of Muddy Terrain for Eastern mobs
[edit] Part 4 - The Golem Mobs
- Stygian Golems are Dervish beasts which use Harrier's Haste to catch up with you. It's almost impossible to reliably lose them with just running skills. The trick here is to circle around the mob and plant Muddy Terrain *behind* the mob, to the NE of the Adept of Whispers (center point on the map to the right). Then head back down below and do the following:
- Cast Suffering
- Run away (use a running skill just before leaving Muddy Terrain's area of effect).
- Wait for mob to resettle.
- Cast Feast of Corruption.
- Run away and wait for mob to resettle.
- Cast Suffering
- Run away until you lose aggro, then head back and drop another Muddy Terrain spirit at the spot on the map.
- Rinse, repeat.
- It works best if you trigger your running skill just prior to leaving the area under the effect of Muddy Terrain. This makes you go fast while the Golems are still stuck trudging along. If the spirit is correctly placed, they'll give up before getting out of its range.
[edit] Part 5 - The Horror Mobs
- Stygian Horrors are warriors which, similar to the Stygian Golems, use Bull's Charge to speed them on their way to killing you. Use the same technique with Muddy Terrain to kill these as used for Stygian Golems.
-
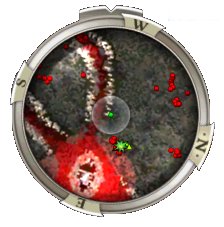 Placement of Muddy Terrain for Western mobs
[edit] Part 6 - The Mixed Mobs
- The last mob of each of the three sets has all of the Stygian Demons in it. You'll need to use the high-health armor to deal with the Fiends and use the Muddy Terrain technique (See the map images for placement for Eastern and Western mobs). Unfortunately, that means you're unlikely to kill them all simultaneously. Once the Stygian Hungers are the only ones left, switch back to your 55 armor for the final kills.
[edit] Part 7 - How do I get my drops?!?!
- Once you've killed all the mobs, the area around the Adept will be safe. However, it's easy enough to pick up valuable drops long before that point, either directly after killing one set or not.
- If you've just killed a set, then run away *without* using a running skill. Go around the Dreadspawn Maw with the remaining two mobs trailing behind you. Just as you cross the halfway-around point, hit your running skills and head for your most valuable drops. If done correctly, you can pick up one or two items, then run away without being hit and be able to continue the farm if desired.
- This will most likely not work if a mob of Fiends, Golems, or Horrors is present - only make hoover runs with Brutes and Hungers around. Look at the table showing the order of the mobs in Breaching the Stygian Veil to figure out your best kill order to get drops.
- If you haven't just killed a set, just aggro them with Suffering and run around the Maw as described above.
[edit] Variants
A N/A using Deadly Paradox Shadow of Haste Dark Escape and Dash and 12 Shadow Arts instead of the ranger skills and Wilderness Survival. The strategy is very much the same except for the running away part. For that you activate Deadly Paradox then Shadow of Haste, run in, cast your spell(s), then use Dash to cancel out Shadow of Haste. This will teleport you back to the place where you used Shadow of Haste and you can proceed to run using Dark Escape if needed. For a more indepth guide to this version see here.
[edit] Counters
- Everything in this area hits hard. Getting hit once is likely to produce a Necromancer-shaped corpse. Try to avoid getting hit.
[edit] Template
 |
AkMhZOMmH2wlAOIG6O/6jjwF |
[edit] Notes
There are generally one or two chests in the area that people run to all the time. Bring a few keys. This run can also be done in Hard Mode, with a few changes in strategy. Muddy Terrain must be used for ALL mobs, to negate the inherent speed boost that hard mode supplies (you will also be better off laying Muddy Terrain while killing the mob in the trench, so they don't kite outside casting distance.) Also, hoover runs are done slightly differently than in Normal Mode: lay a Muddy Terrain halfway around the Dreadspawn Maw, then aggro the demons and run around. they will stop for a moment to kill the spirit. Once they do, hit Natural Stride (your fastest running skill) and run for your drops.
[edit] See also
[edit] Build History
   * (cur) (last)  21:40, 27 April 2007 76.19.223.231 (Talk) (→Notes)
   * (cur) (last) 01:02, 11 April 2007 70.226.136.29 (Talk) (→Usage)
   * (cur) (last) 15:56, 5 April 2007 71.114.97.226 (Talk) (→Part 6 - The Mixed Mobs)
   * (cur) (last) 18:10, 13 February 2007 83.144.120.169 (Talk) (→Part 6 - The Mixed Mobs)
   * (cur) (last) 19:58, 30 January 2007 Toxik (Talk | contribs) m (Agro -> Aggro)
   * (cur) (last) 17:10, 19 January 2007 Zdain (Talk | contribs) m (→Varients - Variants)
   * (cur) (last) 23:06, 18 January 2007 Zdain (Talk | contribs) m (→Usage - - clarifying where to run when running away from mobs)
   * (cur) (last) 02:01, 18 January 2007 Crazytreeboy (Talk | contribs) m (→Part 7 - How do I get my drops?!?!)
   * (cur) (last) 01:07, 18 January 2007 Ekrin (Talk | contribs)
   * (cur) (last) 01:00, 18 January 2007 Ekrin (Talk | contribs)
   * (cur) (last) 07:14, 7 January 2007 Defiant Elements (Talk | contribs)
   * (cur) (last) 12:42, 6 January 2007 Zdain (Talk | contribs) m (→Part 7 - How do I get my drops?!?!)
   * (cur) (last) 12:28, 6 January 2007 Zdain (Talk | contribs) m (→Usage)
   * (cur) (last) 11:27, 6 January 2007 Zdain (Talk | contribs) m (→Part 4 - The Golem Mobs)
   * (cur) (last) 11:13, 6 January 2007 Zdain (Talk | contribs) m
   * (cur) (last) 11:12, 6 January 2007 Zdain (Talk | contribs) m (→Part 5 - The Horror Mob)
   * (cur) (last) 09:39, 6 January 2007 Zdain (Talk | contribs) (→Part 6 - The Mixed Mobs)
   * (cur) (last) 09:38, 6 January 2007 Zdain (Talk | contribs) (→Part 6 - The Mixed Mobs)
   * (cur) (last) 09:33, 6 January 2007 Zdain (Talk | contribs)
   * (cur) (last) 09:05, 6 January 2007 Zdain (Talk | contribs) (→Part 4 - The Golem Mob)
   * (cur) (last) 08:59, 6 January 2007 Zdain (Talk | contribs) (→Part 3 - The Fiend Mob)
   * (cur) (last) 06:42, 5 January 2007 Zdain (Talk | contribs)
   * (cur) (last) 06:39, 5 January 2007 Zdain (Talk | contribs)

