Build:Team - W/Me Icy Dragon Sword Farming
From GuildWiki
 |
On May 1, 2007, all articles in the GuildWiki build namespace
will be deleted. After that date, no build articles may be posted
to the GuildWiki in either the main or build namespaces before a
new policy is decided on. Find the reasoning and the details behind
this at GuildWiki:Builds wipe. |
| This build is not favored by the
GuildWiki community.
The general consensus among users of GuildWiki is that this build is not viable. |
|
[edit] Introduction
This is a 3-4 person build designed for farming the Ice Imps in the caves of Mineral Springs. Icy Dragon Swords are sought after, because of the fact that they are always max damage, and always come with the Damage +15% while health above 50% mod. This build is designed to defend against heavy elemental damage, and is of very little use against enemies that use physical attacks and hexes.
[edit] 2-3 Charge Warriors
[edit] Skills
 |
 |
 |
 |
 |
 |
 |
 |
[edit] Attributes
- Strength: 10+1+1
- Tactics: 10+1
- Swordsmanship: 10+1
- Inspiration Magic: 5
Unspent Attribute Points: 2
[edit] Equipment
Ice Imps are not weak to fire damage so you do not need sword that deals fire damage. You will find a Furious or Sundering sword much more beneficial. As for a shield, you are always in a stance, so an "in stance" bonus will be to your benefit. Also, a "while hexed" shield would be a good choice as you will constantly have Mind Freeze on you while fighting. Keep in mind however that -2/3 damage (in stance/while hexed) is physical damage only. Consider using the Crimson Carapace Shield or another shield with similar bonuses.
[edit] 1 Defy Pain Warrior
The Defy Pain Warrior is used to concentrate aggro on him and relies on the Charge Warriors to provide him with "Charge!" and "Watch Yourself!".
[edit] Skills
|
|
|
|
|
 |
|
 |
|
[edit] Attributes
- Strength: 10+1+1
- Tactics: 10+1
- Swordsmanship: 10+1
- Inspiration Magic: 5
Unspent Attribute Points: 2
[edit] Equipment
Ice Imps are not weak to fire damage so you do not need sword that deals fire damage. You will find a Furious or Sundering sword much more beneficial. As for a shield, you are always in a stance, so an "in stance" bonus will be to your benefit. Also, a "while hexed" shield would be a good choice as you will constantly have Mind Freeze on you while fighting. Keep in mind however that -2/3 damage (in stance/while hexed) is physical damage only. Consider using the Crimson Carapace Shield or another shield with similar bonuses.
[edit] Using the build
[edit] Tasca's Demise
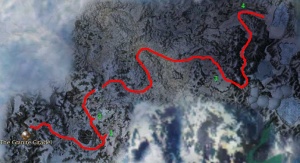
The run starts from The Granite Citadel, going out into Tasca's Demise. From here, go out, and use "Charge!" to run through the mobs of enemies. When the path forks, take the rightmost fork (keep going straight). Shortly after the path forks, you will arrive at a bridge (Point 1 on map). Run slightly past the bridge, and pay attention to the mob on the bridge. At the time you get there, they should be on the opposite end, or making their way there. If you wait, they will turn around and come back toward you. Once they are off the bridge, run past and go over the bridge. Immediately after crossing the bridge, move to the right side of the path and wait (Point 2 on map). A mob with at least one Siege Ice Golem will come through the pass. Once they have passed, run through and make for the portal to Mineral Springs. Right before the end, if you are unlucky, you cannot avoid aggroing a group that includes several Stone Summit Heretics, who use Crippling Anguish and Conjure Phantasm. One warrior should attack them as a distraction, while the others run past. Be sure to time your run so you do not run into the group that patrols right next to the end.
[edit] Mineral Springs
Note that the build does not contain any resses, so once you reach Mineral Springs, dying group members can not be resurrected!
Once in Mineral Springs, begin by running through the mob of Avicara and take the right fork. From here, the path is relatively linear. Just run through all the mobs, and try to avoid aggravating more than one group at a time. You will eventually reach a resurrection shrine in the eastern end of Mineral Springs (Point 3 on map). Beyond this, there are Tundra Giants. They use Giant Stomp, so you will need to use Balanced Stance before running through. At the top of the hill is an Avicara boss, which should not be too difficult to run past.
Once you arrive at the caves (Point 4 on map), you should stop and assess the situation. There are likely to be one or more groups of Avicara nearby. If you reach the Ice Imps while Avicara are still chasing you, you will die. Pull the closest group of Avicara away from the Ice Imps and kill them (preferably 1 by 1). When the way is cleared, proceed to the cave.
[edit] Ice Imp Cave
Before you start attacking, use Elemental Resistance. The Defy Pain Warrior should go in first and concentrate aggro on himself. Once you have reached your first enemy, cast Dolyak Signet, and once you start gaining Adrenaline, use it to keep Defy Pain on. Along with the Ice Imps, there are a few Siege Ice Golems and Mountain Trolls. The Trolls deal physical damage, which your skills are not effective at negating. Worse, the Ice Golems will use Rust, which causes Healing Signet to take 6 seconds to cast. Do not cast Healing Signet while you have Rust on you. Kill the Ice Golems and Trolls before you start attacking the Ice Imps. As long as you pay close attention to your buffs, and heal when needed, even large groups of Ice Imps should give you no trouble.
If after killing all the Ice Imps you do not get an Icy Dragon Sword, do not be disappointed. They do not drop often, and if you get a single one in a run, it was at worst an average run.
[edit] Variations
You don't have to use a sword with this build. Axes are very popular because of the higher critical damage and the Penetrating Blow attack. You can use any weapon you want, as long as you take appropriate attack skills for it. This build uses very little energy, so attack skills that use energy such as Power Attack and Desperation Blow would work well. If you use non-adrenal attacks, though, you need to make sure you keep enough energy to maintain Elemental Resistance.

